Calman Required Version
- Calman Studio, Video Pro, or Ultimate
- Calman 5.15.0.4
- Calman 5.15.0.4
Calman Required Workflows
- Calibration – 3D LUT
Required Hardware
- AJA ColorBox
- Calman-compatible Meter
- Display to calibrate
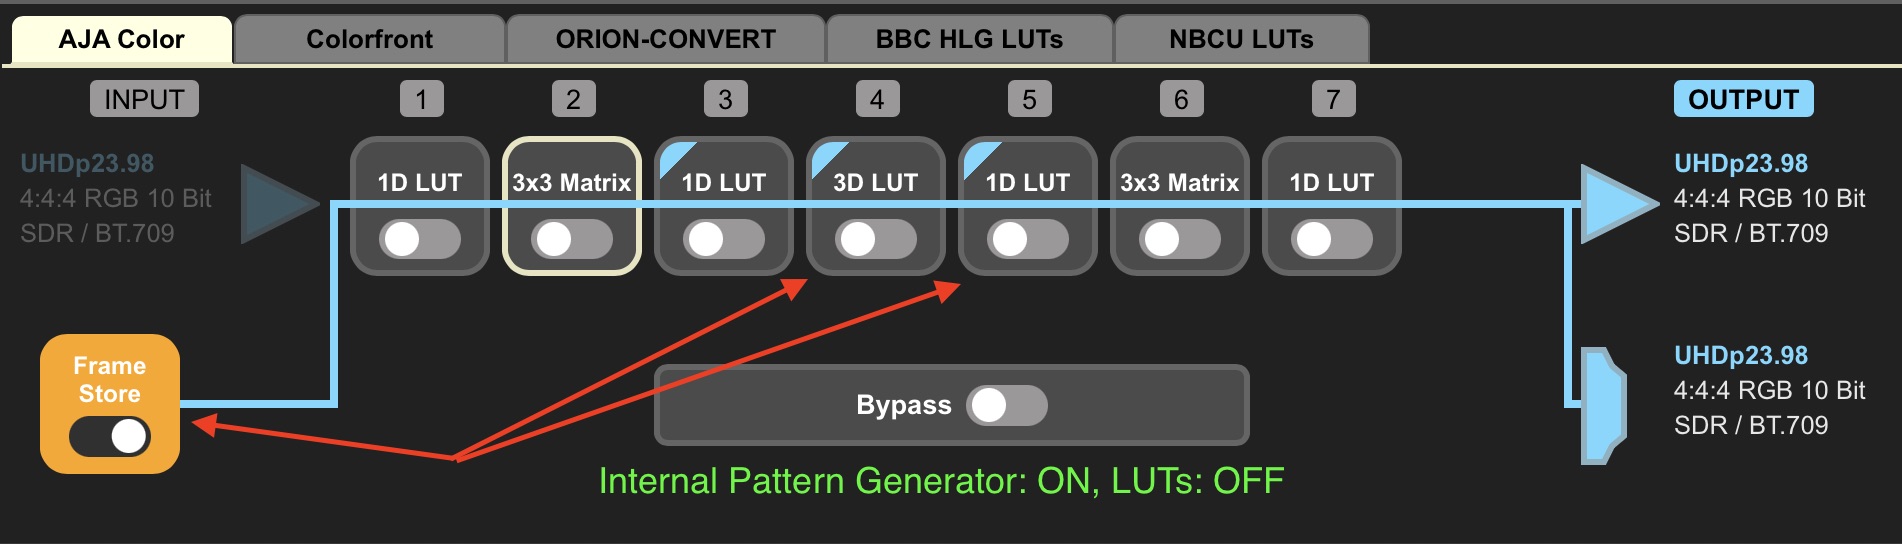
The AJA ColorBox is a very powerful and feature-rich image pre-processor for video signals. It consists of 7 Nodes to adjust/process the video signal:
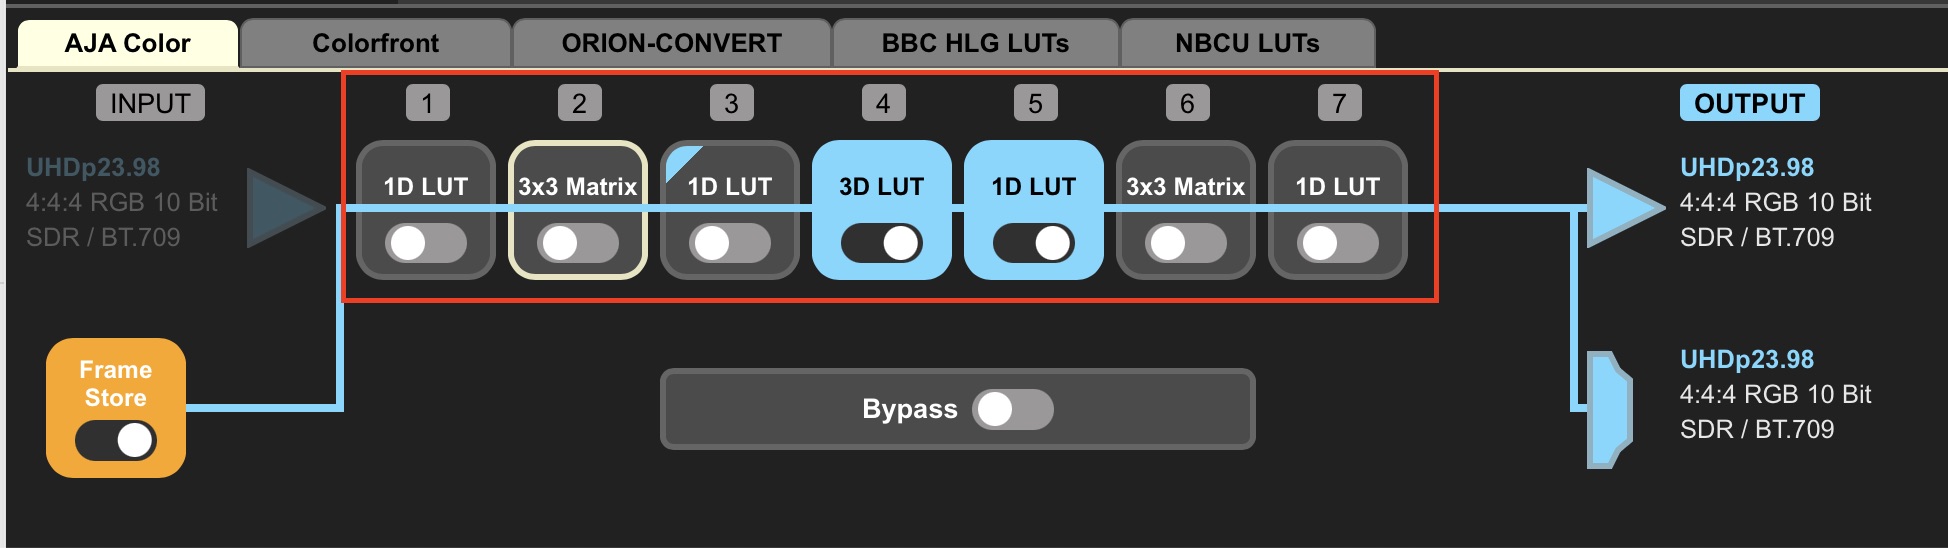
While there are 7 nodes as illustrated above, Calman is designed to work with 2 of them– Nodes 4 and 5.
- Node 4 = 3D LUT
- Node 5 = 1D LUT
Note: Calman is able to calibrate in either Video or Full Ranges and the LUTs will be accurate in both on the AJA. For example, a user may calibrate in Video Range but decide they want to change the AJA to Full Range– the LUT has been designed to scale properly so that a single LUT may be used in both instances.
When using the AJA ColorBox with Calman there are a few considerations:
- The AJA ColorBox is controlled by a network connection; as such, the AJA ColorBox will need to be on the same WiFi or Wired network as the Calman host. Additionally, the two devices will need to be on the same subnet or have a VLAN that allows communications between the two subnets.
- To utilize both the internal pattern generator (Frame Store) and the LUT capabilities Calman will need to be connected as both the ‘Source’ and the ‘Display’– enter the same IP Address for both.
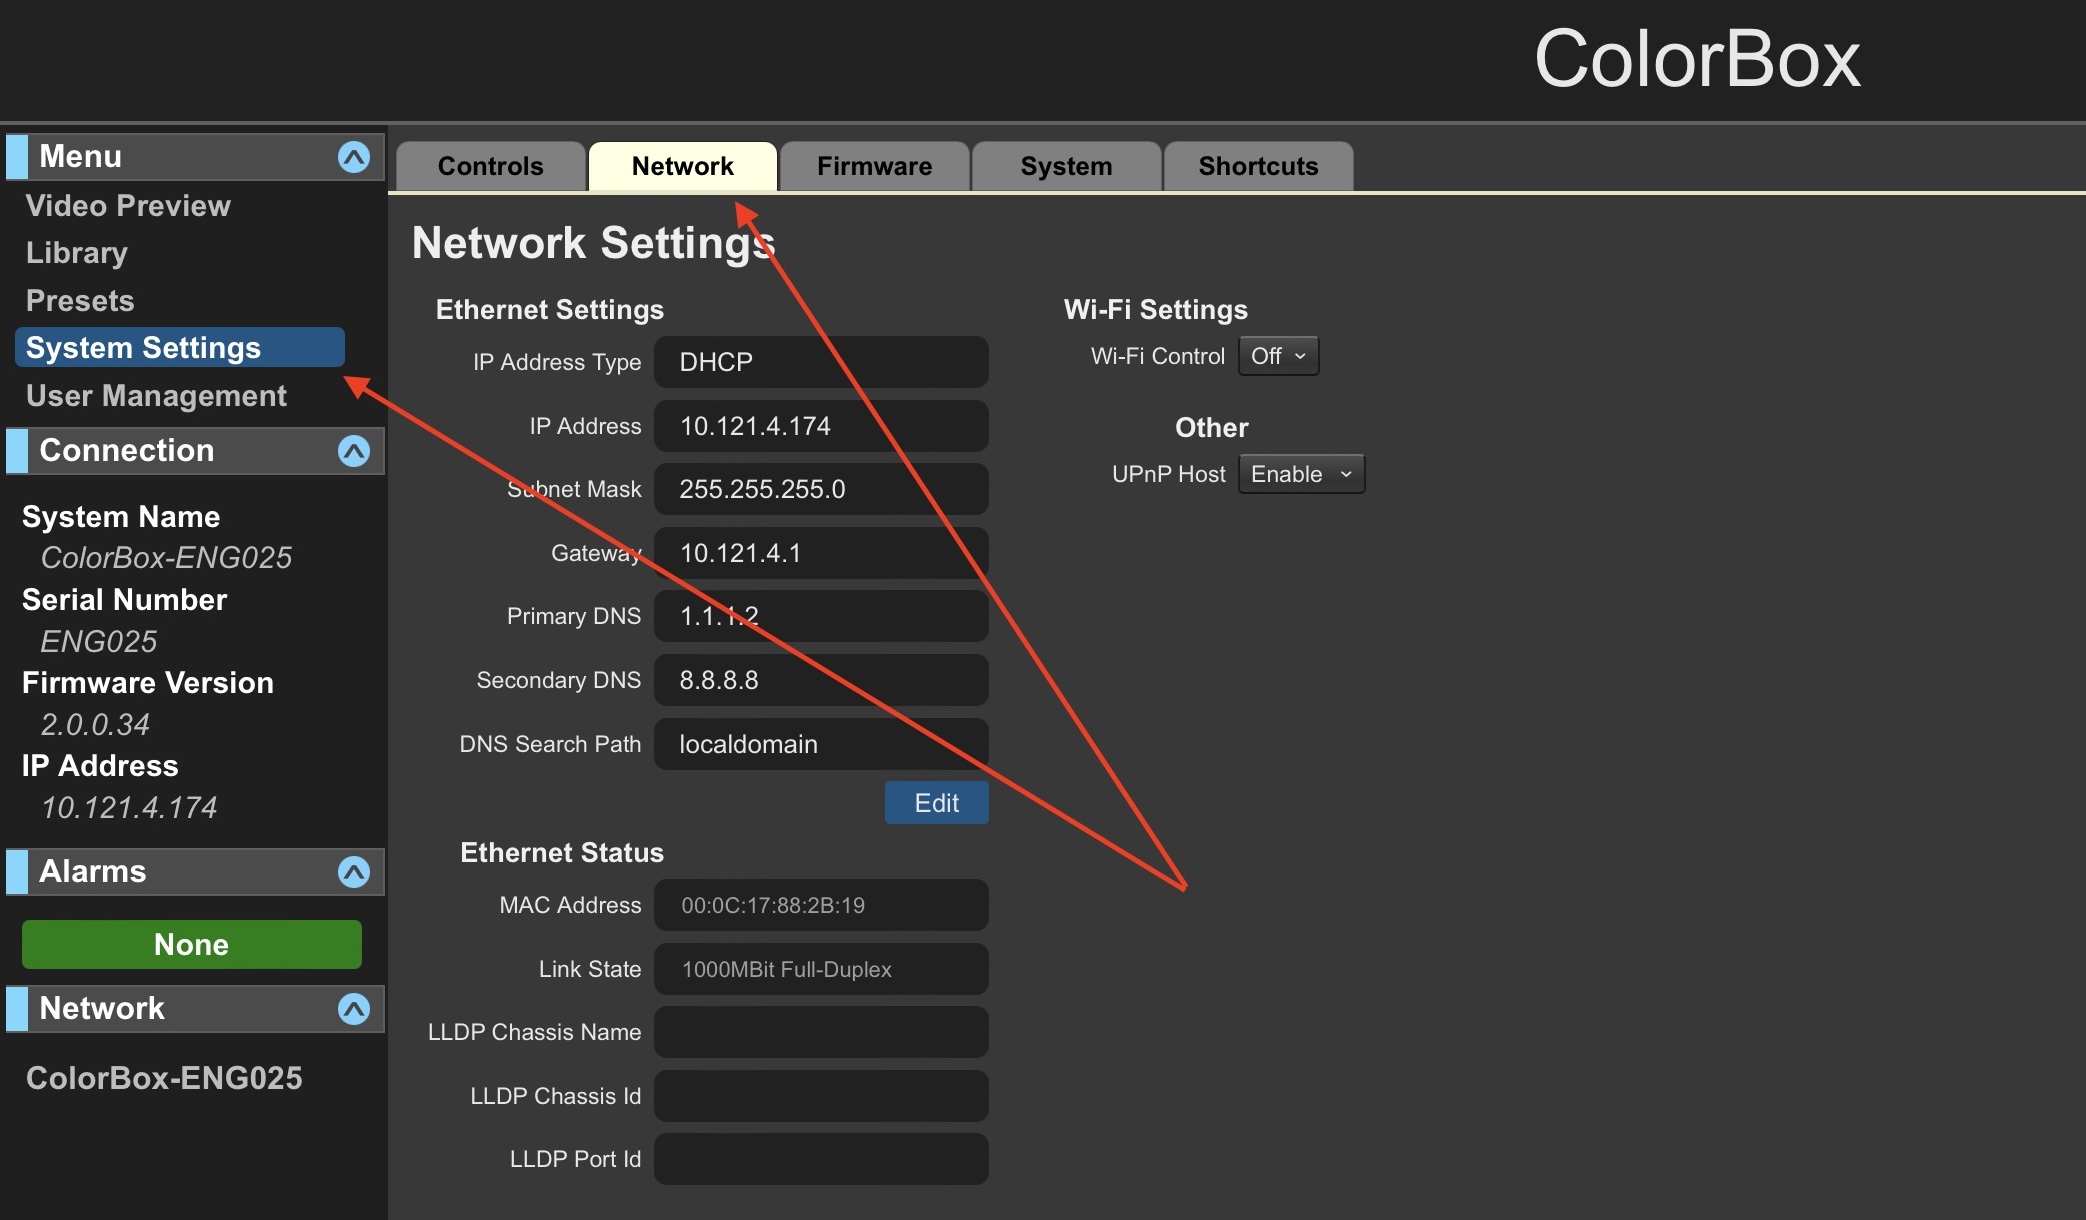
- To set up the WiFi network connection a user will need to utilize the Web User Interface for the AJA ColorBox, which is accessible by using the device’s IP Address and entering it into a web browser. From there, go to System Settings > Network
- The AJA ColorBox Supports up to 16 1D LUTs, 16 3D LUTs and 16 3×3 Matrices; however, Calman’s implementation is designed to be more straightforward for the user. Specifically, Calman is saving out the entire pipeline as a “Preset” in order for an entire optimization to be recalled as one.
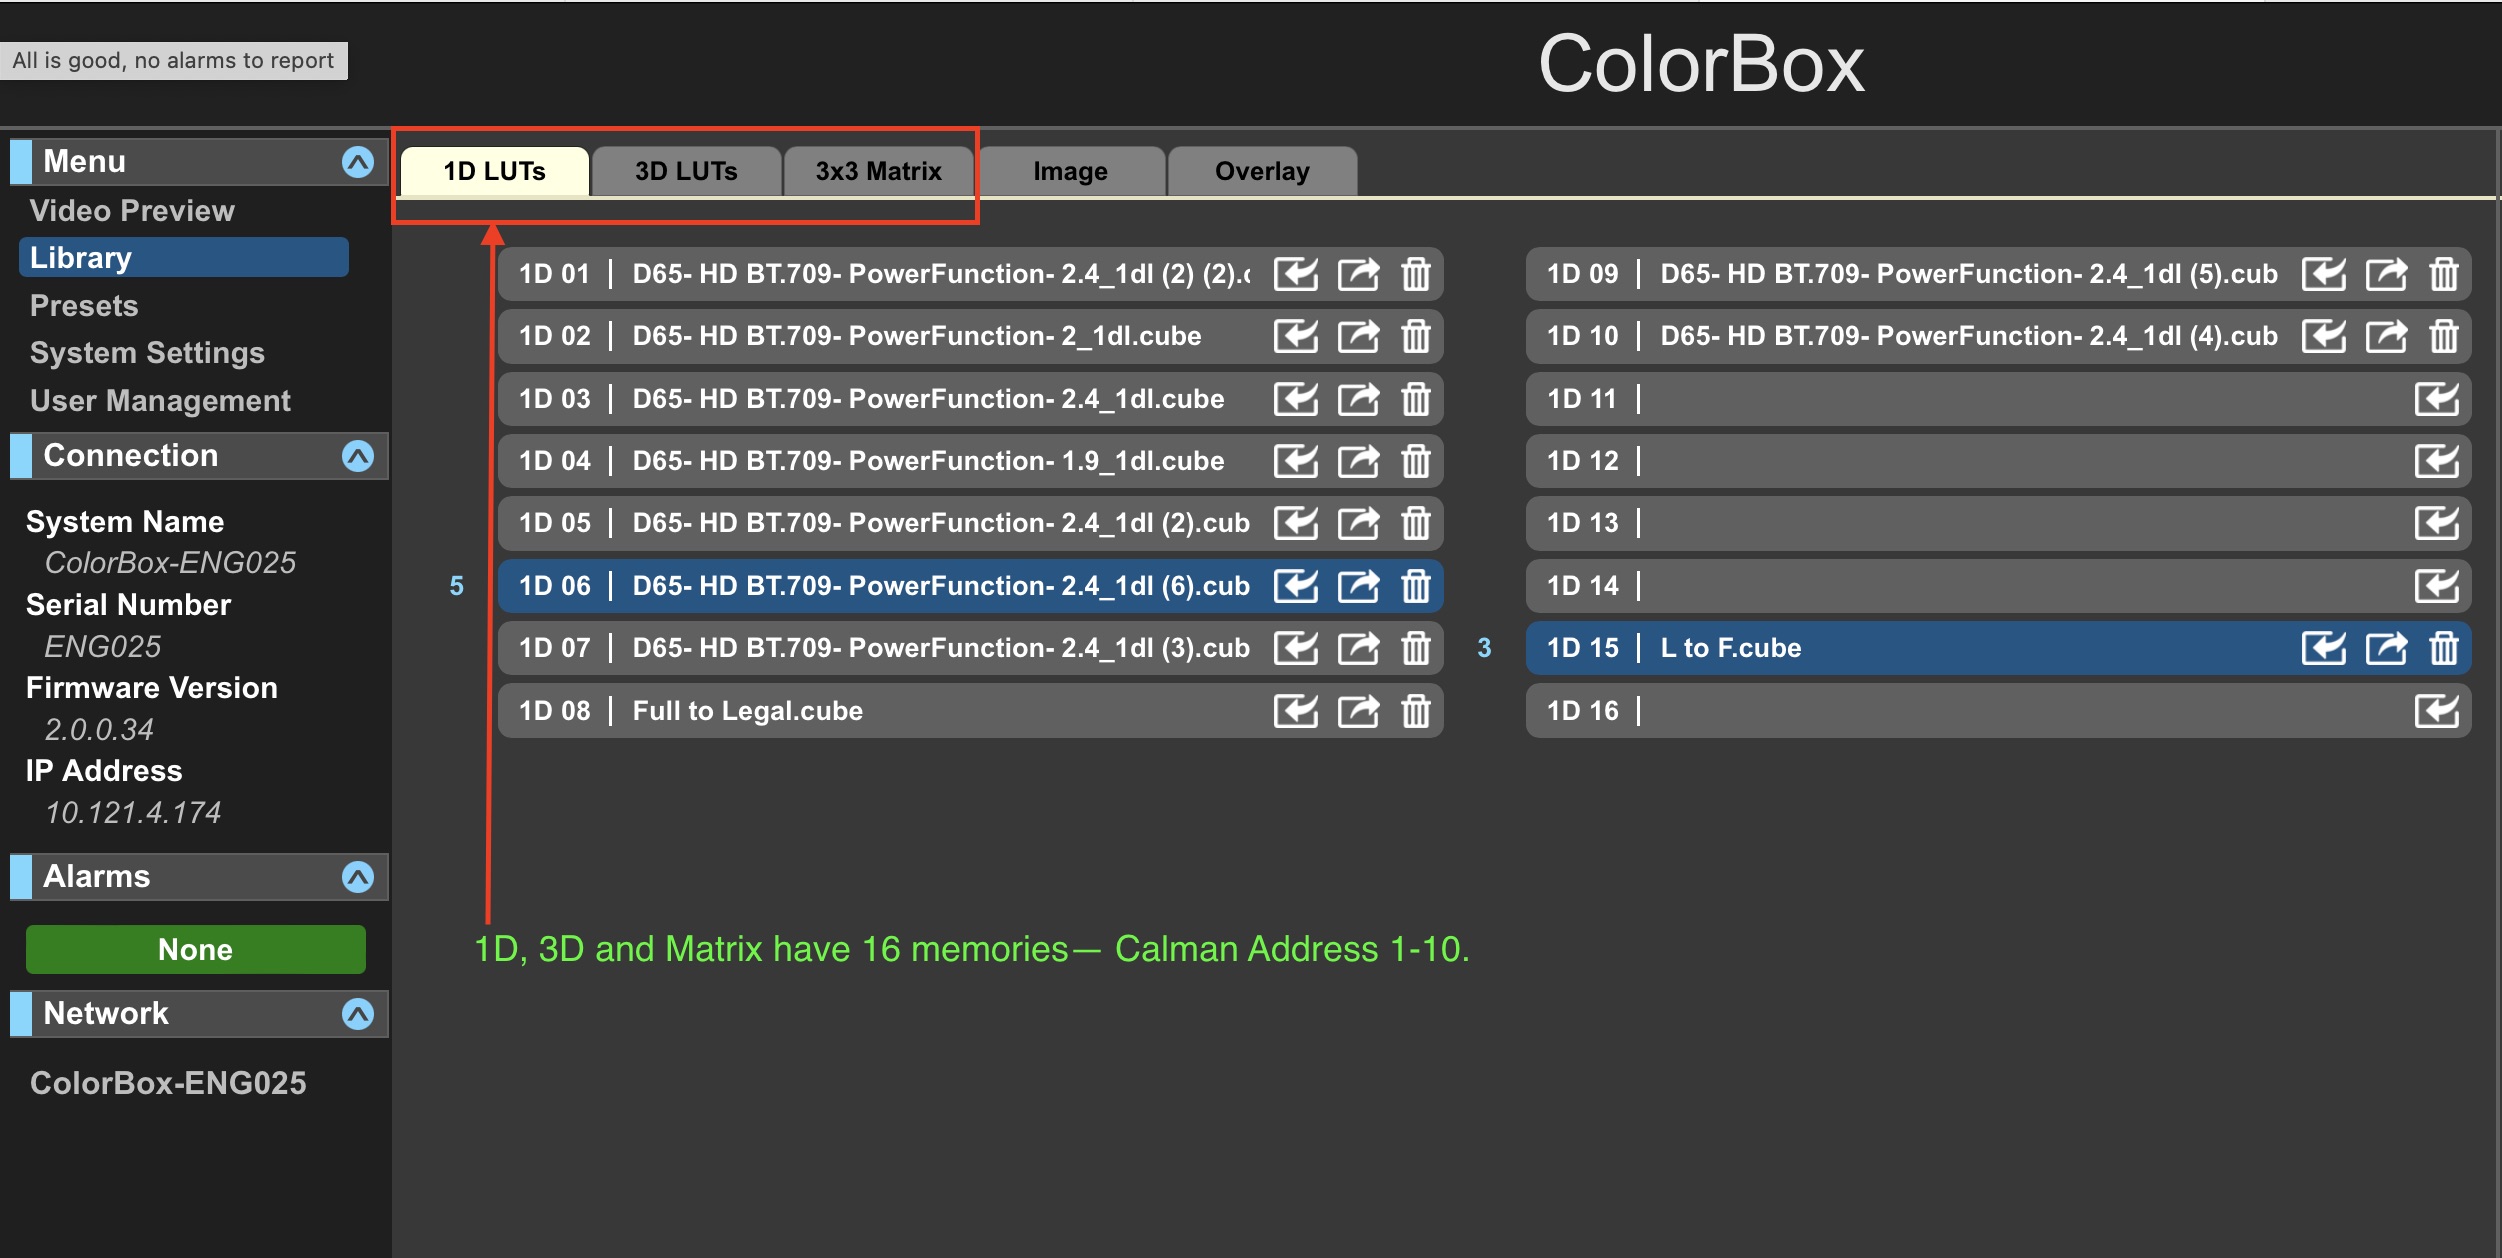
- The above illustration shows the tabs for the individual memories, Calman will address 1-10, but save these into a ‘Preset’ shown in the below diagram. These presets take a snapshot of the settings on the device so 1D and 3D LUTs associated with them are recalled together; as well as any display pipe customizations.
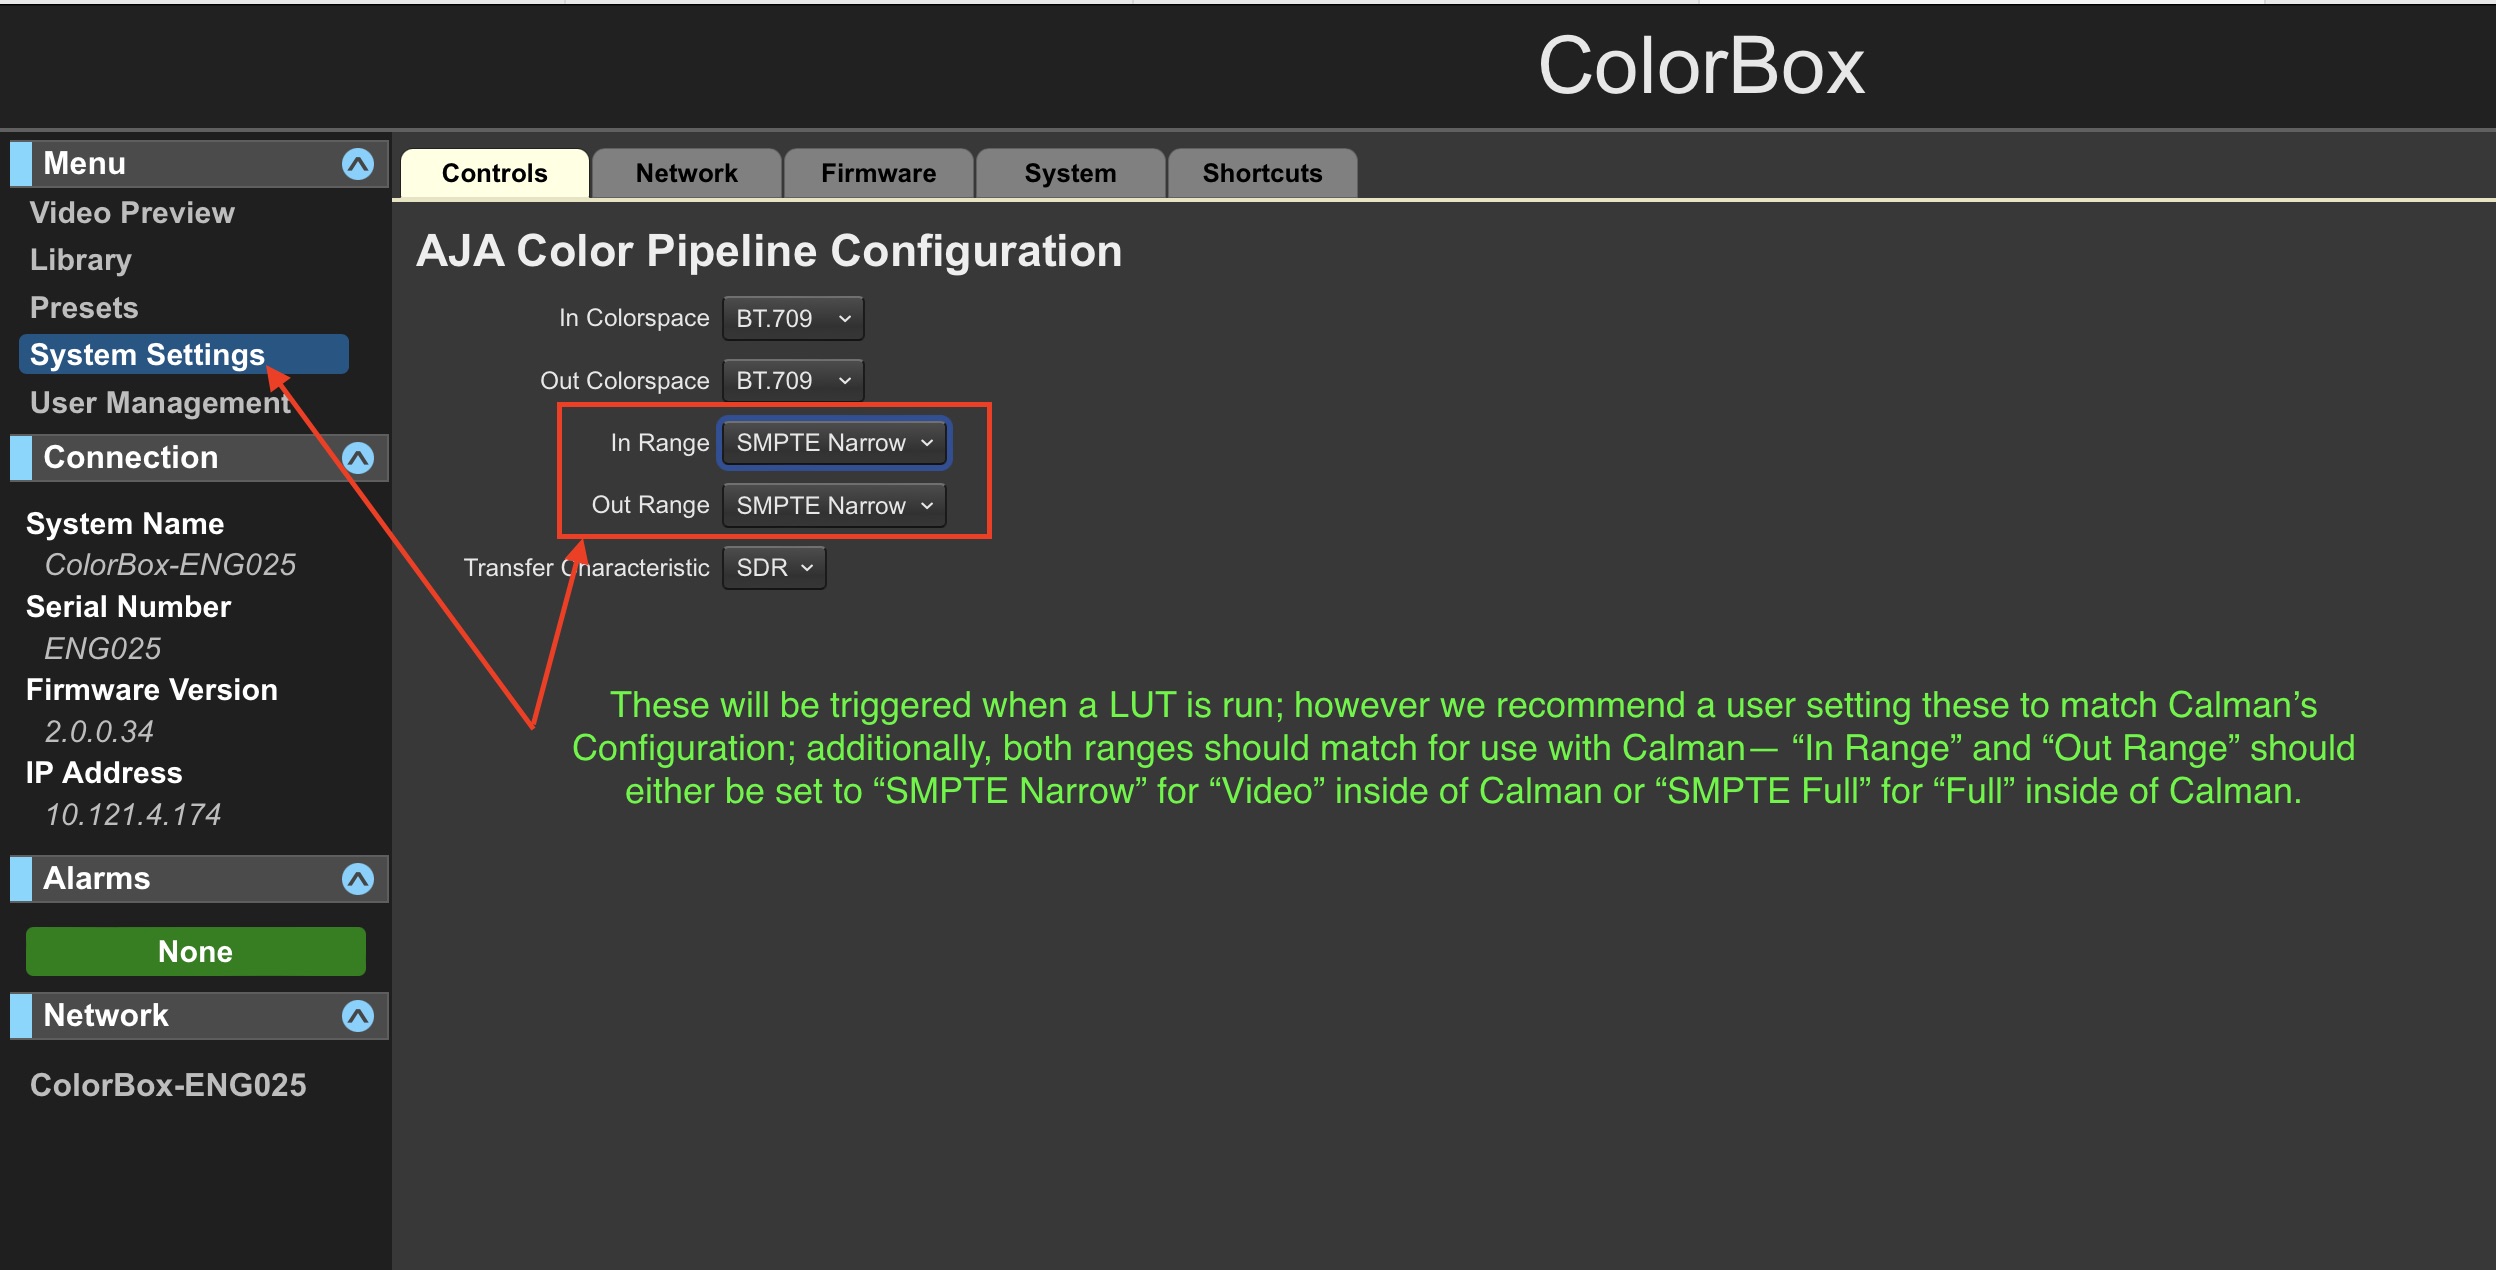
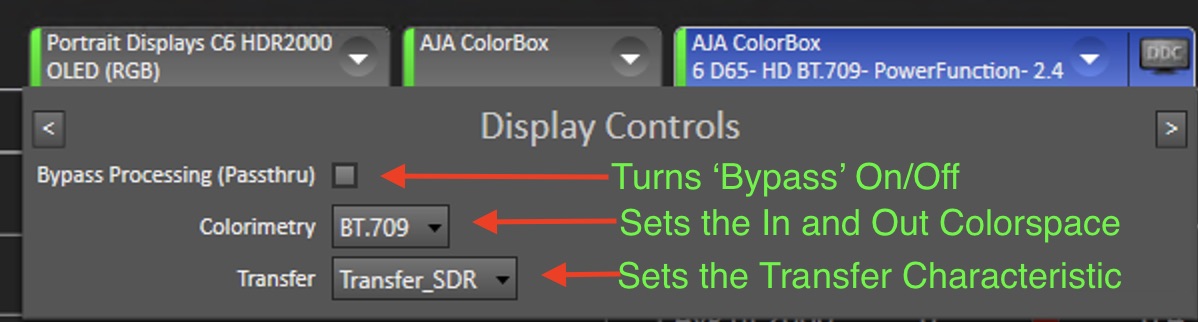
- While Calman will set the “System Settings” for the In and Out Range when a LUT is triggered it is important to note that a user may want to set this manually as Calman’s “Video” and “Full” range settings will NOT automatically change these. A Full DDC Reset will set these based on Calman’s Range setting. This is important to note as a mismatch here will cause poor results all around. Specifically, if Calman is in “Video” the “In Range” AND “Out Range” must be in “SMPTE Narrow”; if Calman is in “Full” the “In Range” AND “Out Range” must be in “SMPTE Full”.
There are two ways to generate test patterns for use with the AJA ColorBox:
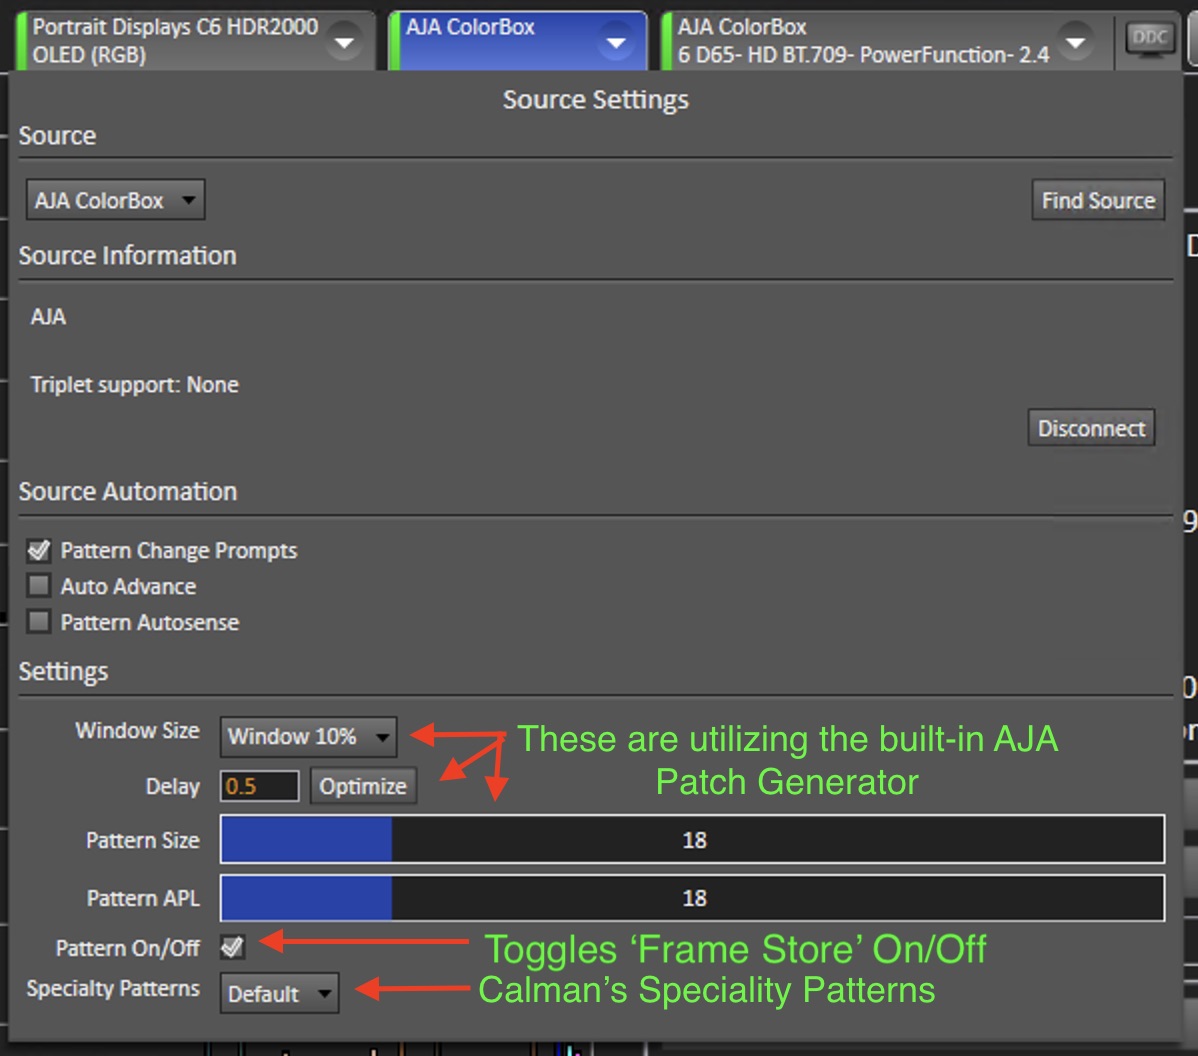
- Internal Pattern Generator: The Internal Pattern Generator is also called the “Frame Store”. Calman has integrated into the AJA’s Frame Store to both utilize the internal patch generator provided by AJA and also write custom patterns or “Specialty Patterns” inside of Calman. Note that when the “Frame Store” is On the external image will not pass through.
- The internal pattern generator operates in Narrow at 64-940 or Full 0-1023. This is important to note as there is no way for Calman to do Super White (Extended Range) through the AJA’s internal generator. If a monitor is configured to show data from 64-1019 Calman will be unable to fully profile the display leading to error’s in the results. The best practice here is to optimize the monitor for 64-940 when calibrating in Narrow Range. After the calibration is complete, the user may bring the Super White levels back into he display or change into Full if desired.
- If the user utilizes the “Bypass” feature on the AJA, the LUTs will always be bypassed even if ‘active’; as such, we recommend not using the “Bypass” and instead turning the LUTs off– Calman does this automatically when profiling.
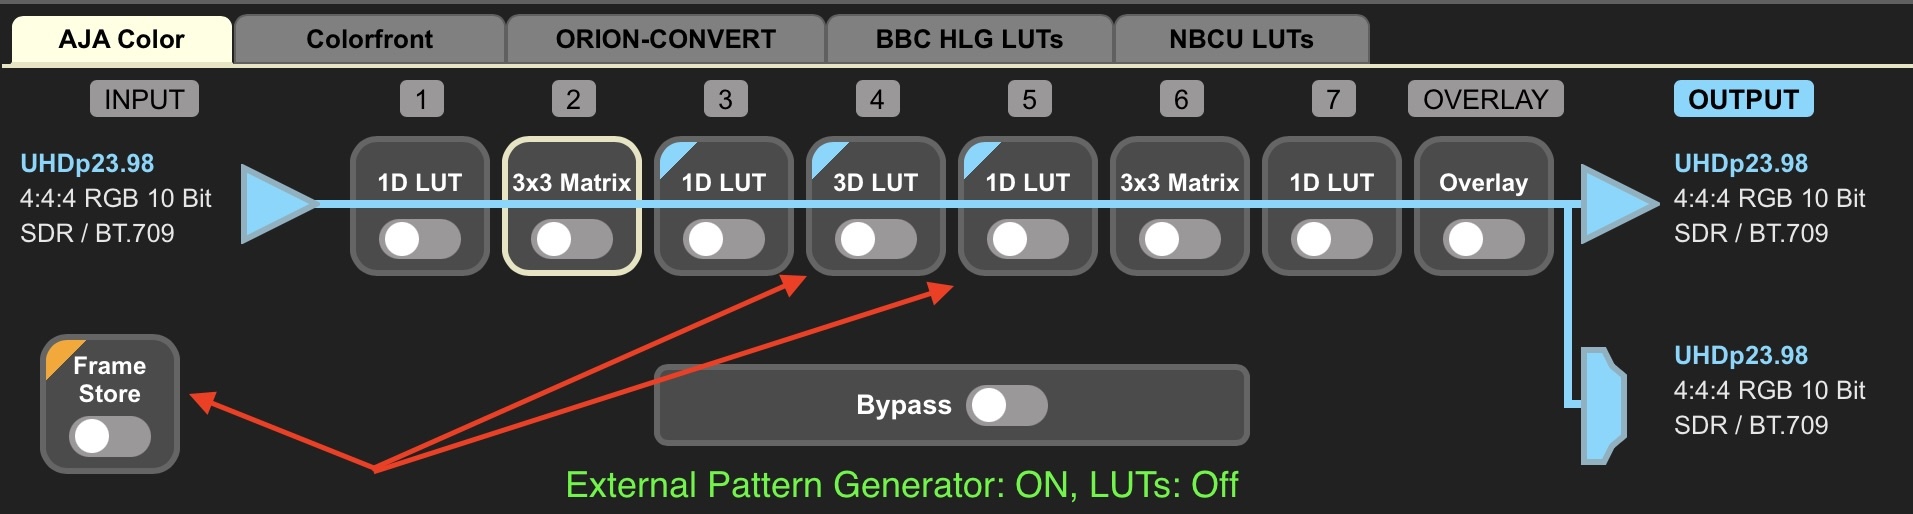
- External Pattern Generator: The External Pattern Generator promises to be difficult for users. The AJA ColorBox only intakes an SDI signal; as such, a Full Range signal is typically 4-1019; whereas, an HDMI Full Range signal is 0-1019– this leaves a discrepancy between what is input Vs. what is output causing errors in bit precision and results. Best practice here is to utilize a Narrow Range external signal; however, the AJA ColorBox will pass 64-1019 in Narrow Range; as such, it WILL accommodate for Super White (Extended Range).
- Note that since the external pattern generator can do 64-1019 and the internal is only capable of 64-940 we would recommend an external pattern generator when working with displays that will support 64-1019; however, it is possible to still calibrate these displays by adjusting the display to clip white to 64-940 when using the internal generator and then correcting after the LUT calibration.
- If the user utilizes the “Bypass” feature on the AJA, the LUTs will always be bypassed even if ‘active’; as such, we recommend not using the “Bypass” and instead turning the LUTs off– Calman does this automatically when profiling.
Calman Setup
The AJA ColorBox has been integrated into Calman as a ‘Source’ and a ‘Display’– connected over IP.
To connect to the ColorBox internal pattern generator:
- On the Source Settings tab, click the Find Source button.
- On the Find Source dialog, select the Manufacturer: AJA and Model: ColorBox
- Enter the ColorBox’s IP address
- Click Connect.
To connect to the ColorBox display device:
- On the Display Settings tab, click the Find Display button.
- On the Find Source dialog, select the Manufacturer: AJA and Model: ColorBox
- Enter the ColorBox’s IP address
- Click Connect.
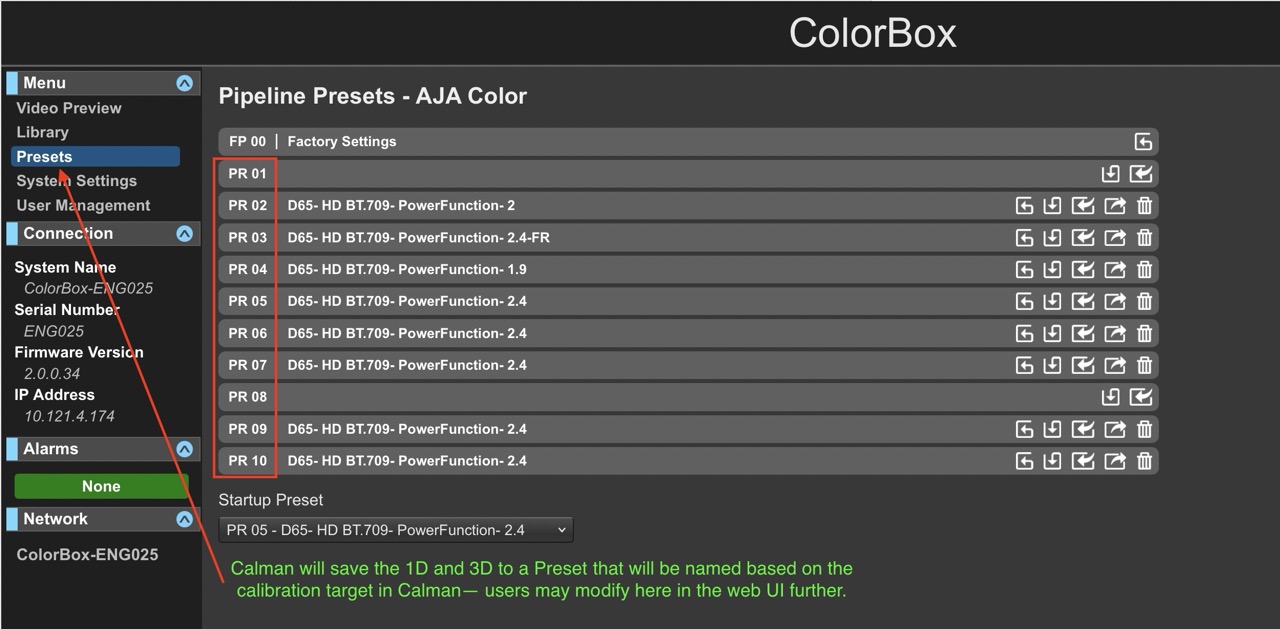
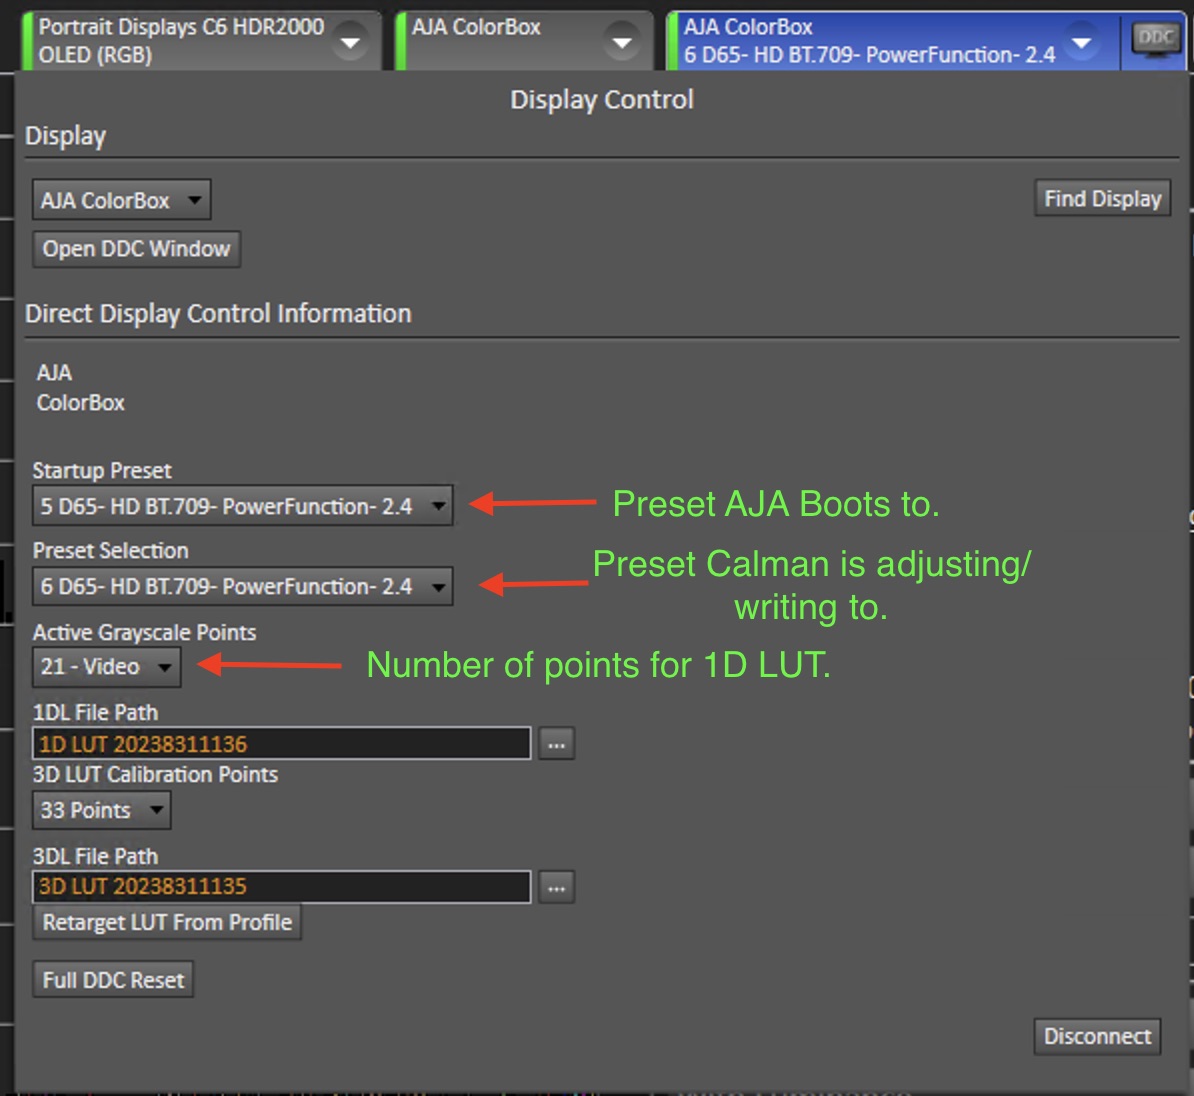
Calman has been highly integrated to support the AJA ColorBox as a Display Device inside of Calman. Upon connecting to the AJA ColorBox Calman will read the names of the 10 Presets, if a slot is empty, it means there isn’t any stored data in it. Additionally, Calman will read what is called the “Startup Preset”, this is the preset that the user would like to have the AJA default to when it is rebooted. This feature is essential as a user may lose power or reboot the device and end up in an uncalibrated state without setting this to their desired setting.
Note: We do not have a way for Calman to read the active preset upon connection; as such, Calman will also read the “Startup Preset” and set the actual Preset to the “Startup Preset”. What this means is that the startup preset could be set to Preset 4, but the active Preset could be 1. When Calman connects it will set the active Preset to 4 and the user will need to manually set the Preset they wish to be in or adjust inside of Calman after connecting.
Calibration
As discussed earlier, we recommend a user calibrate with the highest bit precision for optimum results; as such, they will want to ensure that the display’s settings, the AJA’s settings, any potential external generator, and Calman are in sync with their settings. For example, if calibrating in Full Range, the user will want to make sure that:
- The display is in Full Range
- AJA has In Range and Out Range set to “SMPTE Full”
- Calman is in Full
- If an external generator is used, it is set to Full.
Now remember the recommended process for ranges when using the AJA:
- Full 0-1023 = Internal Generator
- Narrow 64-940 = Internal Generator
- Extended 64-1019 = External generator
- Full 4-1019 = External Generator
This will give the most accurate bit precision for all possible use cases.