Welcome to the madVR Envy Calman Calibration Guide. The purpose of this guide is to help experienced calibrators quickly get up to speed with using Calman to perform 1D and or 3D LUT calibrations with the madVR Envy.
The Envy is unique in that it is the only video processor that supports up to two simultaneous 4096-point 1D LUTs up to 256^3 3D LUTs – empowering calibrators to deliver the most accurate home cinema calibrations. Calman sends Envy 256-point 1D LUTs and 65^3 3D LUTs. Further, this version of Calman supports the new Calman Aurora color engine, for outstanding color accuracy when combined with the Envy.
Note: This guide does not cover calibration concepts or provide background information about calibration. It assumes an advanced level of calibration experience, including important preliminary steps for proper calibration, such as meter setup, selecting the best settings in the projector/display, setting brightness and contrast, etc.
Prerequisites and Calman Installation Download
To successfully use Calman to calibrate an Envy you will need the following:
- A madVR Envy Extreme or Pro, running firmware 1.6.2.52 or later. Check the Envy firmware from the Envy Firmware Configuration menu. If your installed version is prior to 1.6.2.52, then under “Build Type” in the same menu, choose Beta or Experimental, and then select this version or a later to install it.
- A license from Portrait Displays for Calman Pro or Ultimate with active maintenance.
- Calman 5.14.0.3 or later, available from https://www.portrait.com/software-downloads/
- Prior calibration experience and a working knowledge of Calman.
If you carefully follow this guide step by step, and do not veer from the recommended approach as outlined here, we anticipate you will achieve excellent results.
Calibration Walk-through
This section walks you through the calibration of the 1D and 3D LUT with the madVR Envy Extreme and JVC NZ9, and how to check the results. We recommend following these exact steps, in the exact order presented, to achieve great calibration results and avoid any Calman pitfalls. There are other ways to use Calman and its workflows to achieve similar results. However, due to issues with this interim Calman build, we recommend experimenting with alternative approaches and settings only if you have the time and patience.
Envy Calibration Setup Tips and Tricks
This section covers important tips and tricks to help you set up the Envy for the best quality output and calibrations.
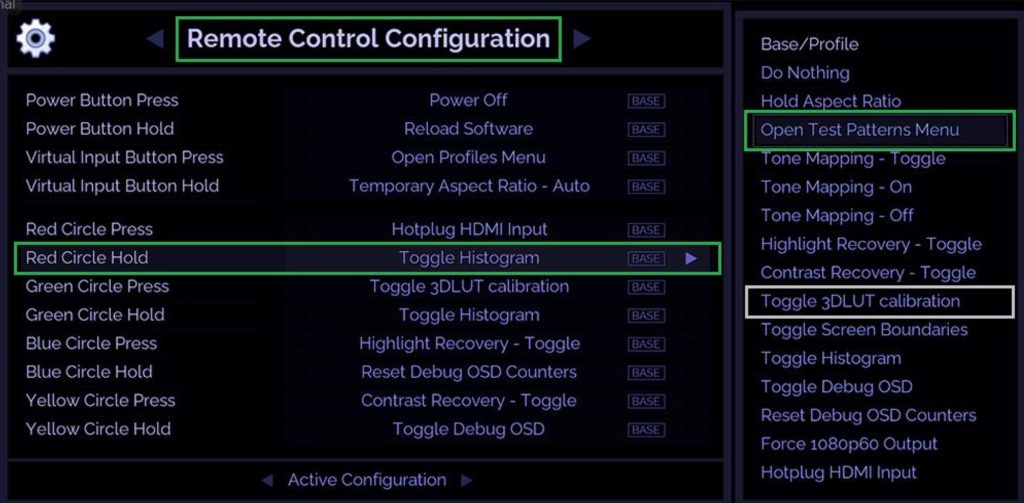
- The Envy has built in test patterns for setting contrast and brightness. To use this, you will first need to assign the “Open Test Patterns Menu” option to one of the Envy remote control’s-colored buttons, as shown below. After assigning, press green on the Envy remote if you wish to make this assignment permanent.
- To activate the test patterns, close the Envy menus and press the colored button you assigned. Press the left and right arrows to change patterns, and OK to close the patterns. Note that you cannot access the test patterns once Calman is connected to the Envy. Note the option to also assign a colored button to toggle the calibration on/off – very handy for instant A/B testing.
- When setting the brightness and contrast, it is best to do this directly in the display. After doing so, you can make finer adjustments, if necessary, using the “Black Level” and “White Level” settings in the Envy Display Configuration menu. If doing so, remember to press the green button to save any changes.
- Important: Do not use the “Brightness” and “Contrast” settings in the Envy Calibration Configuration menu for this, as those apply tweaks to the gamma curve, which is entirely different.
- We recommend setting Envy to output RGB using its Display Configuration menu, instead of YCbCr. This enables Envy to apply its advanced neural network chroma upscaling and transport the full benefit of the chroma upscaling to the display. For this to work, the display must be set into a 4:4:4 capable mode. There is an Envy Test Pattern (see above) to test whether the display supports 4:4:4.
- If you will use the same settings (e.g., gamma, laser/led/lamp brightness, iris, P3 filter in or out) in the display for SDR and HDR content, you can make just a single calibration for HDR and upload it into the Envy DCI-P3 or BT2020 slot
- The calibration will then be applied for HDR content as expected, and when the Envy receives SDR BT.709, the Envy will upscale the colorspace to DCIP3 or BT.2020, and output as SDR to the display. This is incredibly handy as it will save you from having to make a separate calibration for HDR and SDR (again, only if you will use the same settings in the display for SDR and HDR).
- To ensure the ultimate picture quality, please see the guides in the Downloads section at www.madvrenvy.com. These guides cover how to configure your display and media players to get the ultimate in picture quality with the Envy. Guides are available for the Sony, JVC and Barco projectors, as well as the Kaleidescape and other media players.
- Warning! If you use any Envy Profiles to automatically change the active LUT in the Envy Calibration Configuration menu, you must disable those profiles prior to running a calibration. Otherwise, the Profile may result in Envy changing the LUT after the 1D LUT calibration back to your old LUT, invaliding the 1D LUT post measurement and any 3D LUT calibrated subsequently.
- Warning! In some cases, after disconnecting Calman from Envy, you might find that the picture looks extremely undersaturated. If this happens, there is likely nothing wrong with your calibration. To clear it up, simply issue a Reload operation (assign the Reload command to the Power button on the remote – see Section 3.0.1) or restart the Envy.
Calman Setup
- Make sure you have performed other basic calibration setup, such as having the display in the right/best mode, properly setting contrast and brightness, meter setup and profiling, setting your gains at 100% in the display, and so forth.
- Make sure you have met all the prerequisites as outlined in above, including ensuring that you have right version of the Envy firmware installed.
- To begin, launch Calman. Double check that the version is 5.13.2.043 or later.
- From the Red Calman dropdown in the top left, select Open Workflow Template->Calibration->3D LUT. Despite the workflow name, this workflow is also used to perform the 1D LUT.
- From top left menu, select the right arrow that is to the left of the “History 1” tab.
- Select “1D LUT” under the “3D LUT Creation” option.
- Select the Gear Icon in the top right to open the Workflow and Application Settings Panel.
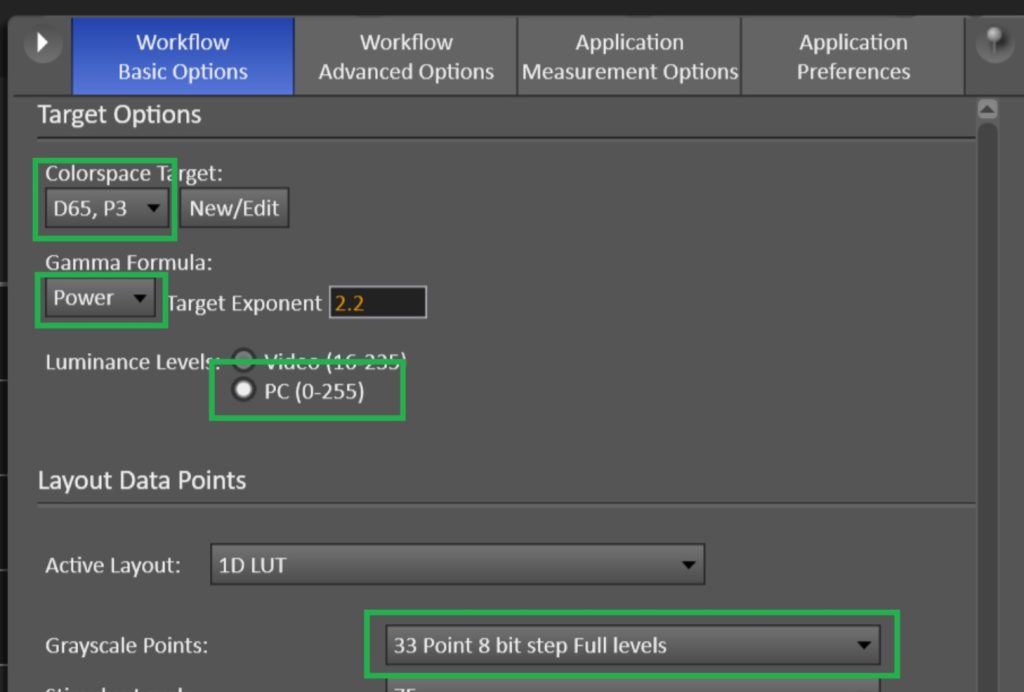
- After clicking the gear icon, you will see the Workflow Basic Options. Set these options as follows:
- Select your desired “Colorspace Target”. For HDR we recommend DCI-P3. If you use BT.2020,
use BT.2020 SDR and not BT.2020 HDR. - Select your preferred Gamma Formula and Target Exponent.
- For “Luminance Levels” select “PC (0-255)”, which is highly recommended, even if the Envy and display are using Video Levels. Regardless of your video chain and settings in your system, there is no downside to selecting PC Levels in Calman. However, doing so will provide the best accuracy when using Calman with the Envy.
- For “Grayscale points” select “33 Point 8 Bit step Full levels”. For brevity we focus here “only” only using 33 points. However you may wish to experiment with larger 1D LUTs and weigh the benefits for your setup. Example settings when calibrating HDR are shown below.
- Select your desired “Colorspace Target”. For HDR we recommend DCI-P3. If you use BT.2020,
- From the Source Settings, select Find Source->Manufacturer: madVR Labs->Model: madVR Envy. Enter the Envy IP address and press Connect. You can find the Envy IP by pressing OK on the Envy remote when no Envy menus are open and pressing the left arrow one time. Important: You must have n incoming signal of any type for Calman to find the Envy. If you receive a message that “the madTPG Software is not running on any instance”, then this is the reason.
- From the Direct Display Control, select Find Display->Manufacturer: madVR Labs->Model: madVR Envy. Then enter the Envy IP and press Connect. You can find the IP from the Envy System Information menu.
- In Display Control panel, which will now say “madVRF2”, select the following options:
- Set “Active Grayscale Points” to “33 – PC”.
- Set the “Select 3D LUT” to the LUT slot in the Envy you wish to store the calibration. For SDR calibrations this will typically be “BT709”. For HDR calibrations – if you selected DCI-P3 as the Colorspace Target, choose DCIP3, or BT2020 if you selected BT.2020 as the Colorspace target.
- In Display Control panel, which will now say “madVRF2”, select the following options:
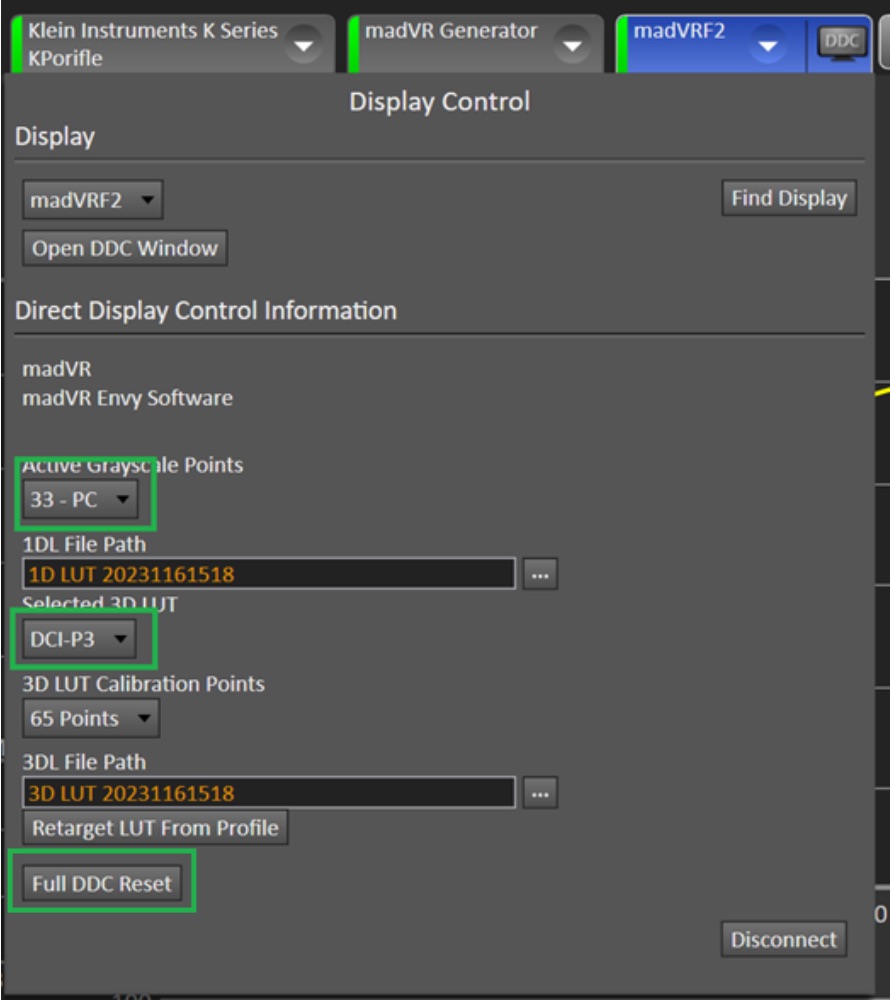
- Click the “Full DDC Reset” button. This ensures you are starting with a fresh slate and no active LUT. Note that this action will erase any previous LUT stored with the default name or chosen name
Performing the 1D LUT Calibration
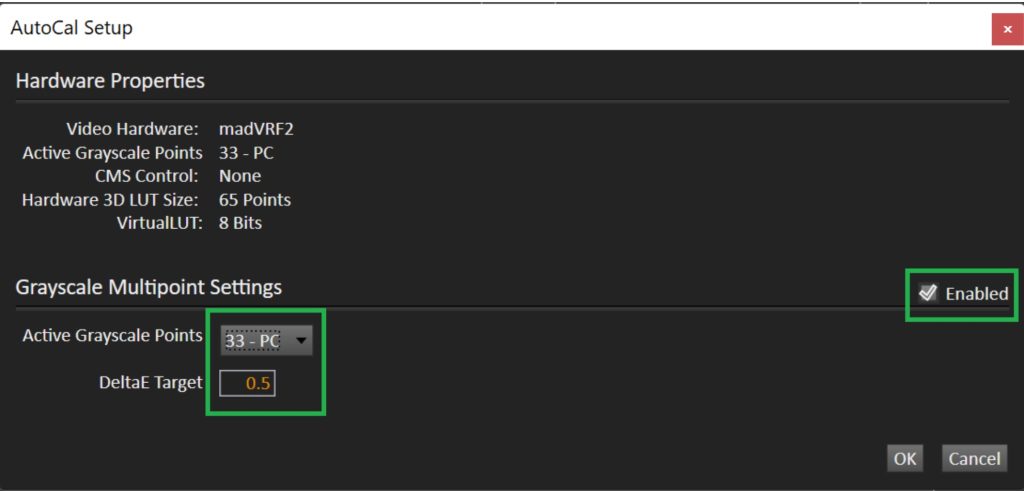
We are now ready to begin the 1D LUT calibration. Make sure you are on the Calman screen with the heading “1D LUT Calibration” and press the AutoCal button in the bottom right corner to bring up the 1D AutoCal Setup. Note that using a 1D LUT along with a 3D LUT is recommended but optional.
- Set the “Active Grayscale Points” to “33 – PC”.
- Use the default “DeltaE Target” of “0.5”. You can experiment with more aggressive values, such as 0.3, however we have found that 0.5 sometimes provides better results.
- Make sure that “Grayscale Multipoint Settings” is checked (Enabled). Optional: You can specify a name for the LUT that is stored in the Envy by clicking on the “DDC” button next to the Display Control in Calman (where it shows “madVRF2”), then clicking the little right arrow in that window until you see “Display Controls” and entering a LUT name there. However, you may find it easier to use the Envy IP Control Utility instead to manage and name LUTs
- Warning: If you change any settings after following these steps, Calman may revert some of the settings, such as the Colorspace Target, Gamma, Active Grayscale Points, and or the Selected 3D LUT – throwing off your entire calibration without you realizing it until the end. Therefore, before starting the 1D and 3D calibrations, please also double check that the Workflow Basic Options and Display Options (madVRF2) have not reverted
- Press OK to begin the 1D LUT calibration. Once complete, Calman automatically uploads the 1D LUT to the Envy. However, you must then enable it, which is covered next.
- To verify the quality of the 1D LUT calibration, go to the Source tab, which will say “madVR Generator” and click the Enabled 3D LUT option so that it is checked. Even though it says “Enable 3D LUT”, this is really enabling the 1D LUT here.
- Return to the main Calman screen and click the option near the bottom right for “Read Series.”
If your calibration was successful, you should see great results like those below. If not, make sure that you enabled the 3D LUT per the red text above. If still not, then retrace all your steps from the beginning. If still not, it could be an issue with your pre-calibration setup, meter, measurement techniques and or the display itself. 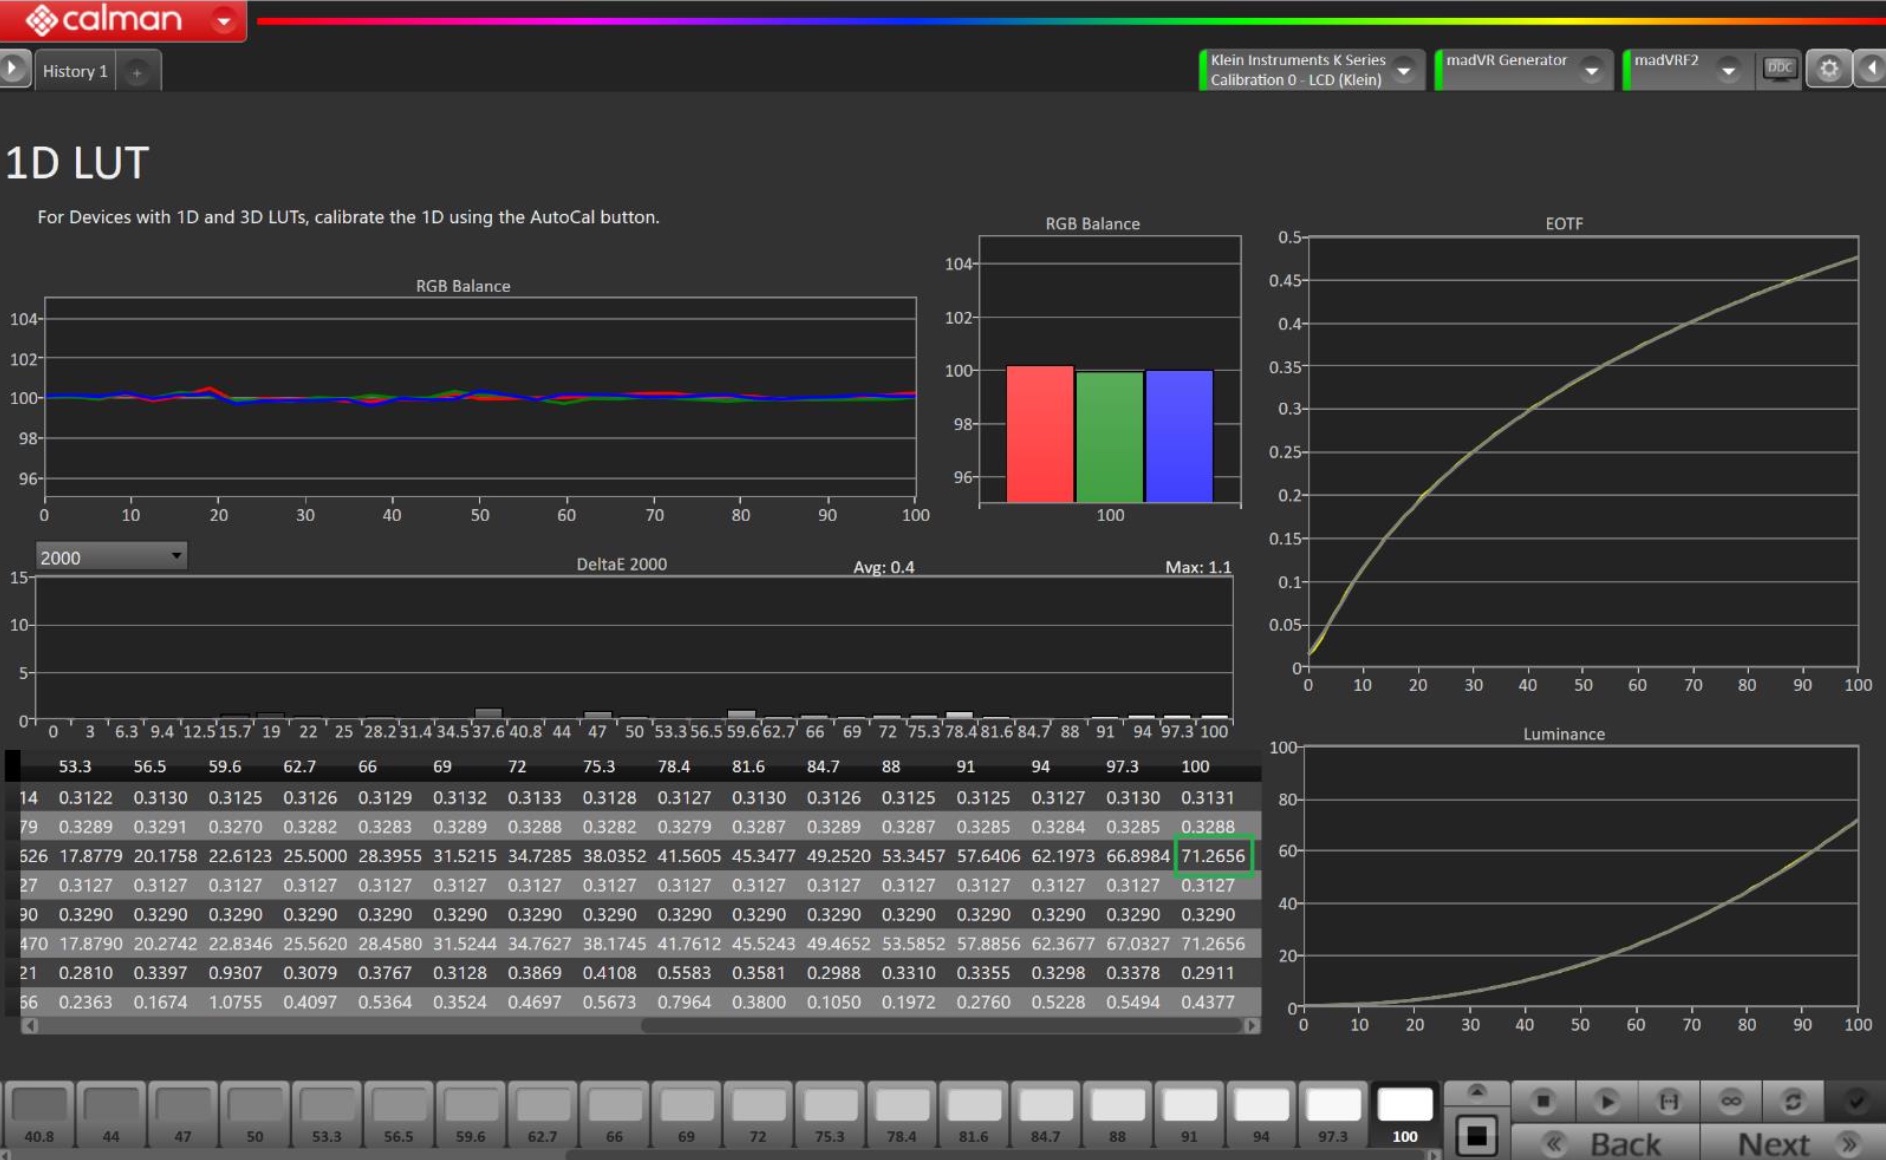
- After the measurement from the above step completes, note your peak white level by getting the Y value from the “100” column, as highlighted in the green box in the image above. In this example, the peak brightness is 71. Enter your peak Y value in the Envy’s Display Calibration menu as the Peak Luminance and save it permanently to the Envy Base settings (highlight Peak Luminance in the Envy menu and press the green button on the Envy remote). This step is critical to Envy rendering HDR properly, regardless of how the calibration measures. It is fine if you prefer to wait until the full calibration is complete before entering this value, but if you do wait, please remember to do so before evaluating HDR content.
- On the main Calman screen, press Next to move to the “3D LUT Calibration” page.
Performing the 3D LUT Calibration
We are now ready to perform the 3D LUT Calibration:
- Make sure that the Enabled 3D LUT option is still checked in the madVR Generator panel. Unlike when performing the 1D LUT calibration, where we want the 3D LUT disabled, it must be enabled prior to performing the 3D calibration.
- Warning! Sometimes Calman does not actually have the LUT enabled, even if the Enable 3D LUT button is checked. Therefore, we highly recommend unchecking this option, and then checking it again, which will ensure that the LUT is active.
- Press the AutoCal button in the bottom right corner.
- Tick the “Set 3DLut Grayscale to unity” box so that it is checked! This box is not checked by default. If you forget this step, the 3D LUT will completely overwrite your 1D LUT and your calibration will be as if no 1D LUT was performed. Note however, if you decided to skip running a 1D LUT as covered in Section 3.0.3, then you must leave this Unity option unchecked so that Calman will calibrate the gamma and grayscale as part of the 3D LUT.
- For the Calibration Type, select the size calibration you would like to choose. Shown here is a Fixed Grid, 13 points, for a fairly “quick” calibration. For the most extreme results, we recommend using at least 17 points, or 21 points, if you have the time. However, in this Calman build, using 21 points crashed Calman – your experience may vary. We also found that depending on the display, the Lightning LUT option might provide excellent results, which can come in handy when experimenting. Note that the size of the LUT needed is likely dependent on the linearity of your display.
- Press OK to begin the 3D LUT process. Note: Occasionally when starting a calibration, or a series of measurements, you might find that Calman becomes frozen. If this happens, please be patient and Calman will recover and proceed without issue after several minutes.
- Upon completion, Calman will automatically add the 3D LUT to the 1D LUT from Section 3.0.3 and send the LUTs to the Envy.
Checking the Calibration
There are several ways to test the calibration, largely outside the scope of this document. However, here are some suggestions on how to check the quality of the calibration. Remember to make sure the Enable 3D LUT option is still checked in Calman:
- Warning! Sometimes Calman does not actually have the LUT enabled, even if the Enable 3D LUT button is checked. Therefore, before proceeding with any measurements, we highly recommend clicking on the madVR Generator tab in Calman, and unchecking the “Enable 3D LUT” box, and then checking it again. This will ensure that the LUT is active for your measurements. Otherwise, your calibration may be fine, but you may wind up taking the validation measurements without the calibration active!
- Check your 1D LUT by returning to the “1D LUT” screen you started with in section 3.0.3 using the side menu in the top left of Calman (see the images at the bottom of page 3 and top of page 4). Note that you may then have to click on the Gear in the top right corner and change “Grayscale Points” back to “33 Point 8 bit step Full levels”, as Calman may have reverted this to White Only and possibly reverted other settings. [Portrait is aware of this issue with reverting settings, and plans to resolve this in the next public release of Calman]. After checking this, make sure the Colorspace Target, Gamma Formula and Target Exponent, and the settings in the Display Control (madVRF2) have not reverted
- Click Read Series to measure the 1D gamma. It is normal for this to change a little from your previous measurement pre-3D LUT but should not be significantly different. If it is significantly worse, make sure you remembered to select the Unity option
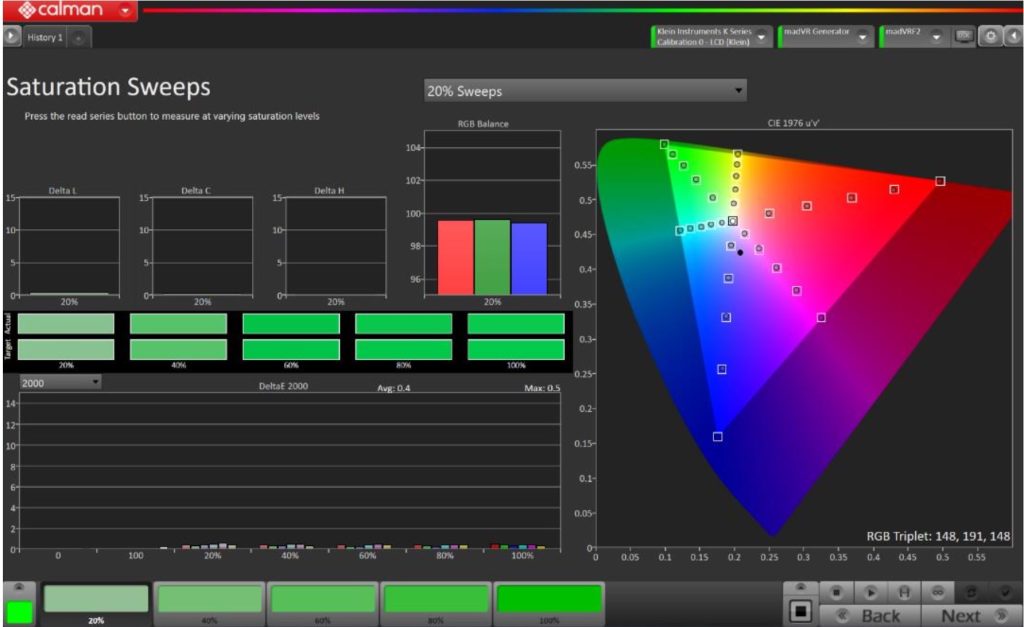
- Check your 3D LUT by choosing Saturation Sweeps from the left-hand menu. The results should show the targets landing in or near their respective boxes. Note that if your gamut is undersaturated, such as if using the no P3 filter on purpose to gain extra brightness, or if your display cannot match the full colorspace (such as not reaching 100% of P3), then missing the targets should be expected. The next page shows an example of excellent results with the Saturation Sweeps.
- It is also a good idea to check your 3D LUT using the Calman ColorChecker. Here is an example of excellent results:

LUT Management
The Envy supports an unlimited number of 1D and 3D LUTs per colorspace. Therefore, being able to easily organize and manage your LUTs is important.
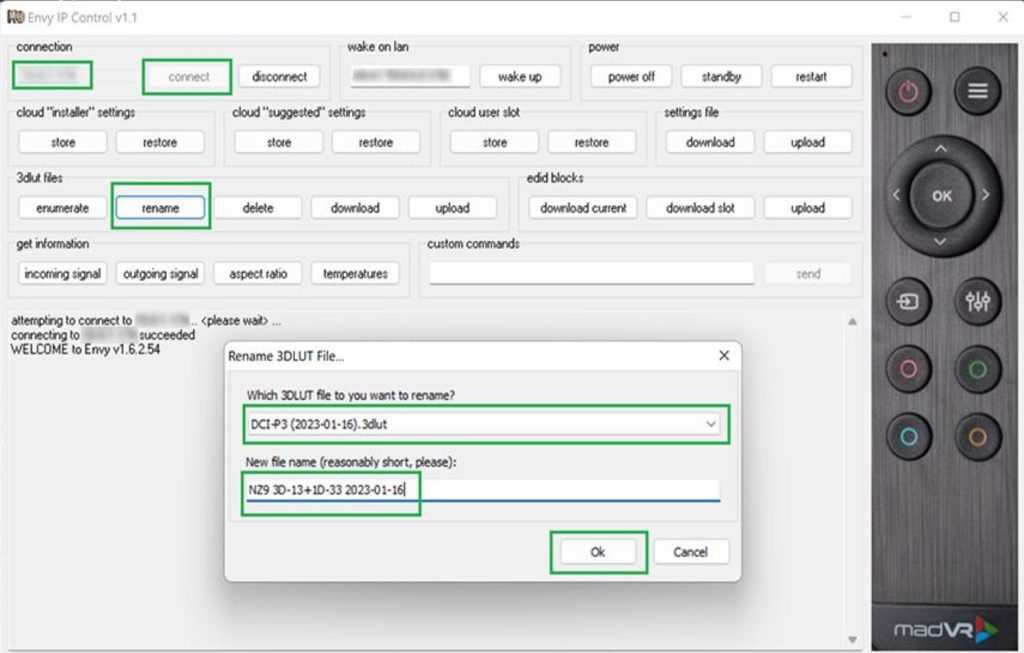
For example, you may wish to have a few different LUTs for HDR and some others for SDR, perhaps each with different viewing conditions or settings in the display (e.g., high laser vs low laser mode). To easily manage your LUTs, we recommend using the Envy IP Control Utility, available here: https://madvrenvy.com/wp- content/uploads/EnvyIPControl.zip. This utility enables you to download (for safe keeping or transfer to a different Envy), upload, rename and delete LUTs.
Below is an image showing the utility in action. To use it, simply enter the IP of the Envy, click Connect, click Rename in the 3D LUT Files section, select the LUT you want to rename and enter the new name. Here is a look at the utility in action:
Likewise, you can connect a keyboard to any USB port on the back of the Envy to delete and rename LUTs directly through the Envy menu. To delete a LUT, select it in the main Display Configuration menu, then click Red on the Envy remote. To rename it, click Yellow on the LUT name, as shown on the next page, then type the new name.

In this guide we demonstrated how to perform a 33-point 1D LUT with 13-point 3D LUT calibration using Calman and a madVR Envy. The results are outstanding, with gamma/grayscale with an average dE 2000 of 0.4 and max dE of 1.6, along with an average dE of 0.4 and a max 1.2 across the 13-point cube (2,197 measured points). Although display dependent, further accuracy usually can be obtained by using larger LUTs, such as 17 or 21 points.
The full report generated by Calman for this calibration is available here: https://madvrenvy.com/wp- content/uploads/Calman-Envy-Calibration-Report-2023-01-16.pdf.
To learn more about the Envy, including how to use IP Control, Profiles, NLS+ and other important setup information, please see the Downloads section at www.madvrenvy.com.
We hope this guide has been helpful. We will update it as Calman continues to evolve and take advantage of the Envy’s full calibration capabilities for extreme accuracy.