![]()
When the G1 is properly connected to the same network as the computer by following the steps as outlined in Portrait Displays G1 – Network Setup, launch Calman.
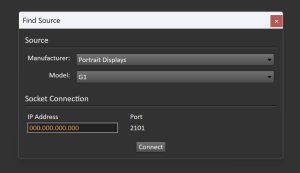
- Click on Find Source from the Source tab or Calman Workflow
- Select Portrait Displays
- Select G1
- Type in the IP address as shown on the video output of G1

- Click on Connect – Calman will detect the G1 and confirm that the generator is connected. When successful the Alignment pattern will be rendered and Calman will display the G1 in the Source tab with a green light.
- You are now connected to your Portrait Displays G1 and ready to proceed.
Automatic Connection
G1 can be configured to automatically connect on the launch of Calman by ensuring “Reconnect Source on Startup” in the Calman Application Preferences
Disconnect
To disconnect the G1 from Calman click on the Disconnect button located under the Calman Source Settings Menu
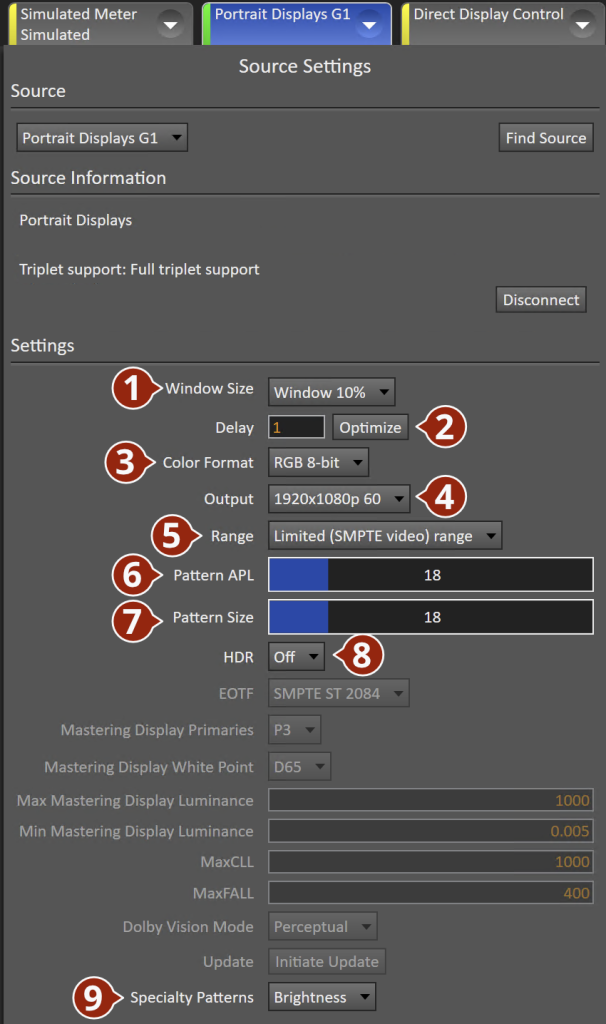
Calman Source Settings Options
The G1 is designed for testing and calibrating HDMI systems and the devices in these systems together with a meter like C6 HDR2000 taking readings.
When the G1 is connected as a Calman test pattern source, the following Settings options on the Calman Source Settings tab should be set according to the type of display being measured or calibrated:
- Window Size
- The patch window can be customized for different uses when taking measurements. You can manually change the size and type of the window under Window Size to accompany different tests and methodologies for calibration.
- Delay
- Recommendations for Delay:
- SDR – 1 Second
- HDR – 1.5 Seconds
- Dolby Vision – 4 Seconds
- Recommendations for Delay:
- Color Format
- RGB 8-Bit
- YCbCr444 10-Bit
- Output
- Configures output resolution
- 720х480р 50/60
- 1280x720p 50/60
- 1920х1080р 24/25/30/50/60
- 3840х2160р 24/30/50/60
- 4096х2160р 24/30/50/60
- Configures output resolution
- Range
- Configures output range
- Limited (SMPTE video)
- 16-235
- Full (PC)
- 0-255
- Limited (SMPTE video)
- Configures output range
- Pattern APL
- When Window Size is set to “User” this will determine the average picture level (APL) level of the area surrounding the pattern window
- For more information on APL patterns, see Constant APL Test Patterns
- Pattern Size
- When Window Size is set to “User” this will determine the percentage of the screen used by the pattern window
- HDR
- Configures output Dynamic Range:
- Standard Dynamic Range (SDR)
- High Dynamic Range (HDR10)
- Hybrid Log Gamma (HLG)
- Dolby Vision
- For recommended HDR/HLG/DV see next section
- Configures output Dynamic Range:
- Specialty Patterns
- Will set the G1 output to one of 21 Speciality Patterns used for a variety of purposes
- For more info, see Portrait Displays G1 – Specialty Pattern Descriptions
Calibration Configurations
VESA sRGB SDR Content Calibration (RGB computer monitors)
G1 Source Settings options for VESA sRGB SDR content:
- Range: Full
- HDR: Off
HDTV SDR Content Calibration (video monitors & consumer TVs)
G1 Source Settings options for HDTV SDR content:
- Range: Limited (SMPTE Video)
- HDR: Off
HDR10 HDR Content Calibration
G1 Source Settings options for HDR10 HDR content:
- Range: Limited (SMPTE Video)
- HDR: HDR10
- EOTF: SMPTE ST 2084
- Mastering Display Primaries: P3
- Mastering Display White Point: D65
- Mastering Display Max Luminance: 1000
- Mastering Display Min Luminance: 0.005
- MaxCLL: 1000
- MaxFall: 400
HLG HDR Content Calibration
G1 Source Settings options for HLG HDR content:
- Range: Limited (SMPTE Video)
- HDR: HDR10
- EOTF: HLG
Dolby Vision HDR Content Calibration
G1 Source Settings options for Dolby Vision HDR content:
- Range: Limited (SMPTE Video)
- HDR: Dolby Vision
- Dolby Vision Mode:
- Relative – When performing the calibration
- Absolute – When taking post-calibration readings
- Perceptual – Testing purposes only, not used during calibration
General Device Testing
A/V HDMI systems consist of three basic component types:
Source Device Testing
A transmitter device that sources HDMI video output (e.g. set-top boxes, game consoles, optical players, computers, etc.). Substitute the G1 for the source during system testing.
Display (sink) Testing
A sink is a receiver device that displays HDMI video input (e.g. TV, monitor, or projector). To test Inject a signal timing that should normally pass through the distribution system into the display from the G1 by following these steps:
-
- Connect an HDMI cable from the G1 HDMI output port to the input of the display you want to test
- Select a test pattern to render from Calman after connecting to the G1. Choose the resolution and timing you want to output.
- Verify that the test pattern appears on the display as it should. If not change resolution and timing until the test pattern is displayed.
Repeater Testing
A combination device that receives and retransmits HDMI video. Connects between one or several source and sink devices (e.g. AVR (audio video receiver) or matrix switch). Compare test patterns and measurements running G1 through the AVR and directly to the Sink.