
The LG Ultimate Calibration Workflow, included with Calman Ultimate licenses, streamlines the calibration process for LG TVs, particularly in demanding production environments. This workflow is tailored to optimize efficiency by automating numerous steps that traditionally required substantial time and expertise from calibration engineers.
By reducing setup complexities and automating repetitive tasks, the LG Ultimate Calibration Workflow empowers users to focus on delivering high-quality visual output, whether for broadcast, post-production, or other professional video applications.
Required Software
- Calman Ultimate 2025 (v5.15.9.2) or later
- This workflow is not included in other Calman licenses
Required Hardware
- HDR and Dolby Vision Compatible Pattern Generator
- Portrait Displays VideoForge Pro recommended
- Portrait Displays G1 Pattern Source supported
- HDR Compatible Meter
- Portrait Displays C6 HDR5000 recommended
- Calman Compatible LG TV
|
Year |
Processor |
OLED Models |
LCD Models |
|
2025 |
Alpha 7 |
– |
QNED80, QNED82, QNED82A, NANO80, NANO90,UA77A, UA75Z, UA77 |
|
|
Alpha 8 |
OLED B5, B5A |
QNED92, QNED90A, QNED90, QNED85, QNED85A, UA90, UA90A |
|
|
Alpha 9 |
OLED C5, C5A |
QNED9M |
|
|
Alpha 11 |
OLED M5, G5 |
– |
|
2024 |
Alpha 5 |
– |
QNED80, NANO80, UT90, UT80, UT73, LR60 |
|
Alpha 8 |
OLED B4 |
QNED90, QNED85, 86Nano80 |
|
|
Alpha 9 |
OLED C4 |
QNED99 |
|
|
Alpha 11 |
OLED M4, OLED G4 |
– |
|
|
2023 |
Alpha 7 G6 |
OLED: A3, B3 |
QNED80, QNED80UQA, QNED90, NANO85, NANO90, NANO91 |
|
Alpha 9 G6 |
OLED: C3, G3, M3, R3 |
QNED99, NANO99, NANO97 |
|
|
2022 |
Alpha 9 G5 |
C2, G2, M2, R2, Z2 |
QNED99, NANO99, NANO97 |
|
Alpha 7 G5 |
A2, B2 |
QNED80, QNED80UQA, QNED90, NANO85, NANO90, NANO91 |
|
|
2021 |
Alpha 9 G4 |
C1, G1, M1, R1, Z1 |
QNED99, QNED95, NANO99, NANO95 |
|
Alpha 7 G4 |
A1, B1 |
QNED90, NANO90, NANO85 |
|
|
2020 |
Alpha 9 G3 |
CX, GX, WX, ZX |
NANO99, NANO97, NANO95 |
|
Alpha 7 G3 |
BX |
NANO90, NANO85 |
|
|
2019 |
Alpha 9 G2 |
R9, Z9, W9, W9S, E9, C9 |
NanoCell SM99 |
|
Alpha 7 G2 |
B9 |
NanoCell LCD Models |
Configuring AutoCal
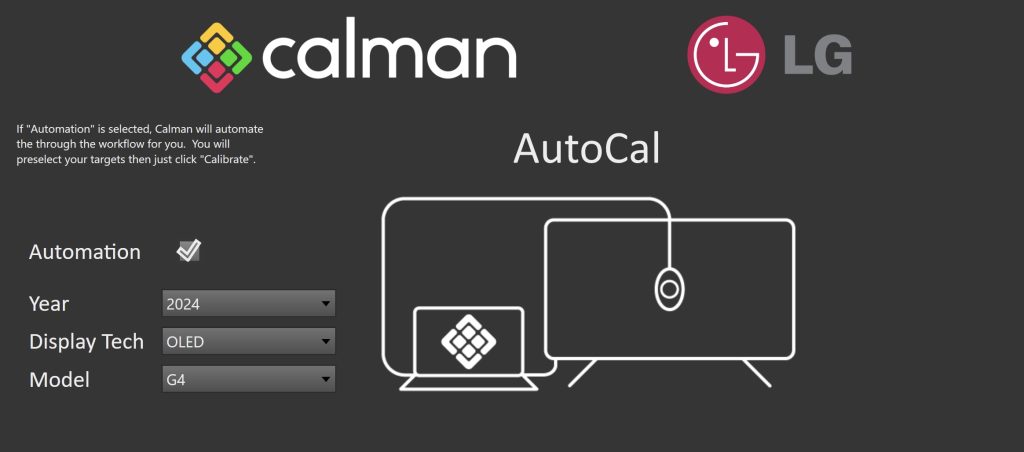
Step 1
- From the Calman Menu in the top-left, choose Open Workflow Template → Display Specific and then AutoCal – LG Ultimate.
-
If the Automation is checked, Calman will automate the through the workflow for you. You will preselect your targets then click Calibrate.
- Select your LG TV’s model Year (2019+), Display Tech (OLED/QLED/NanoCell), and Model
- Click Next to proceed
Step 2
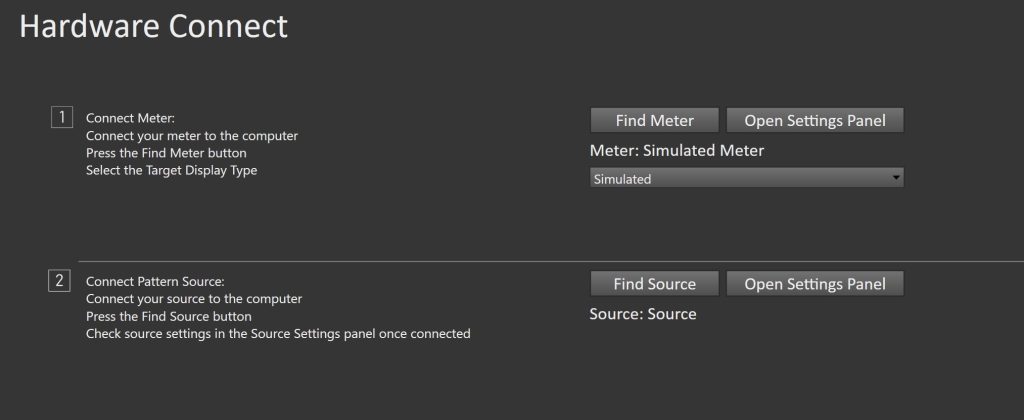
- Plug your meter into a USB port on the computer and click the Find Meter button on the left.
- When your meter is connected, select your display type from the dropdown (this will vary by meter, OLED TV – 2024 for C6 meters)
- Connect Pattern Source to your computer.
- Click the Find Source button then select your source
- Select the pattern window size
- OLED: Window 10%
- LCD: APL 10
Step 3
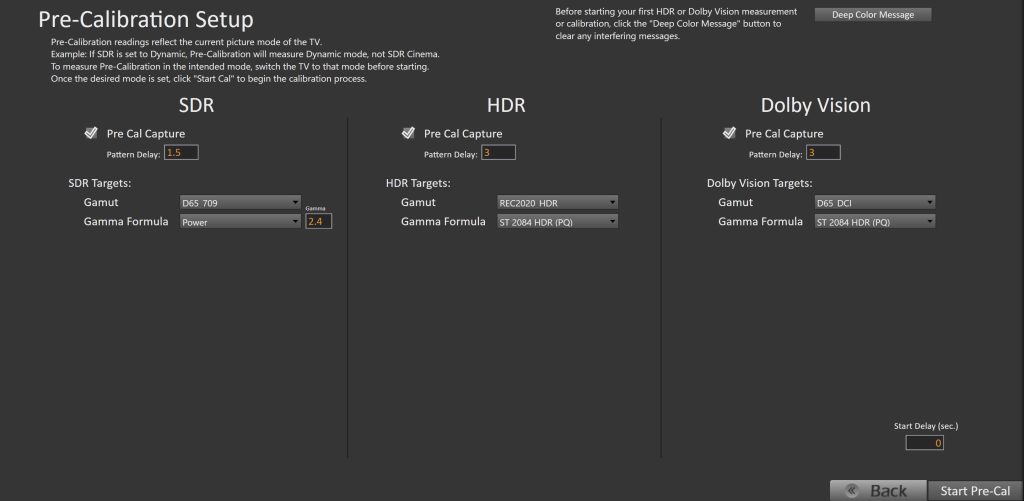
- Pre-Calibration readings reflect the current picture mode of the TV.
- Example: If SDR is set to Dynamic, Pre-Calibration will measure Dynamic mode, not SDR Cinema.
- To measure Pre-Calibration in the intended mode, switch the TV to that mode before starting.
- Check/Uncheck any of the Pre-Cal Capture checkboxes
- Once the desired mode is set, click Start Cal to begin the pre-calibration process.
Step 4
- Once the Pre-calibration measurements have been completed, Calman will proceed to the Calibration Setup page
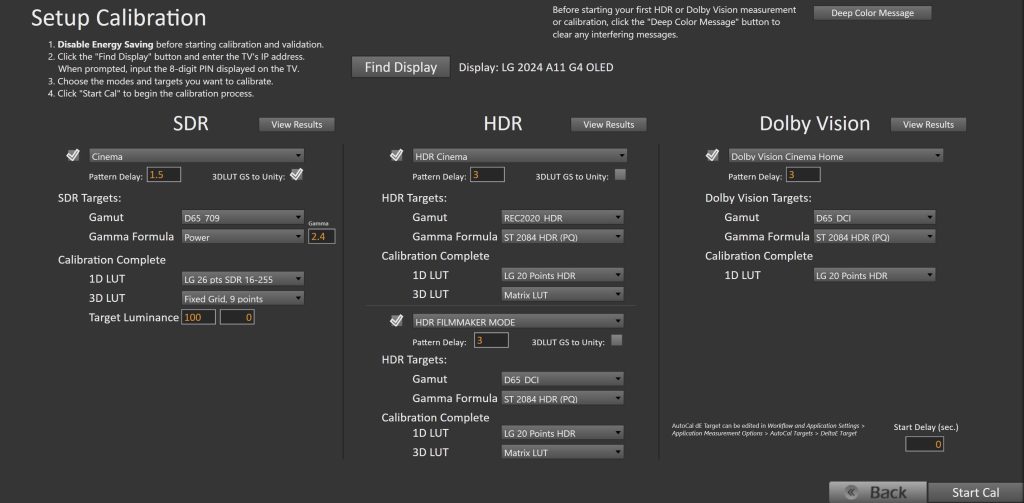
- Prior to calibration…
- AutoCal dE Target can be edited in Workflow and Application Settings → Application Measurement Options → AutoCal Targets → DeltaE Target
- If this is the first time your LG TV is receiving an HDR signal, click the Deep Color Message button in the top-right, and then click OK on the popup message on the TV
- Disable Energy Saving before starting calibration and validation.
- Connect to your LG TV
- Click the Find Display button and enter the TV’s IP address.
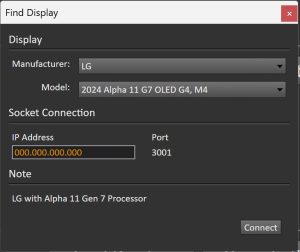
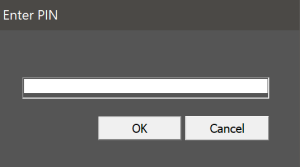
- When prompted, enter the 8-digit passcode displayed on the TV (Will only appear on the first connection)
- Choose the modes and targets you want to calibrate.
- You can select 1 SDR mode, 2 HDR modes, and 1 Dolby Vision mode to calibrate.
- Recommended Configuration
|
SDR |
HDR |
Dolby Vision |
|
|
Picture Mode |
User Choice |
User Choice |
User Choice |
|
Pattern Delay |
1.5 (0.5 with VideoForge Pro) |
3.0 (1.5 with VideoForge Pro) |
3.0 (1.5 with VideoForge Pro) |
|
3D LUT GS to Unity |
Checked |
Unchecked |
N/A |
|
Gamut |
D65_709 |
REC2020_HDR |
D65_DCI |
|
Gamma |
Power 2.4 |
SDR 2084 HDR (PQ) |
SDR 2084 HDR (PQ) |
|
1D LUT |
LG 26pt SDR |
LG 20pt HDR |
LG 20pt HDR |
|
3D LUT |
Fixed Grid 9 Points |
Matrix LUT |
N/A |
|
Notes |
Faster options: Hybrid_5 or Lightning LUT Target luminance: 100 nits for reference environments |
Matrix LUT is the only supported method |
Gamut calibration performed by DV Config File |
- Once configured as intended, click the Start Cal button to initiate the calibration process.
- If needed, you can set a Start Delay above the button, this will pospone the start of calibration by the entered amount of seconds
- The calibration process will automatically begin
Step 5
- You will observe Calman cycle through several calibration steps
- Depending on the options you chose for calibration, the calibration steps may take several hours
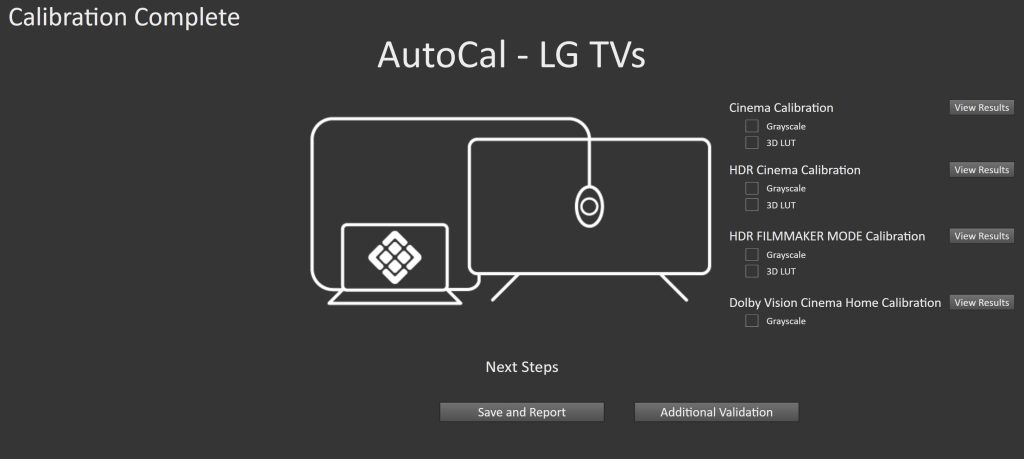
- Once the calibration is complete, you will see the above page.
- The modes that were successfully calibrated will have a checkbox next to them
- To see more detailed results, click the corresponding View Results button
- On the Calibration Complete page, you can also choose to…
- Save and Report
- Select Save and Report to generate the calibration report
- Additional Validation
- Allows measurement of the display using more thorough Saturation Sweeps and ColorChecker® patch sets
- Save and Report