Calman 2019 can automatically calibrate the 2019 Samsung QLED televisions which have an Ex-Link port, in both SDR and HDR. Including the Q60, Q90, and the 8K Q900.

Each step of this workflow has been optimized to display relevant information, and automatically configure common settings. Both Pre-Calibration and Post-Calibration measurement steps are included for comparing pre- and post-performance.
- Calman Required Version
- Calman Studio/Video Pro/Ultimate 2019 v5.10.1 or newer
- Required Hardware
- HDR Compatible Pattern Generator
- A hardware pattern generator like the VideoForge Pro must be used for HDR Calibration
- Other generators, such as MobileForge can be used to SDR ONLY
- HDR Compatible Meter
- For information see Calman Compatible Meters
- Calman Compatible Samsung TV
- 2019
- Q900R
- Q90
- Q60
- 2019
- Serial Connection Cables
- Display connection is impossible without these cables
- Listed Below
- HDR Compatible Pattern Generator
Serial Connection Information
To connect the Calman calibration computer to a Samsung SUHD TV:
- Connect an ExLink adapter (3.5mm headphone jack to DB9 serial cable) between the 3.5mm jack on the side of the Samsung OneConnect box labeled “External Sync” and an RS232 port on your PC or to a USB to serial converter.
- If you are using a USB to serial converter, in Windows Device Manager, under “Ports (COM & LPT),” look for a “USB Serial Port (COMx)” listing.
- Note the listed COM port (COMx) of the serial converter.
3.5mm Headphone Jack to DB9 Female Serial Cable
USB to RS232 Serial Converter
For connecting to a Samsung TV with a computer that does not have an RS232 port, we recommend the FTDI USB to RS232 converter. Extensive testing has determined that this FTDI converter, which includes a data buffer, is the most reliable adapter to use for Calman device control.
Driver:
USB Driver download for FTDI converter or, Calman Device Driver Pack
Jump To
SDR Calibration
Step 1
- From the Calman Menu in the top-left, choose Open Workflow Template -> Display Specific and then AutoCal – Samsung
- Select SDR Calibration to proceed down workflow steps for target colorspace

Connect your Colorimeter and Pattern Generator to Calman.
- Plug your meter into a USB port on the computer and press the Find Meter button on the left
- When your meter is connected, select your display type from the dropdown (this will vary by meter)
- QLED: Quantum Dot LCD (LCD (LED Quantum Dot) – Samsung 2019 for C6 Meter)
- When your meter is connected, select your display type from the dropdown (this will vary by meter)
- Connect Pattern Source to your computer.
- Click the Find Source button then select your source
- Configure Pattern Generator
- Pattern Size
- Full Screen 100%
- Pattern Delay
- 2 Seconds
- Pattern Size
Connect to your Samsung TV for calibration
- Connect an ExLink adapter (3.5mm headphone jack to DB9 serial cable) between the 3.5mm jack on the side of the Samsung OneConnect box labeled “External Sync” and an RS232 port on your PC or to a USB to serial converter.
- If you are using a USB to serial converter, in Windows Device Manager, under “Ports (COM & LPT),” look for a “USB Serial Port (COMx)” listing.
- Note the listed COM port (COMx) of the serial converter.
- Click Find Display, select your model and COM port
Step 2
Confirm your calibration targets and prepare TV
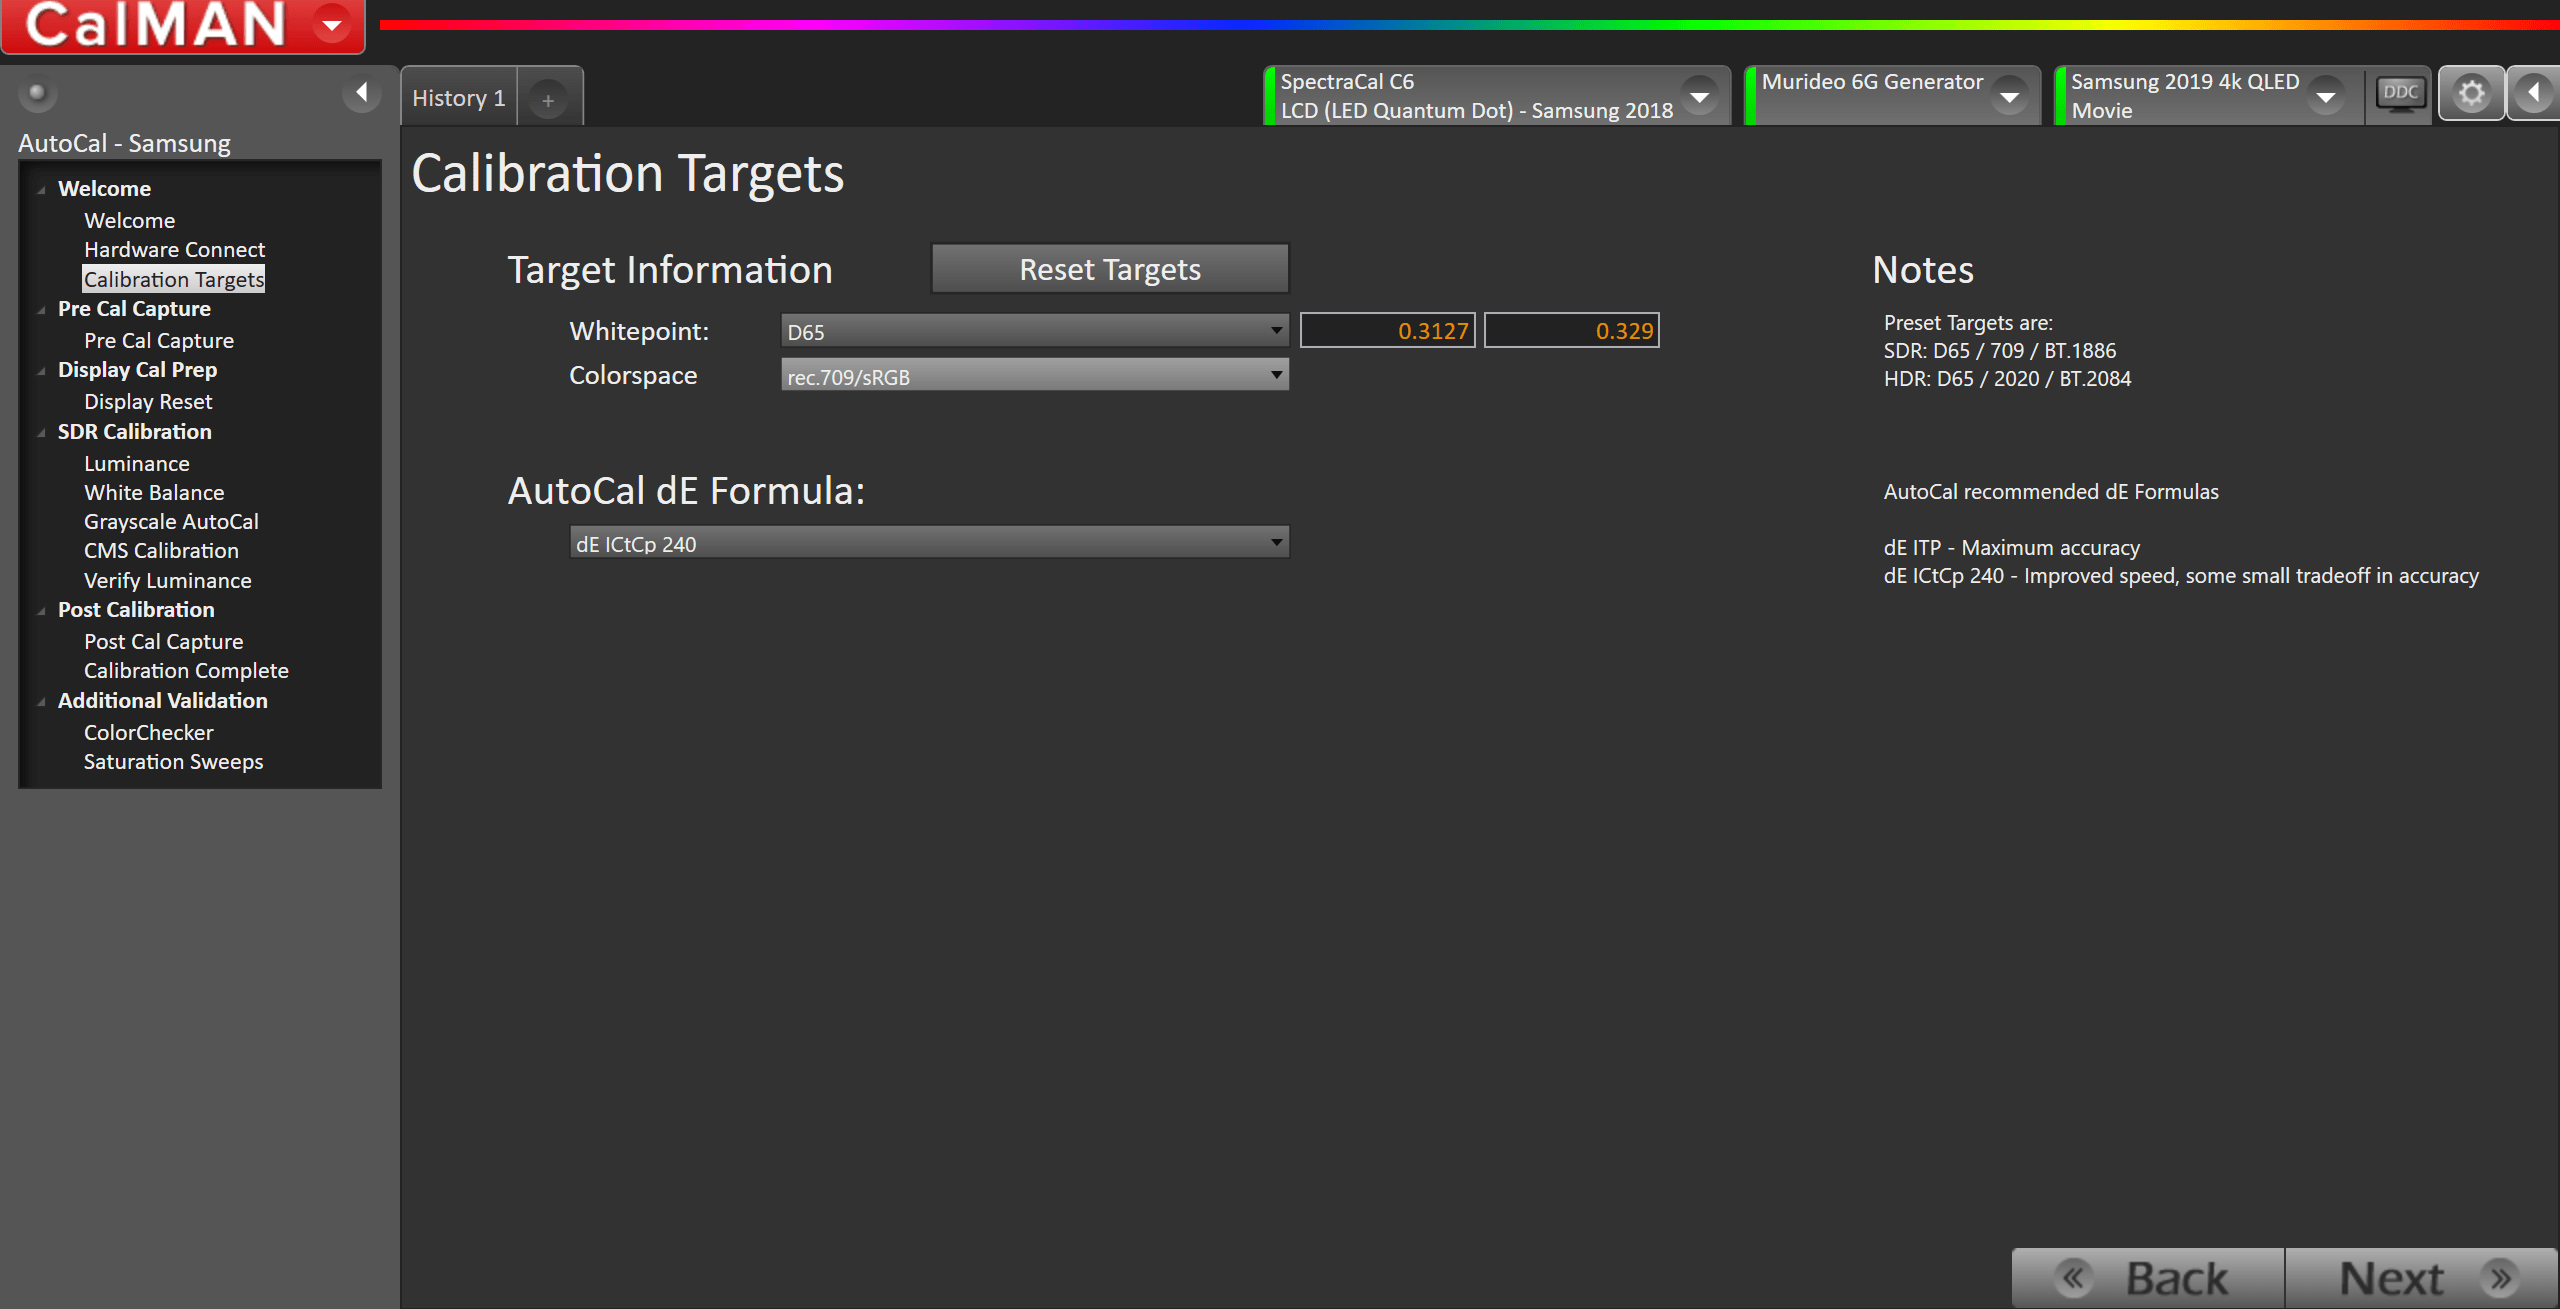
- Press Reset Targets
- For SDR, calibration targets should be:
- Rec709
- D65
- BT.1886
Step 3
In this step, you’ll take readings of your display before the calibration. These will be used to compare your calibration results

- To take Pre-Calibration Measurements click the Read Series […] button to measure the display’s grayscale and ColorChecker response
- This will provide a point of reference to compare your calibration results
Step 4
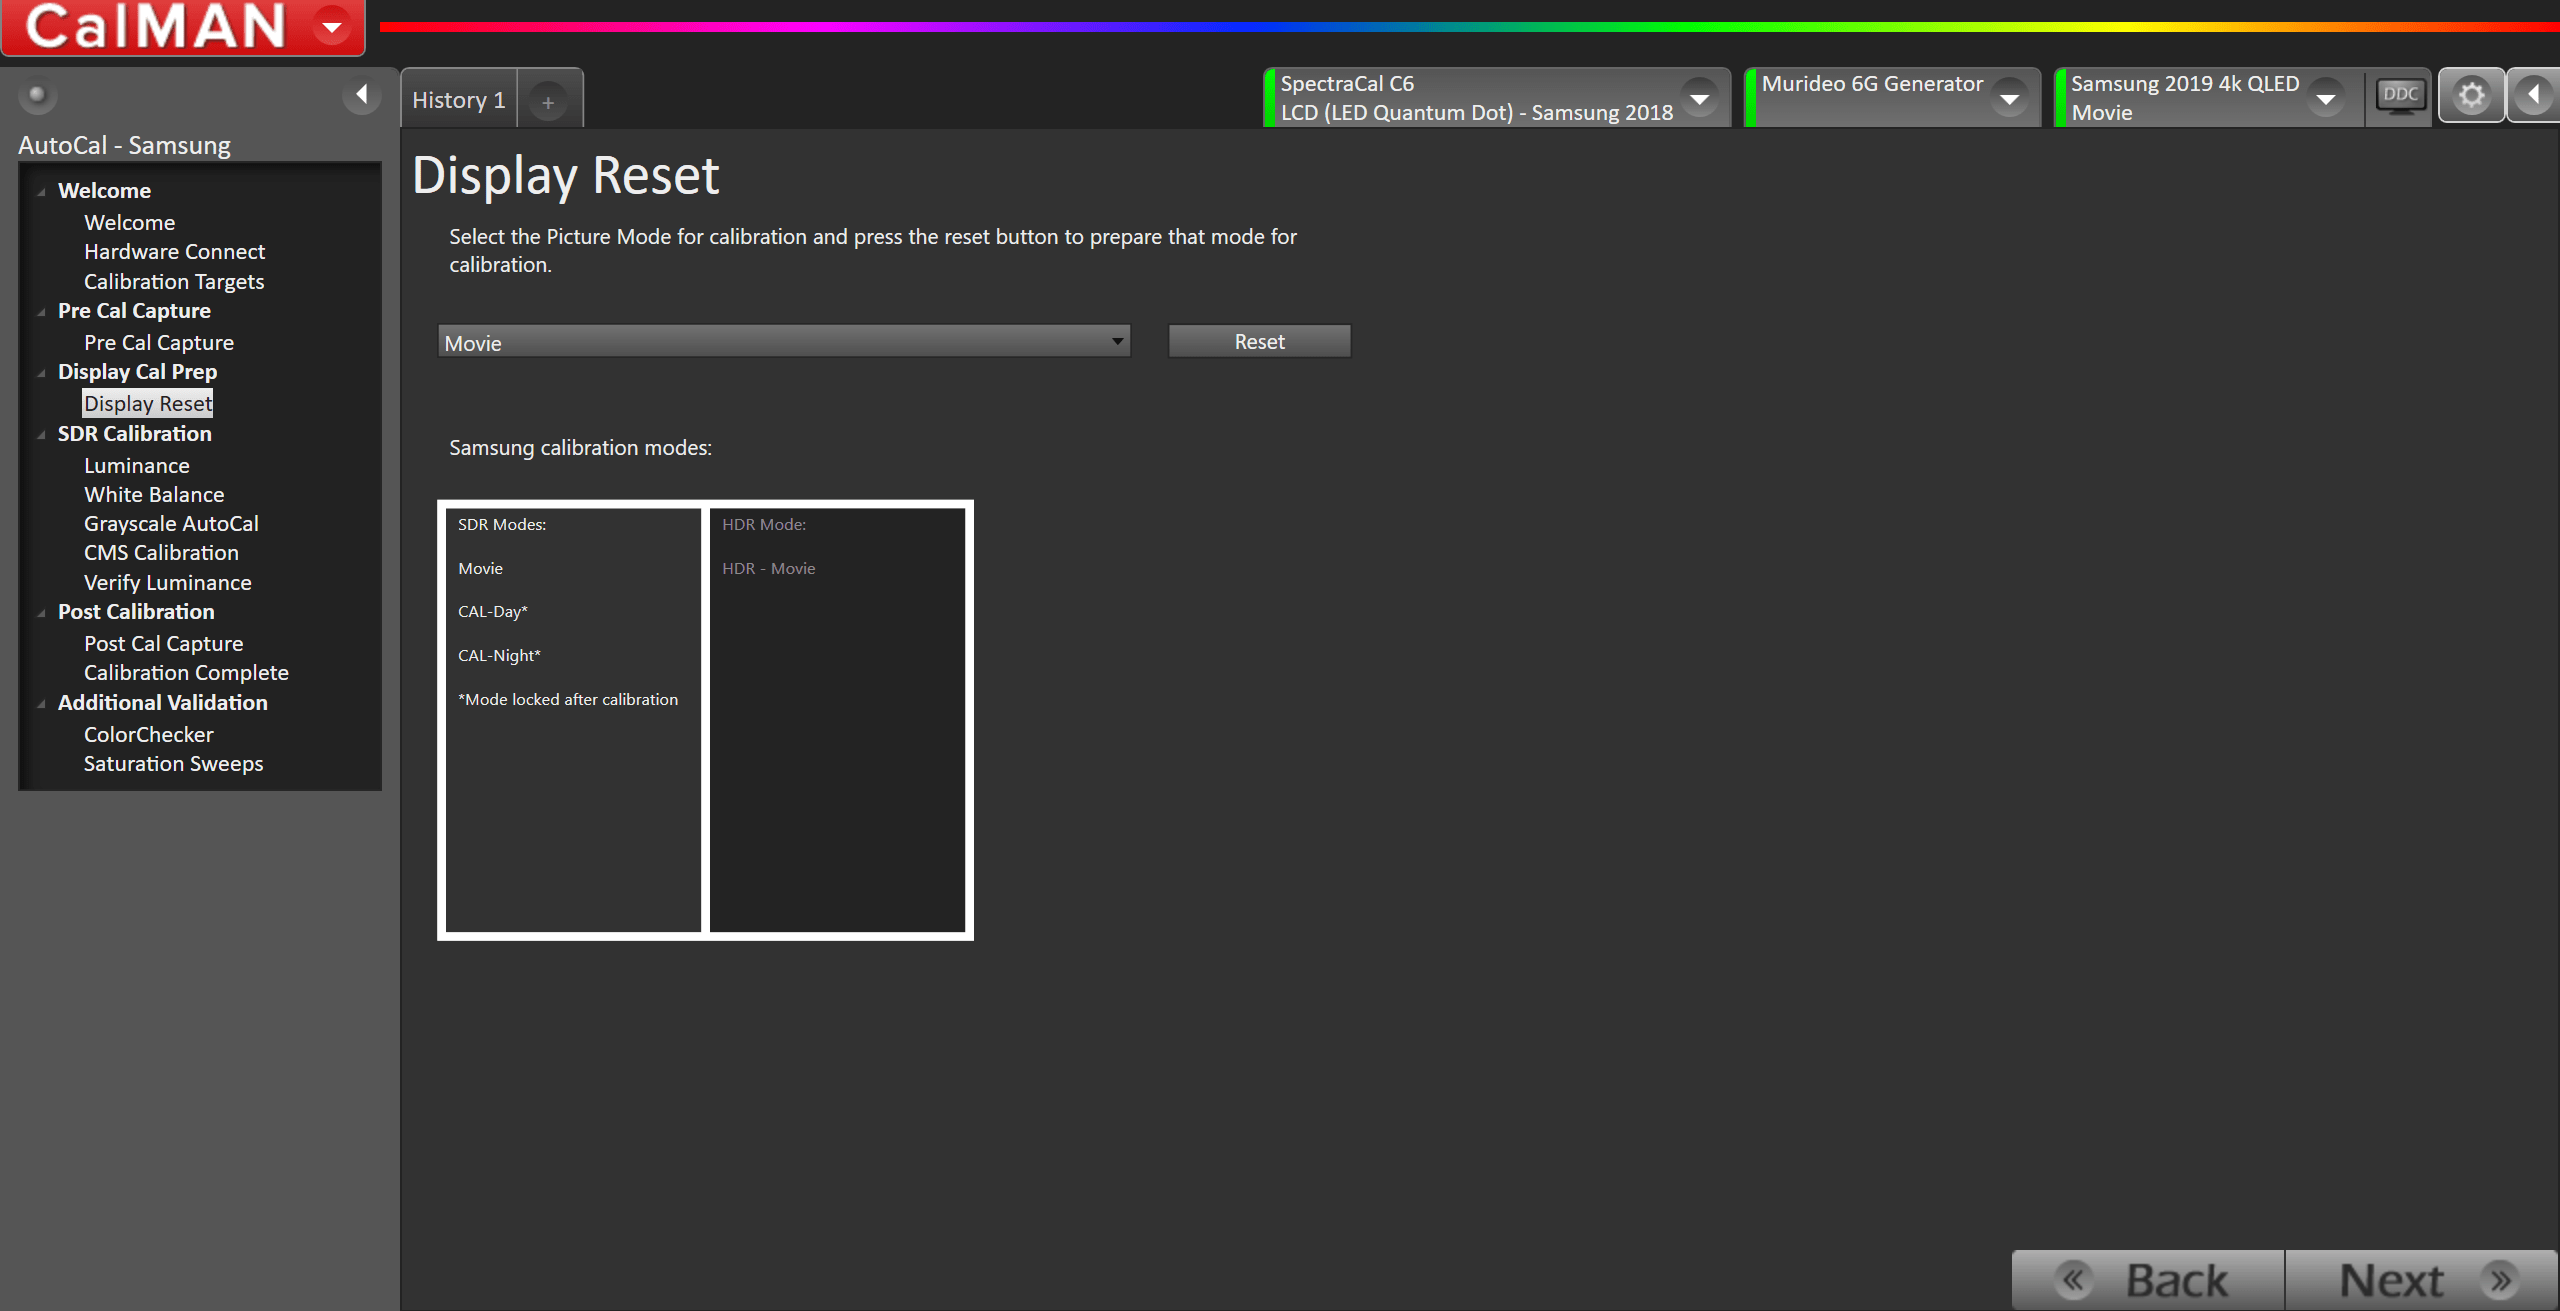
- Select your target picture mode
- Options are
- Movie
- CAL-Day*
- CAL-Night*
- *Mode settings locked after calibration
- Options are
- Press Full DDC Reset
- This will configure several of the TV settings to the ideal values.
- NOTE: Via your TV settings, confirm that your CMS Adjustment Point is set to 100%(Settings -> Picture -> Expert Settings -> ColorSpace Settings (Custom) -> Color Adjustment Point)
- This item will be greyed out on some models.
Step 5
In this step, you will be able to adjust the Luminance of your display to match your desired target. Luminance is a subjective target. SDR reference luminance is 100cd/m2, but you may need to target higher to account for the ambient light in your environment.
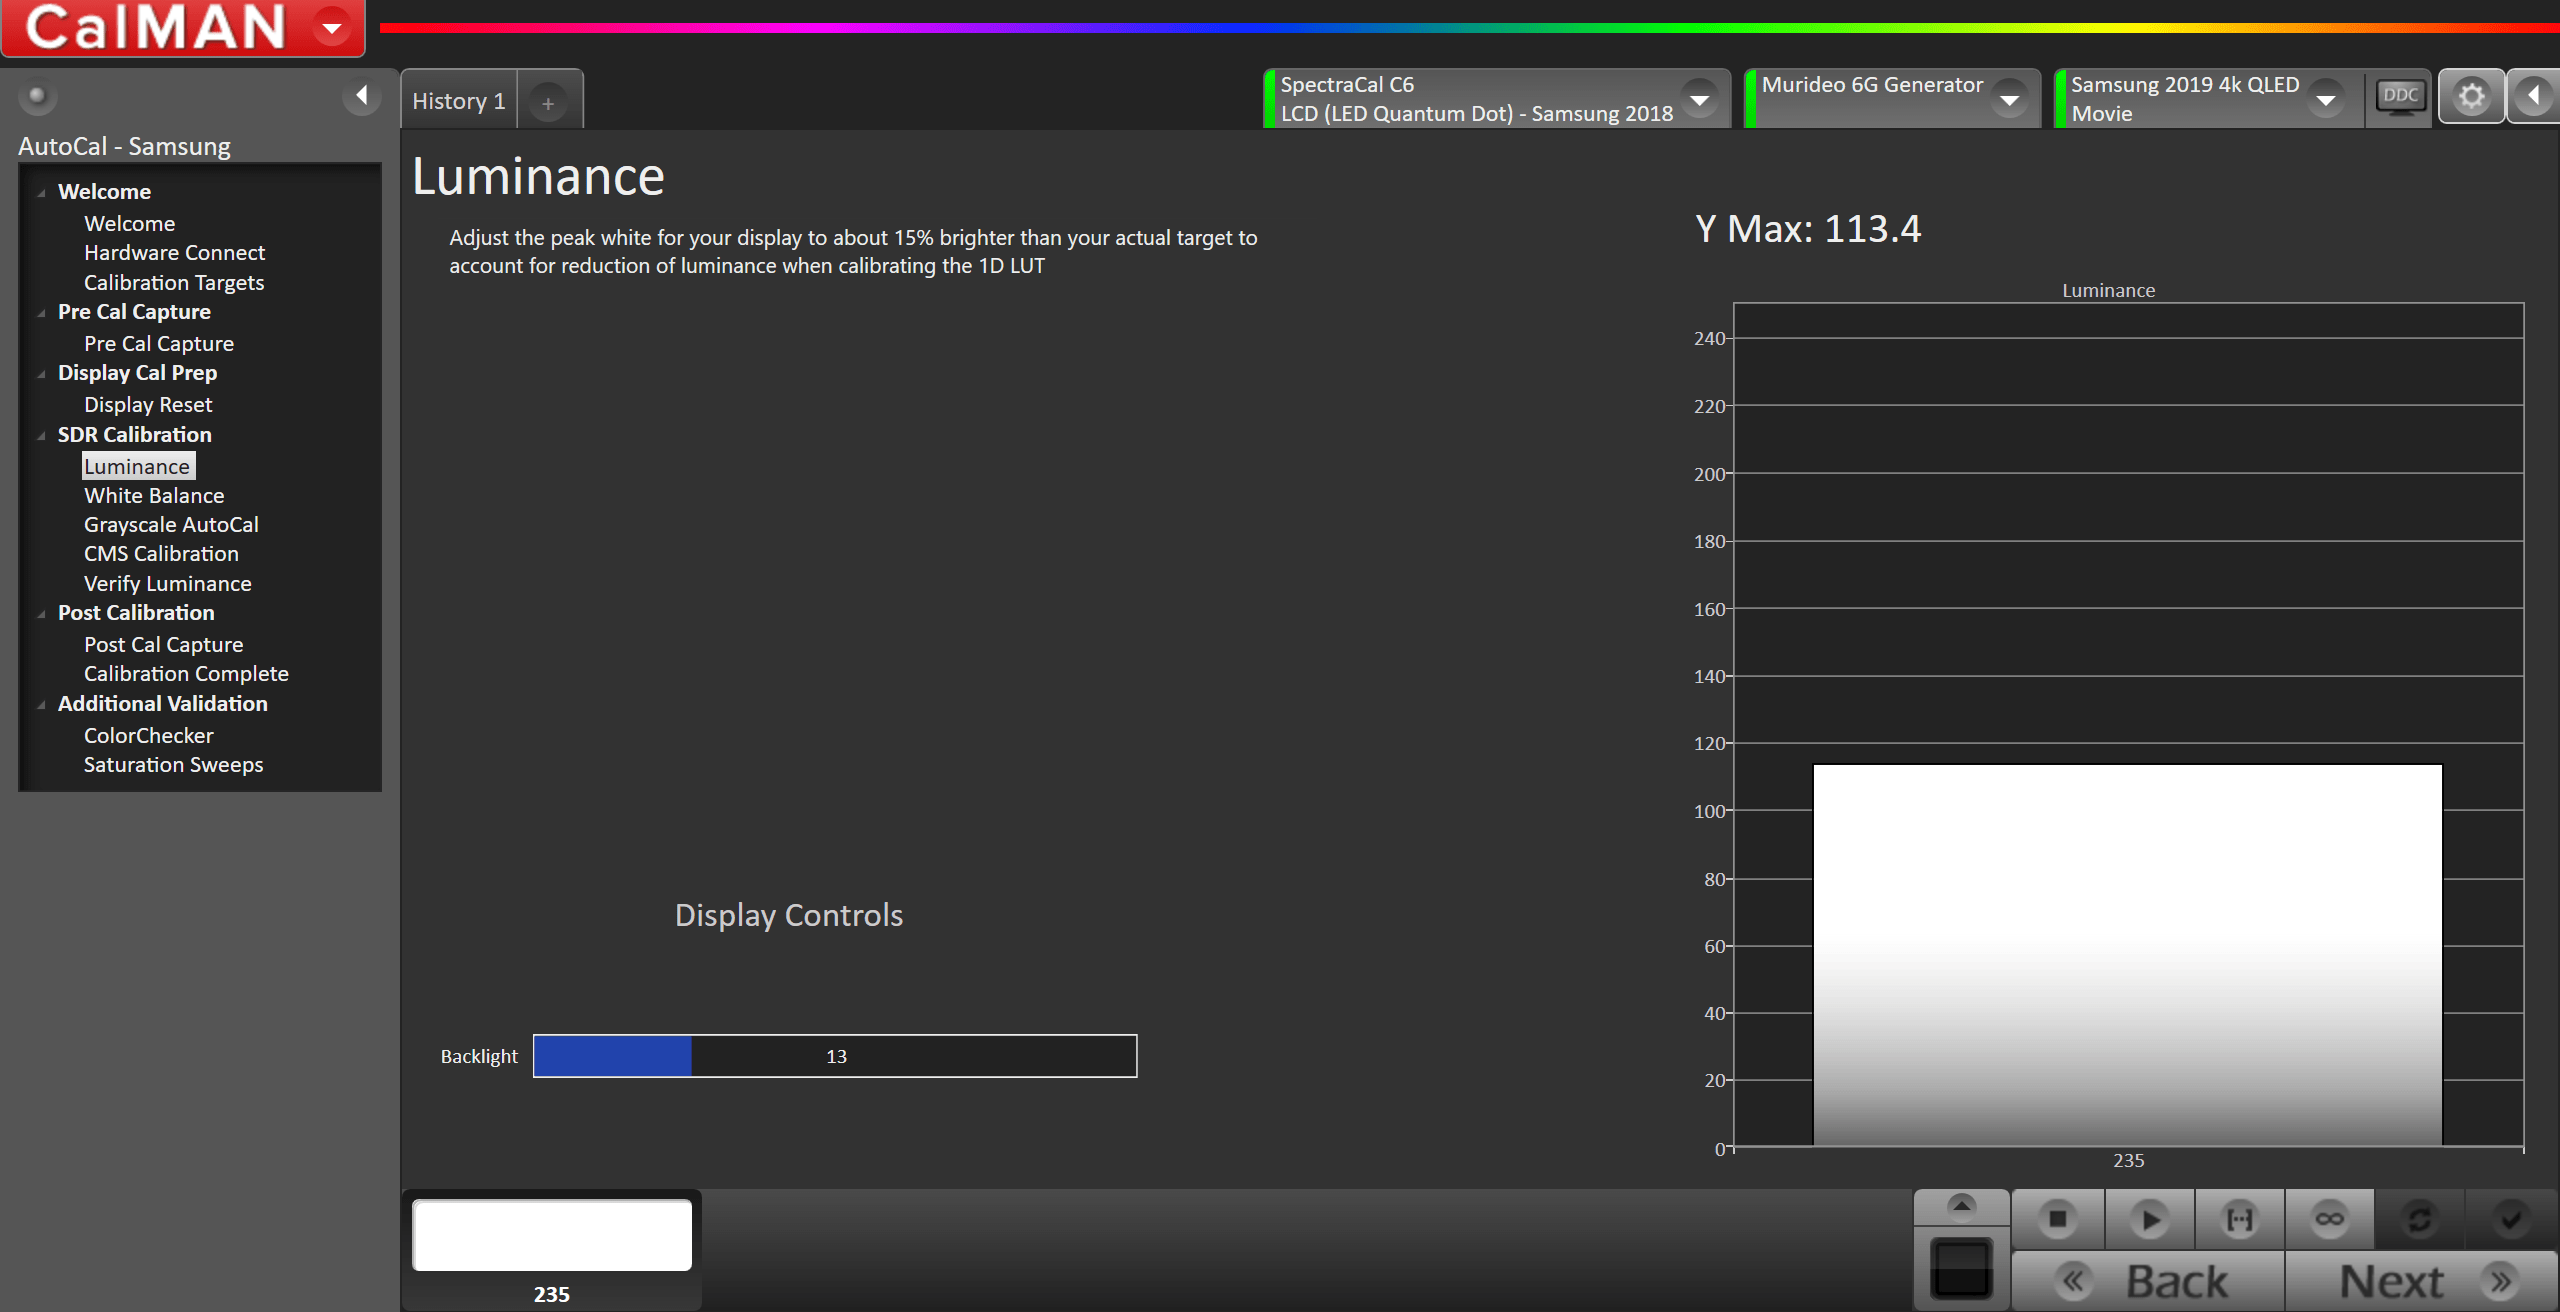
- Click the Measure Luminance button to measure your TV’s light output at 100% white and adjust the display’s peak white to the desired luminance.
- Luminance is a subjective target. SDR reference luminance is 100nits, but you may need to target higher to account for the ambient light in your environment.
- Adjust your TV’s backlight control so your TV is about 15% brighter than your final target to account for a reduction in luminance when calibrating the 1D LUT in the next step
- Press Stop when luminance adjustment is complete
Step 6
On this page, Calman will adjust your display’s White Balance
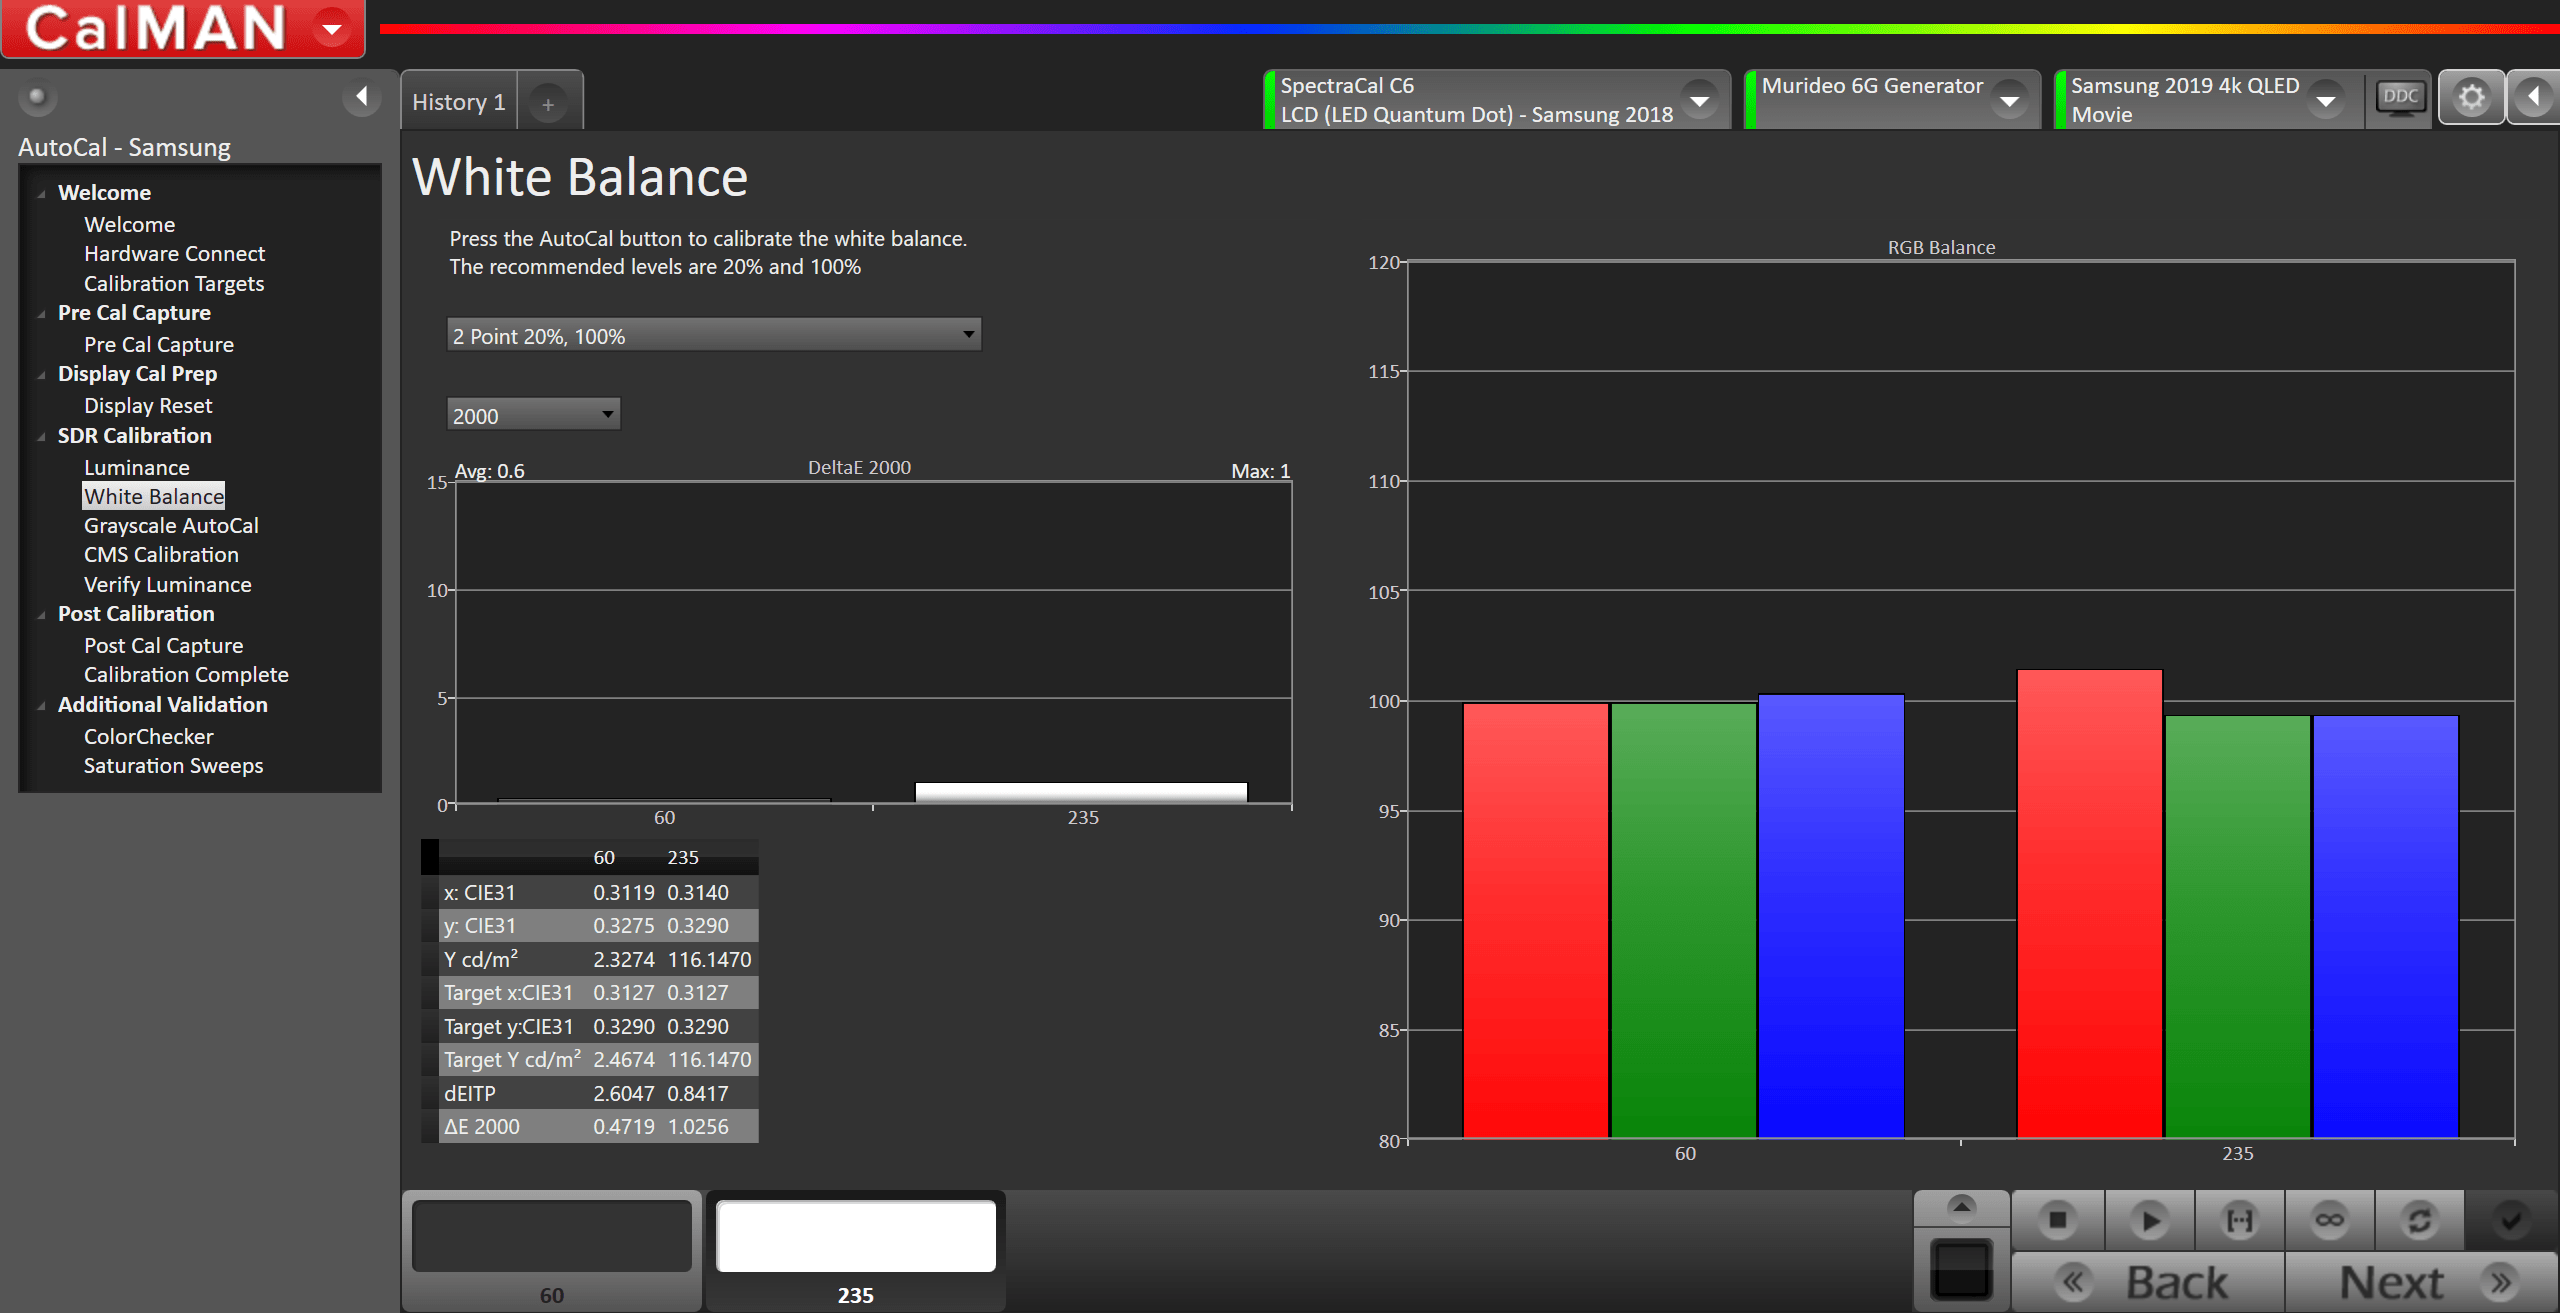
- Click the AutoCal button to perform the 2pt greyscale AutoCal
Step 7
Here Calman will adjust the Multipoint Greyscale of your display.
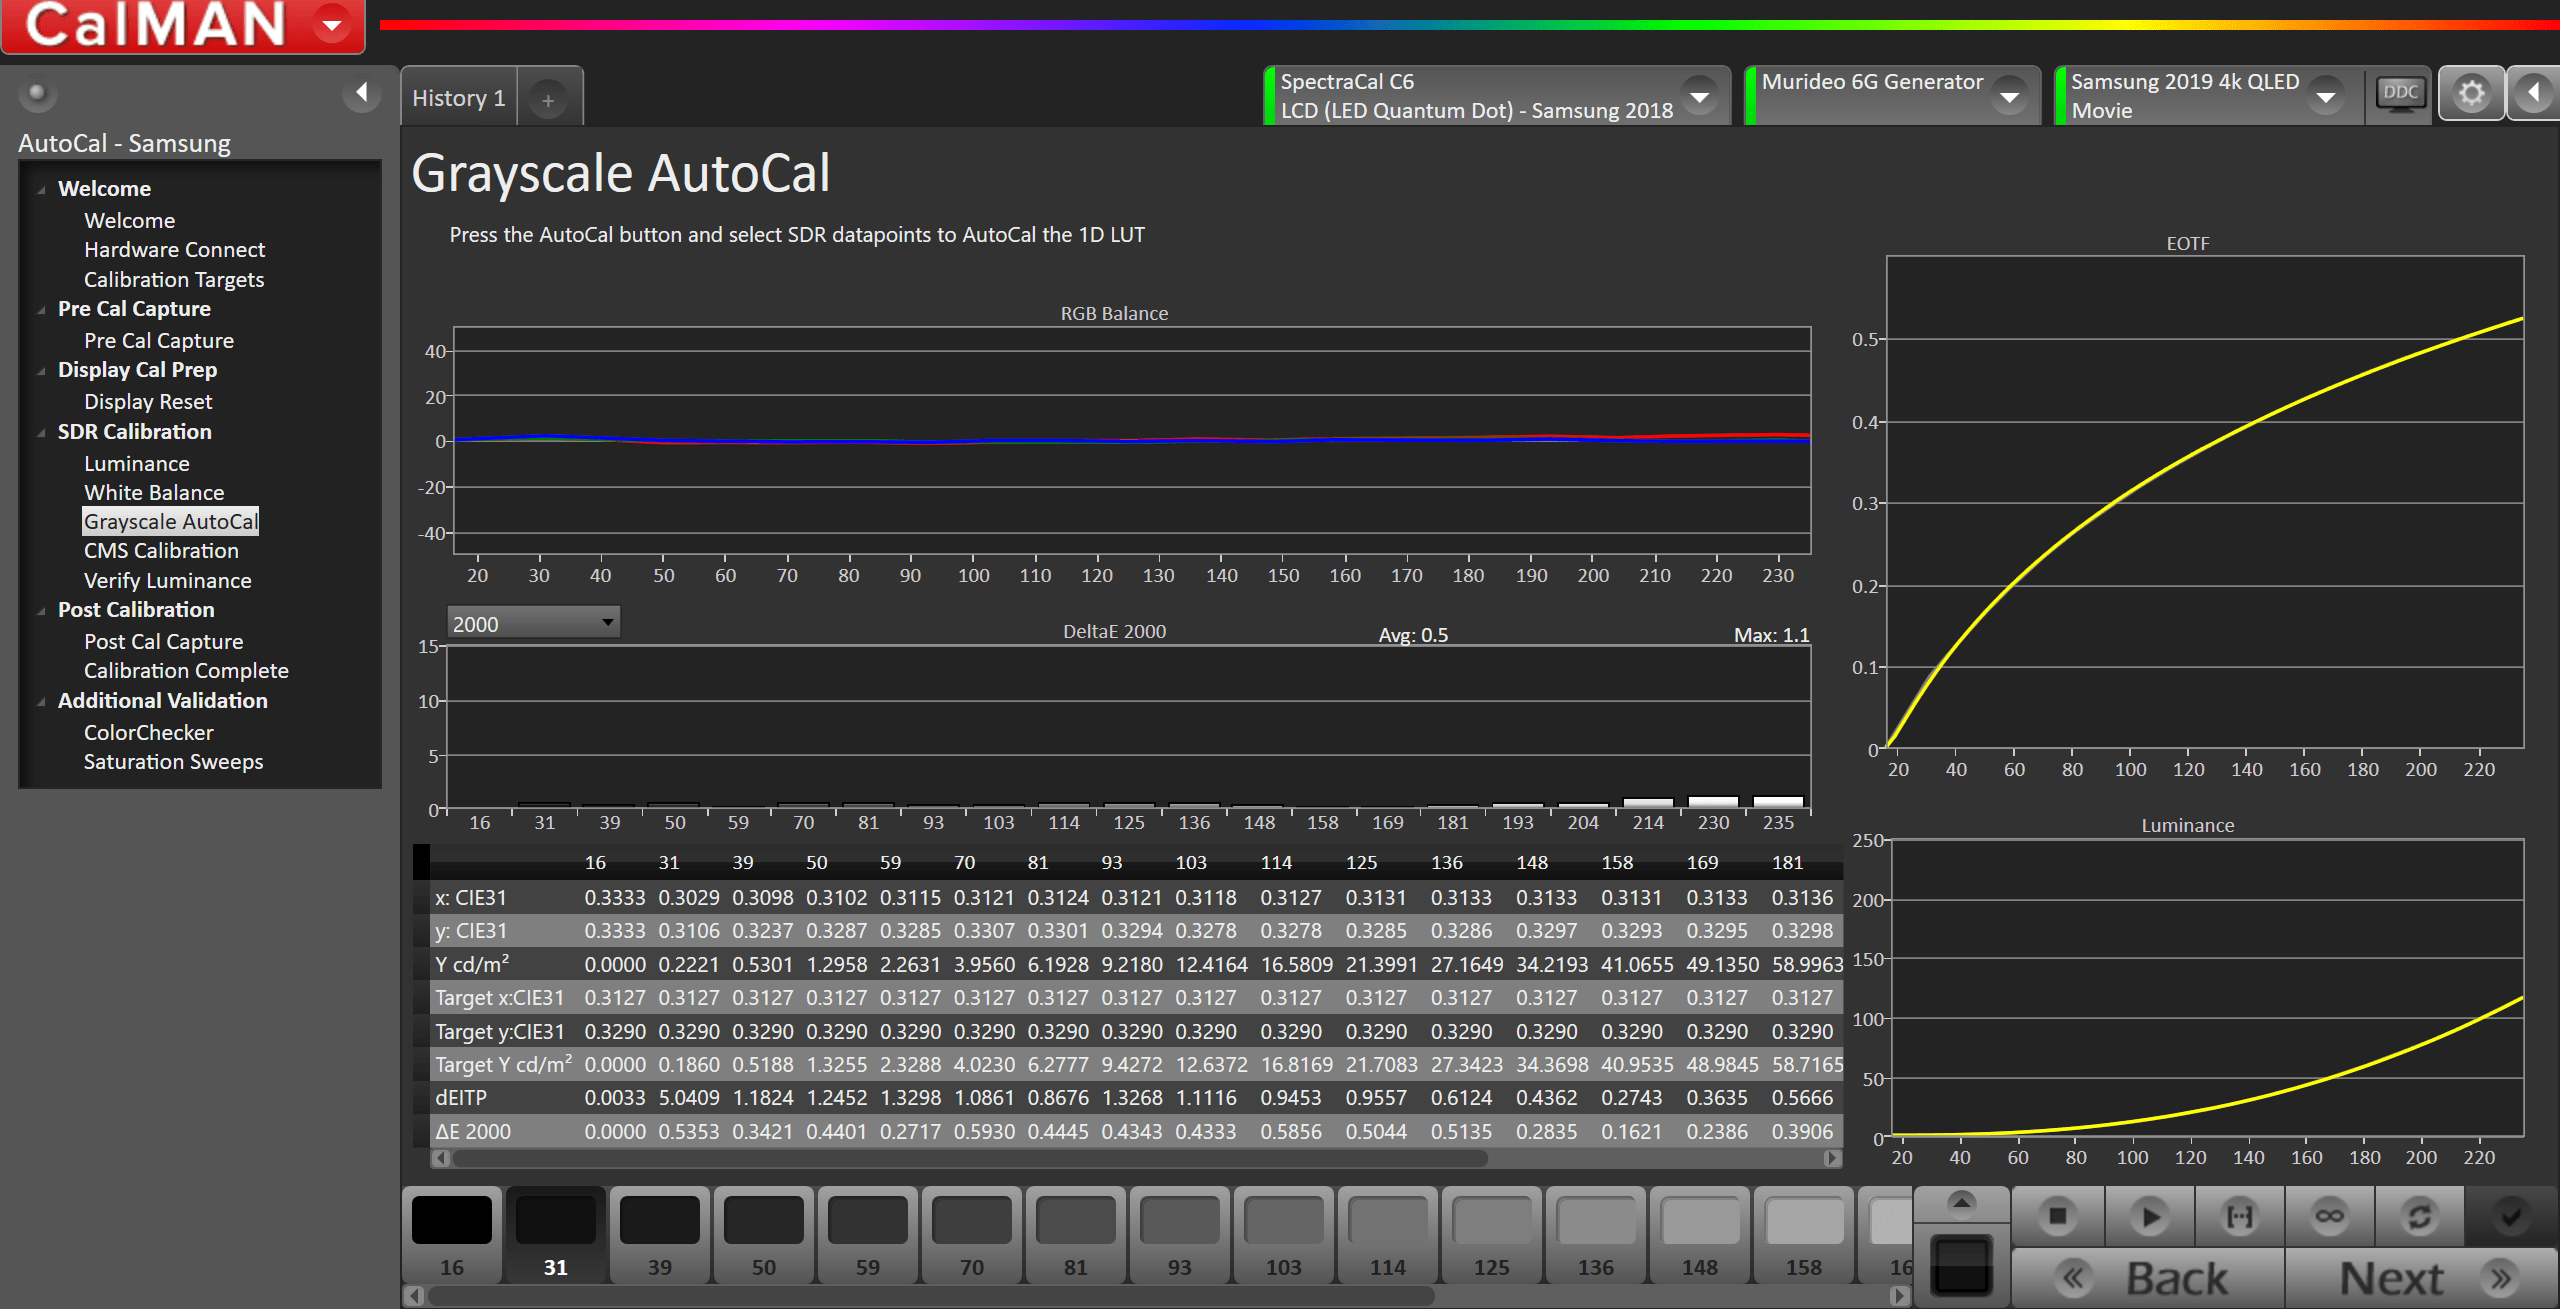
- Press the AutoCal button and select the SDR greyscale points on the AutoCal dialog
Step 8
On this page, Calman will adjust the Colorspace/CMS controls on your display

- Press the AutoCal button to open AutoCal dialog
- All options are preconfigured
- Click OK to begin colorspace AutoCal process
Step 9
Post-calibration readings to document the post-calibration condition of the display.
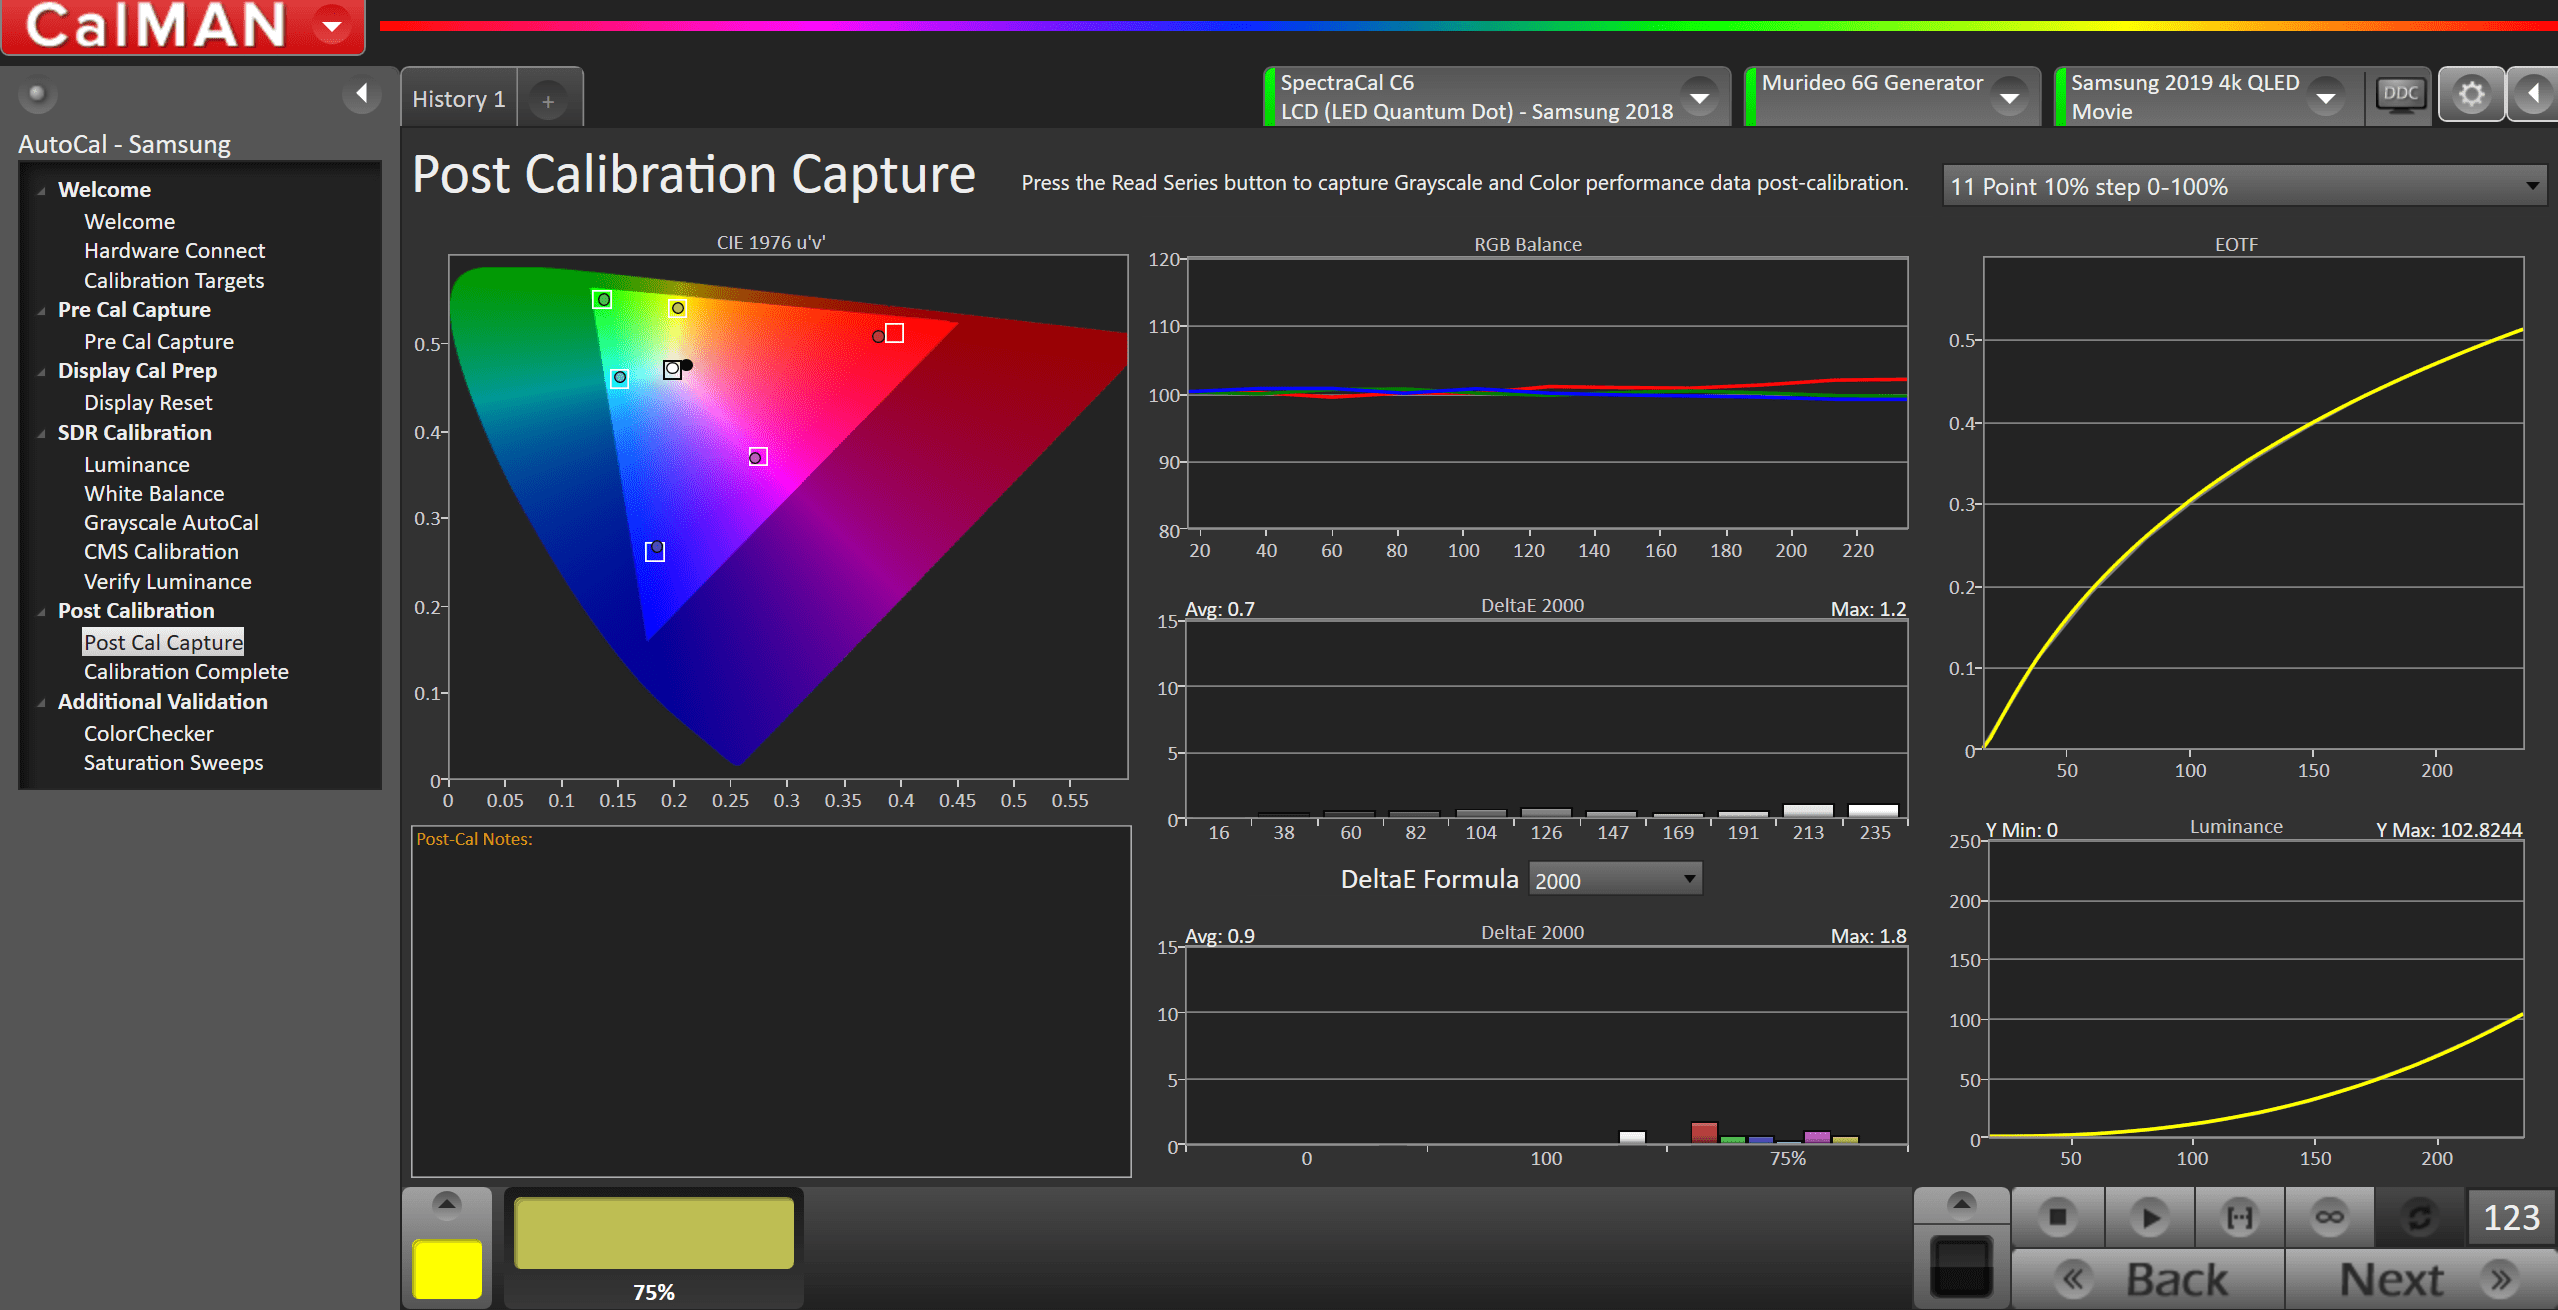
- Click the Read Series […] button
SDR Calibration is now complete
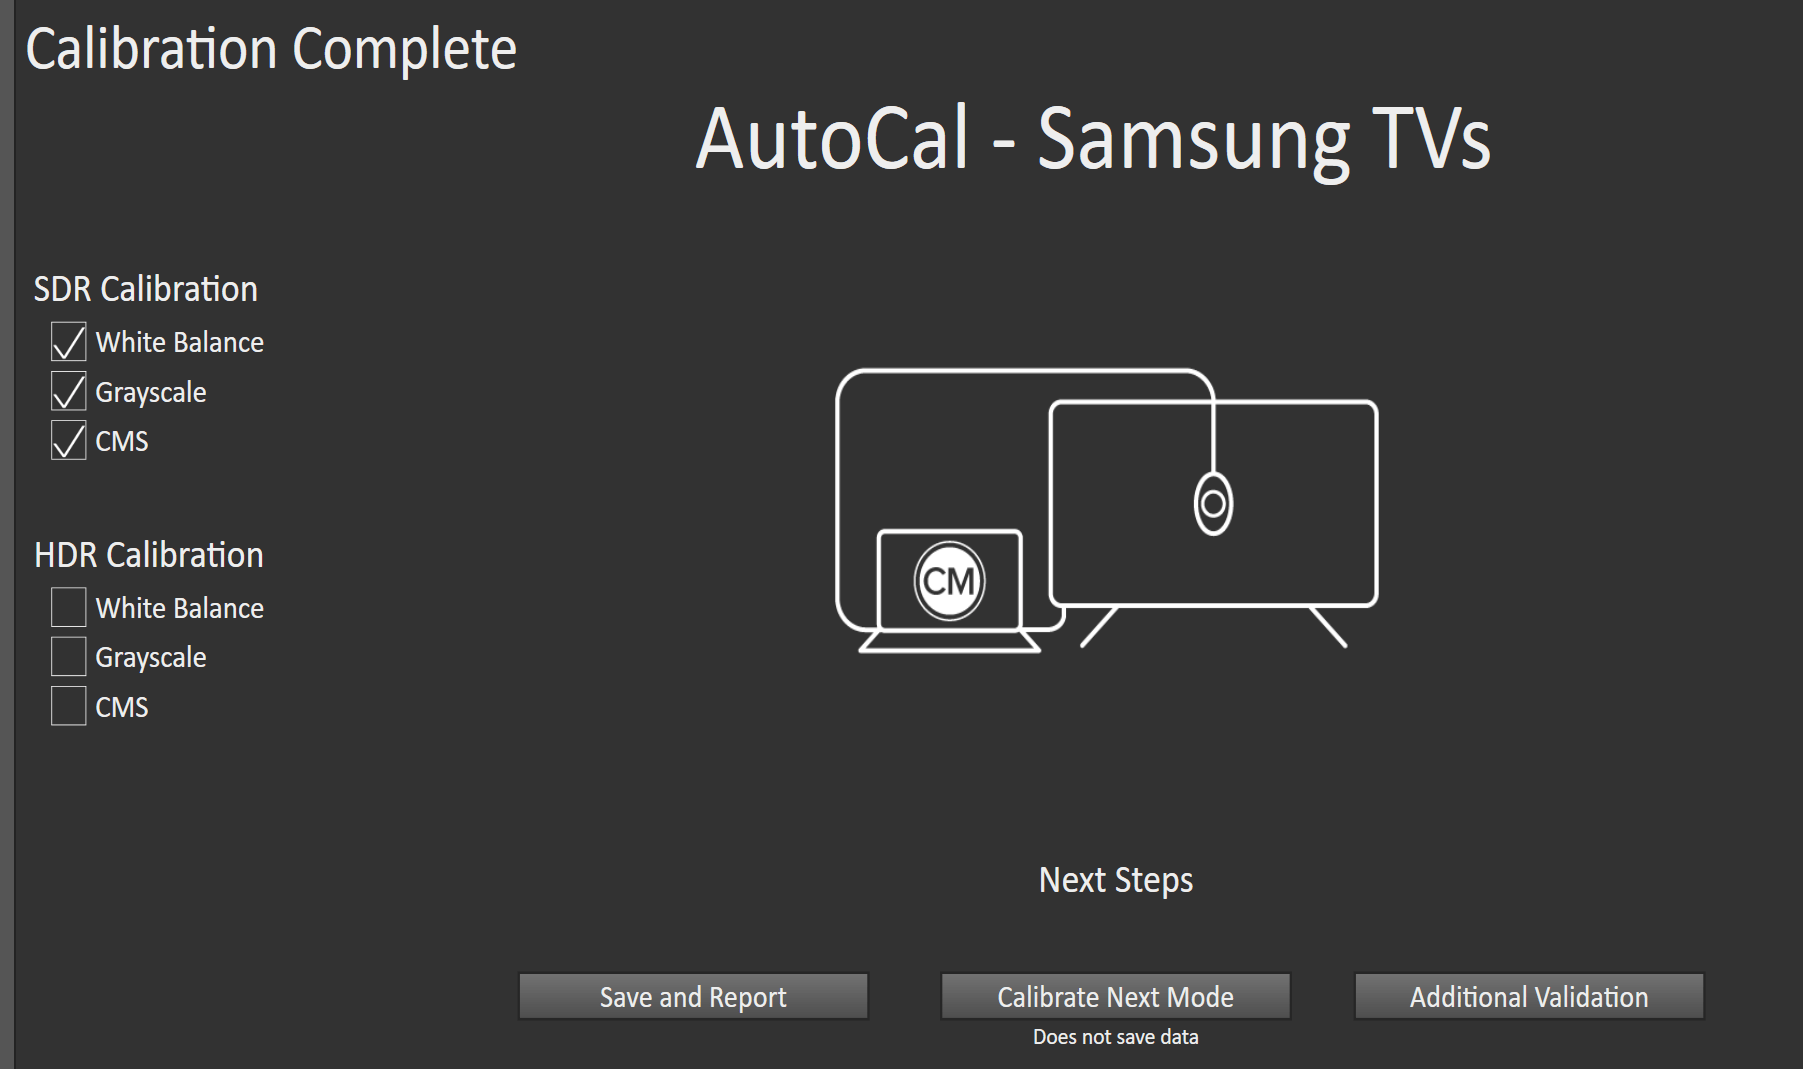
- Save and Report
- Saves current session, and opens AutoCal Report
- Calibrate Next Mode
- Clears data and allows you to return to the beginning of the workflow and calibrate a new mode
- Additional Validation
- Allows additional validation with ColorChecker and Saturation Sweeps.
- Optional
HDR Calibration
Step 1
- From the Calman Menu in the top-left, choose Open Workflow Template -> Display Specific and then AutoCal – Samsung
- Select HDR Calibration to proceed down workflow steps for target colorspace
Connect your Colorimeter and Pattern Generator to Calman.
- Plug your meter into a USB port on the computer and press the Find Meter button on the left
- When your meter is connected, select your display type from the dropdown (this will vary by meter)
- QLED: Quantum Dot LCD (LCD (LED Quantum Dot) – Samsung 2019 for C6 Meter)
- When your meter is connected, select your display type from the dropdown (this will vary by meter)
- Connect Pattern Source to your computer.
- Click the Find Source button then select your source
- Configure Pattern Generator
- Pattern Size
- Window 10%
- Pattern Delay
- 2 Seconds
- Pattern Size
Connect to your Samsung TV for calibration
- Connect an ExLink adapter (3.5mm headphone jack to DB9 serial cable) between the 3.5mm jack on the side of the Samsung OneConnect box labeled “External Sync” and an RS232 port on your PC or to a USB to serial converter.
- If you are using a USB to serial converter, in Windows Device Manager, under “Ports (COM & LPT),” look for a “USB Serial Port (COMx)” listing.
- Note the listed COM port (COMx) of the serial converter.
- Click Find Display, select your model and COM port
Step 2
Confirm your calibration targets and prepare TV
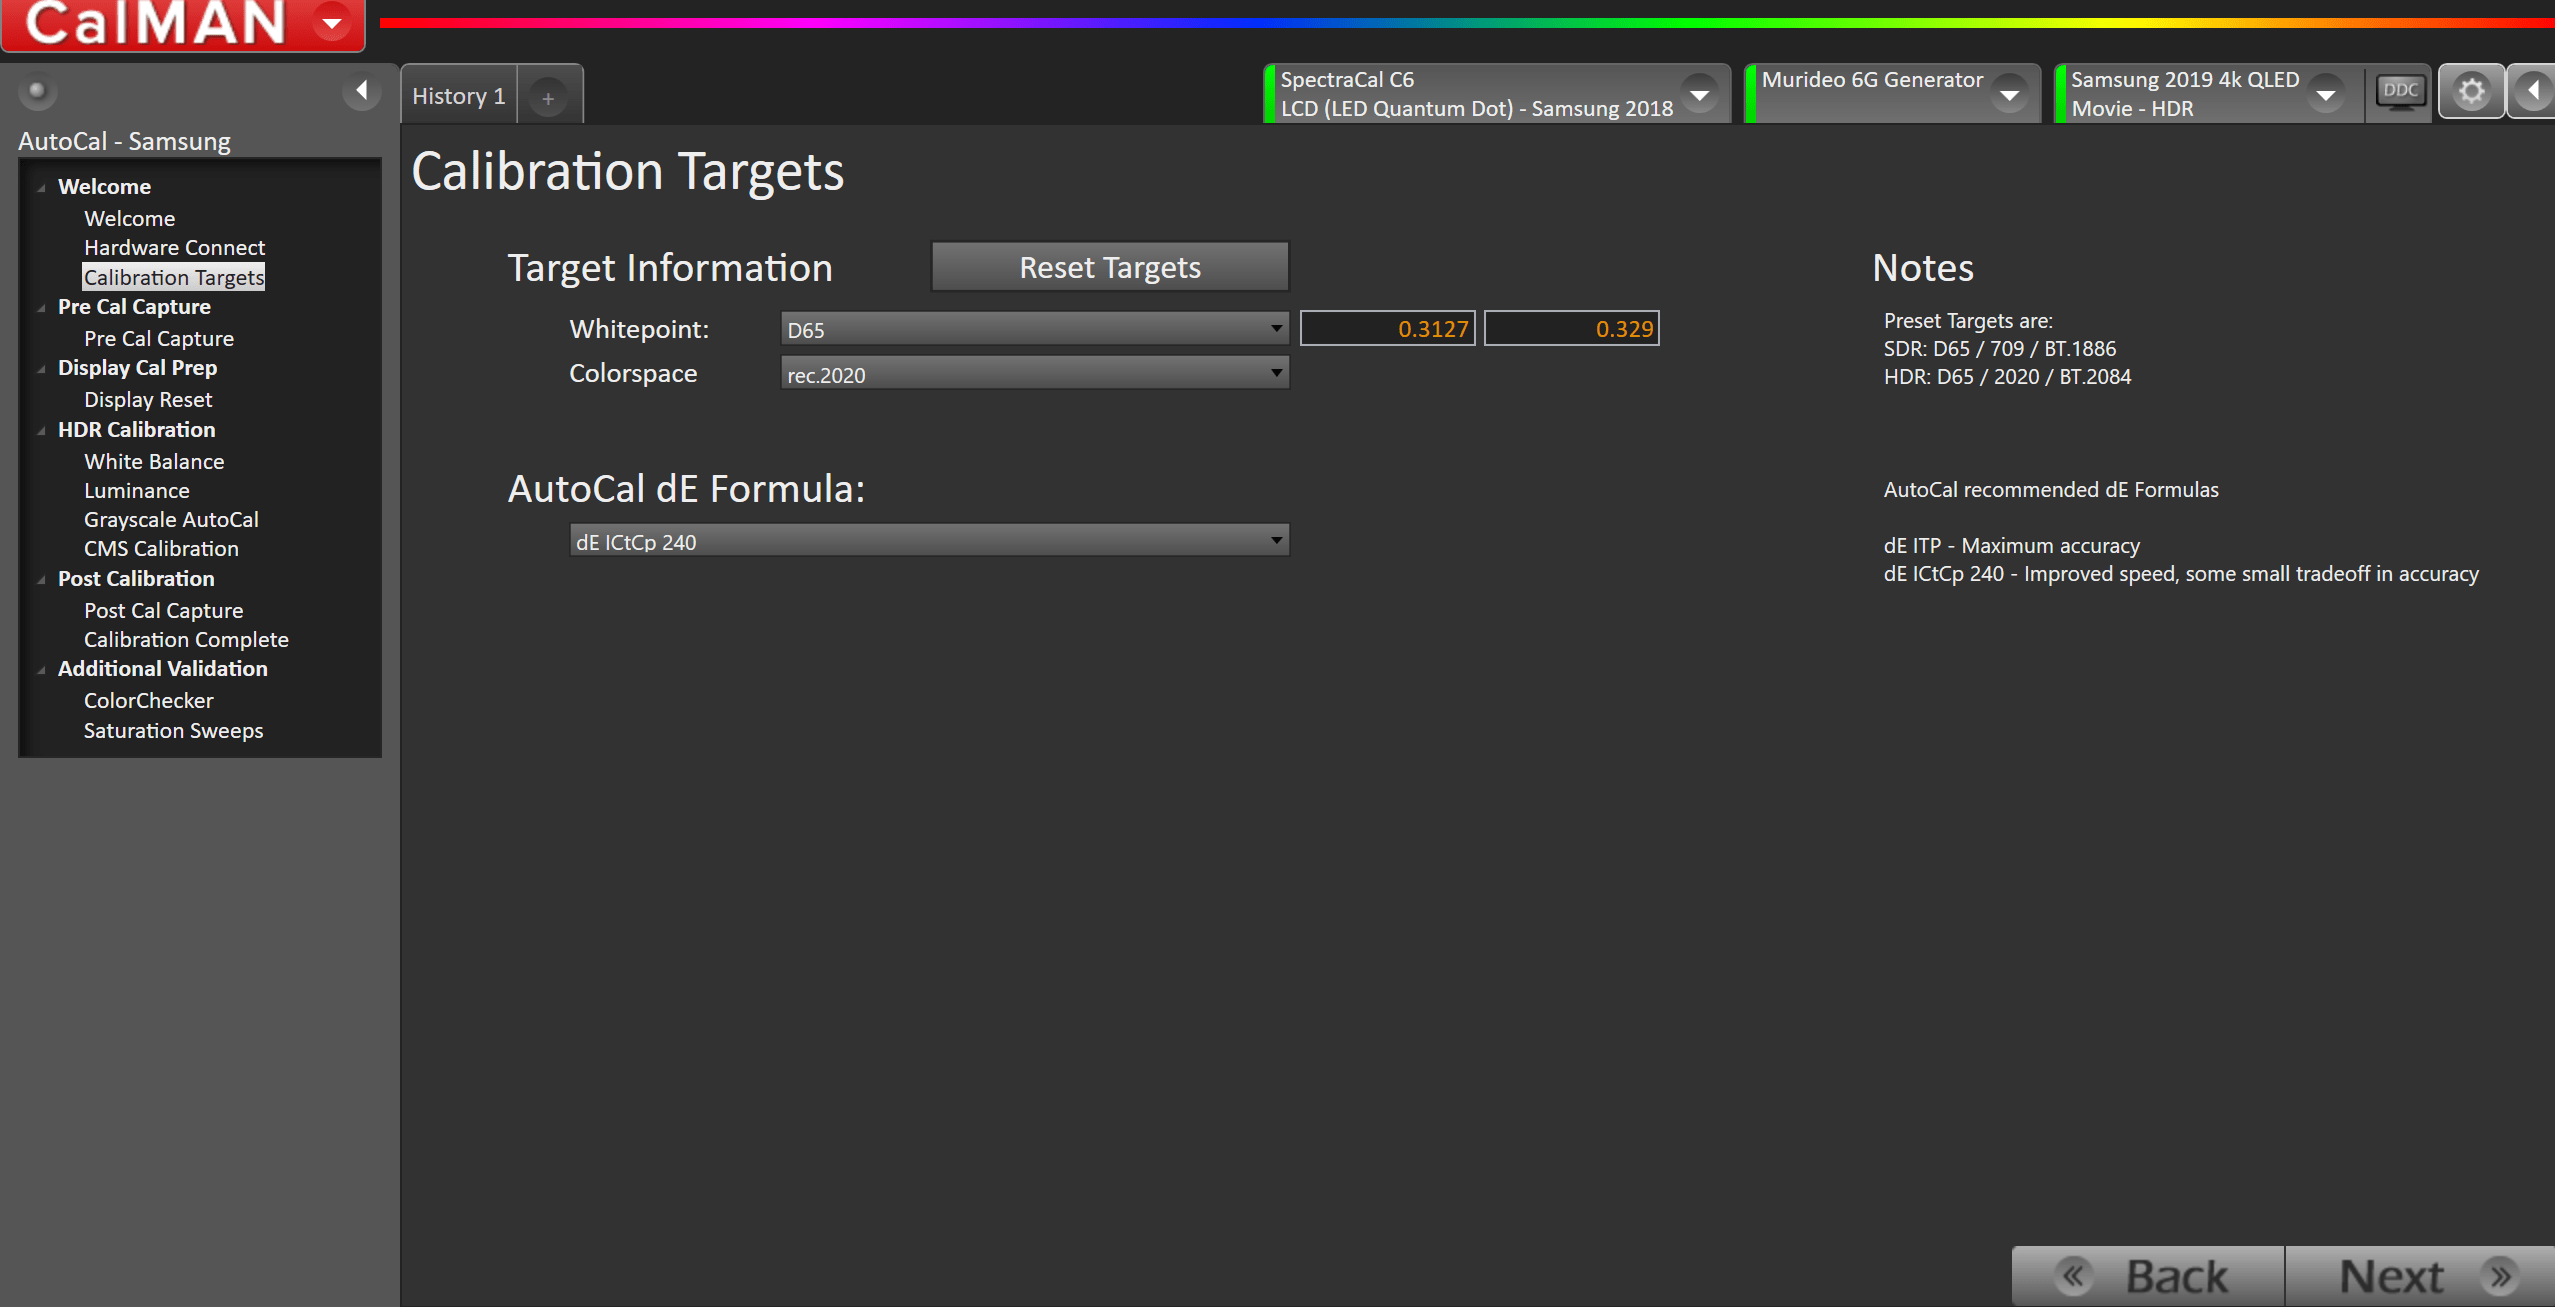
- Press Reset Targets
- For HDR, calibration targets should be:
- rec.2020
- D65
- ST.2084
- Hardware Options
- Pattern Size
- Window 10%
- Pattern Size
Step 3
In this step, you’ll take readings of your display before the calibration. These will be used to compare your calibration results
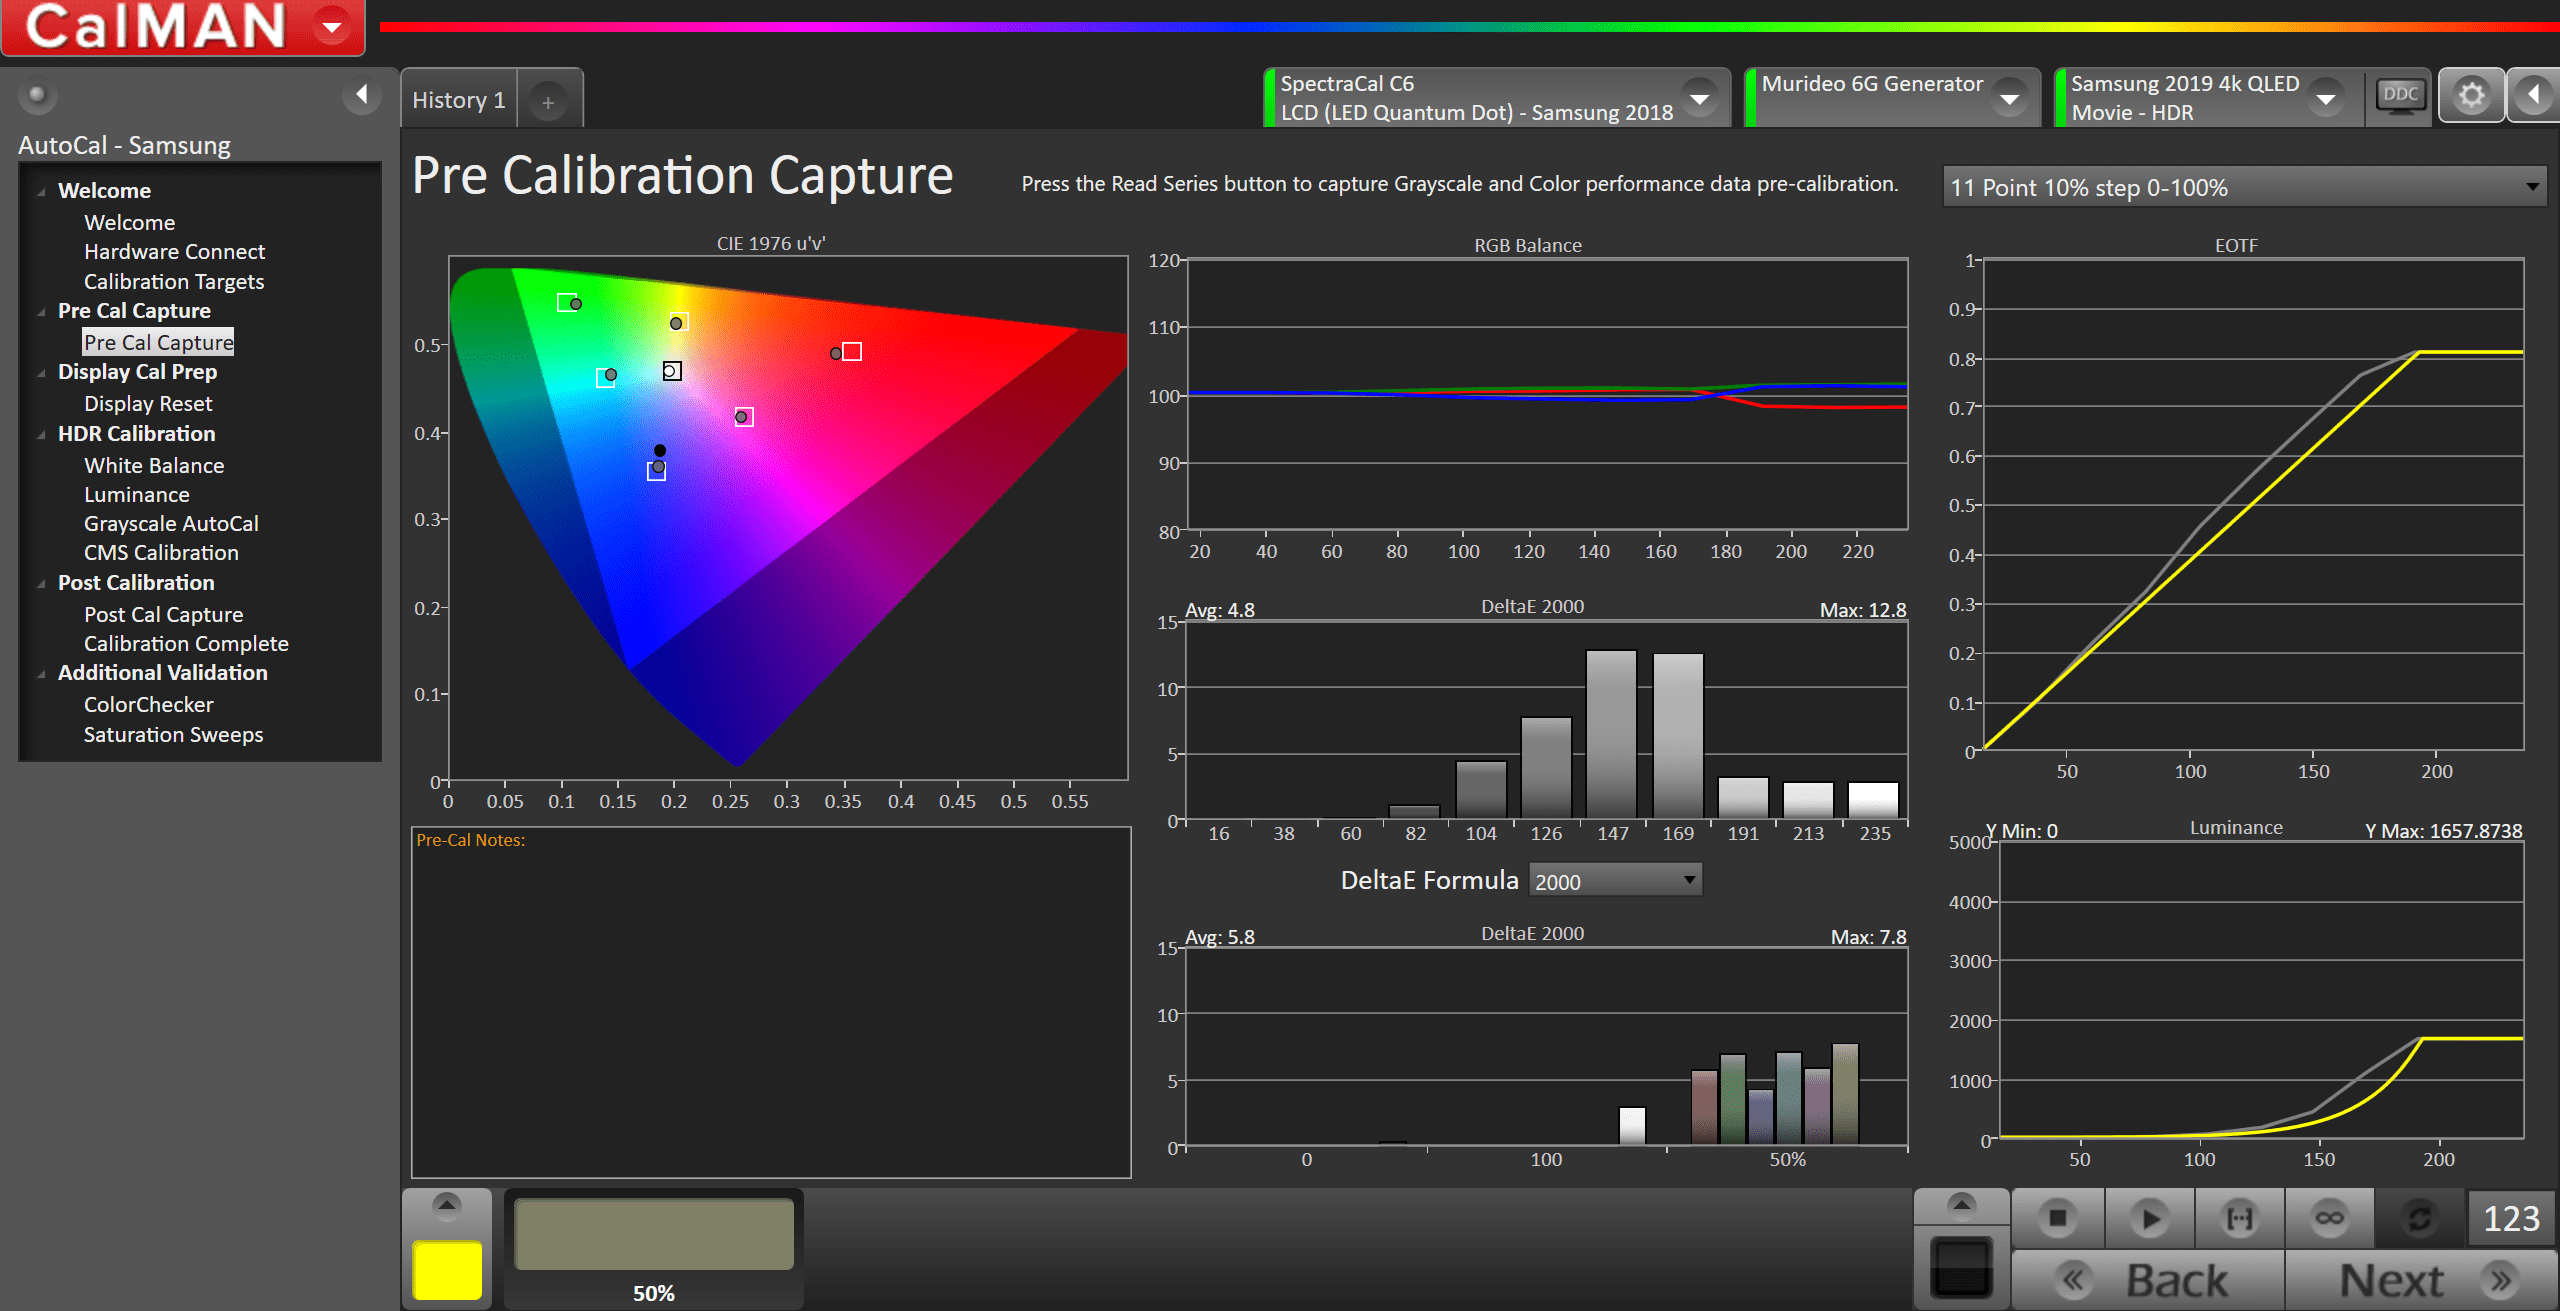
- To take Pre-Calibration Measurements click the Read Series […] button to measure the display’s grayscale and ColorChecker response
- This will provide a point of reference to compare your calibration results
Step 4
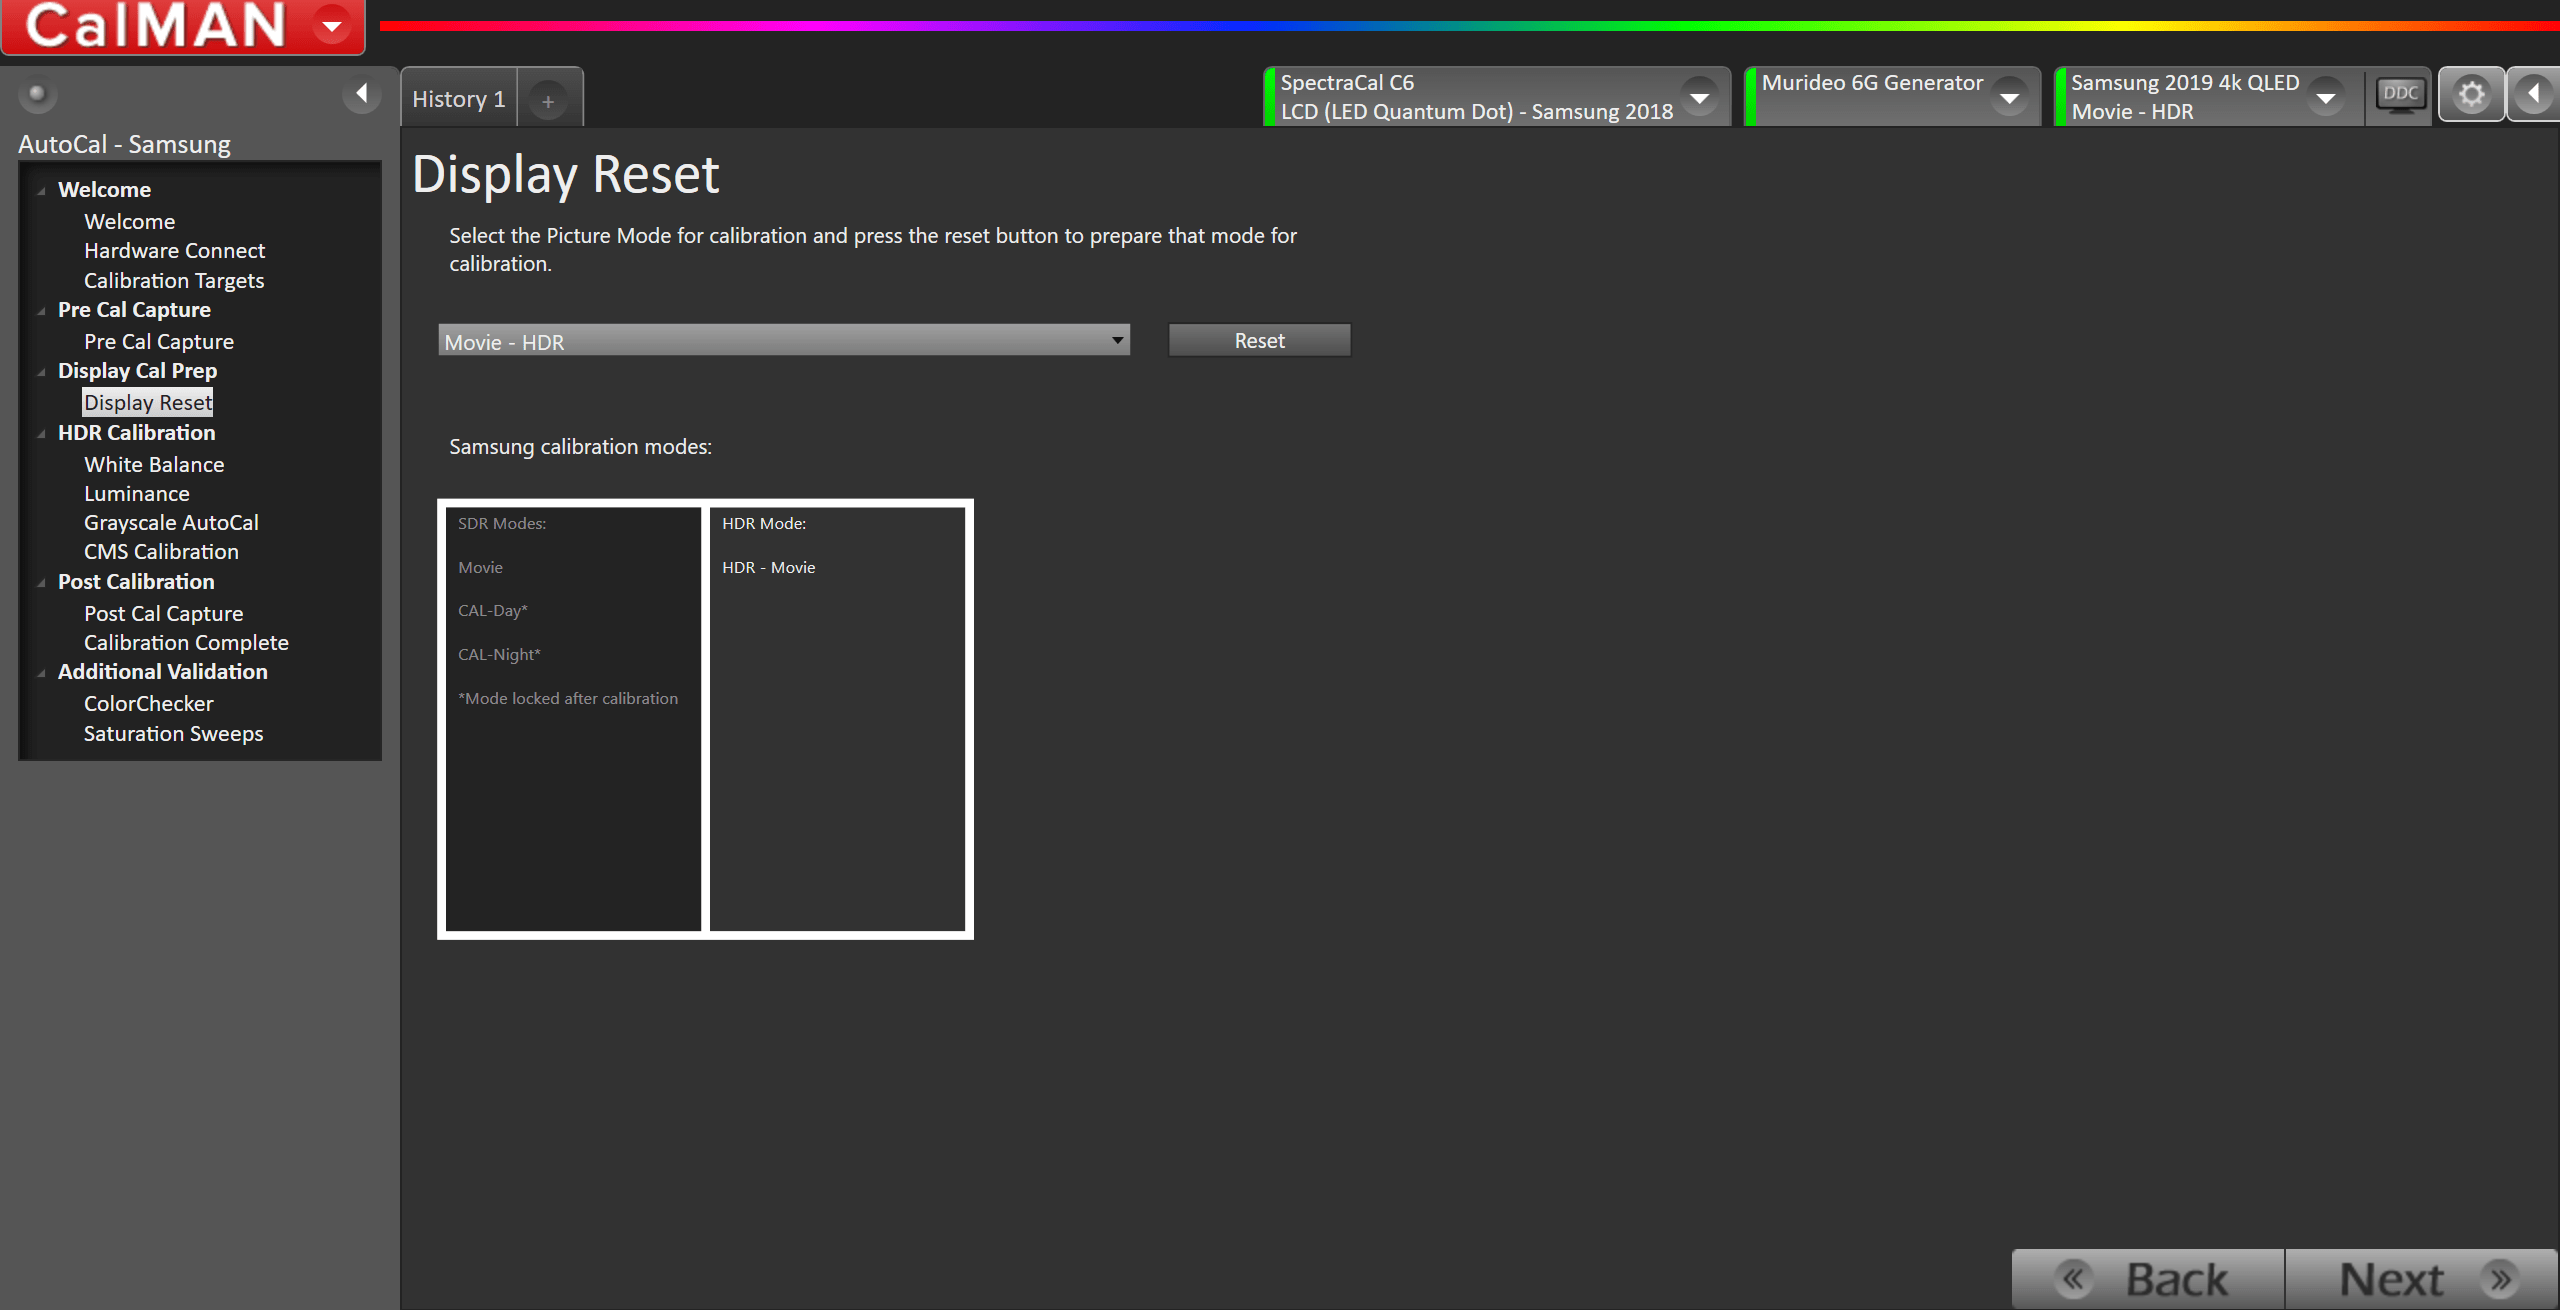
- Select your target Movie – HDR picture mode
- Press Full DDC Reset
- This will configure several of the TVs settings to the ideal values.
Step 5
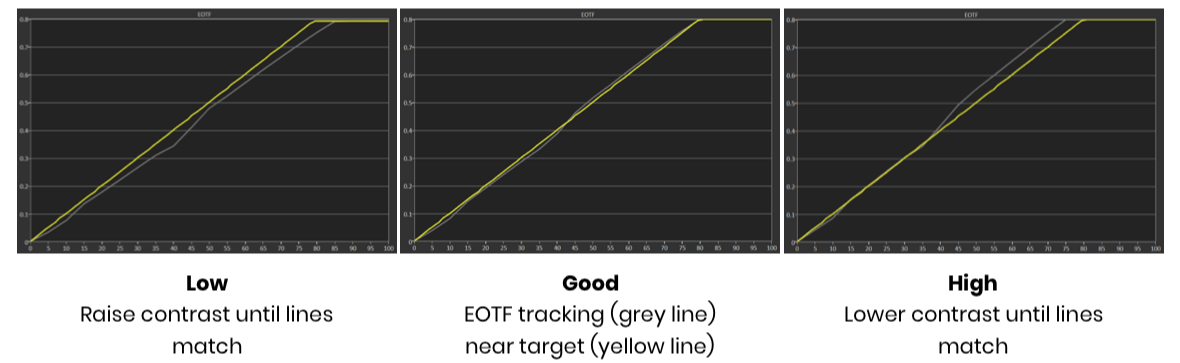
In this step, you will raise or lower the contrast to best match the EOTF. Depending on your Samsung model and physical size, you will have different maximum luminance capabilities. This variability will cause each individual unit to track along the EOTF slightly differently.
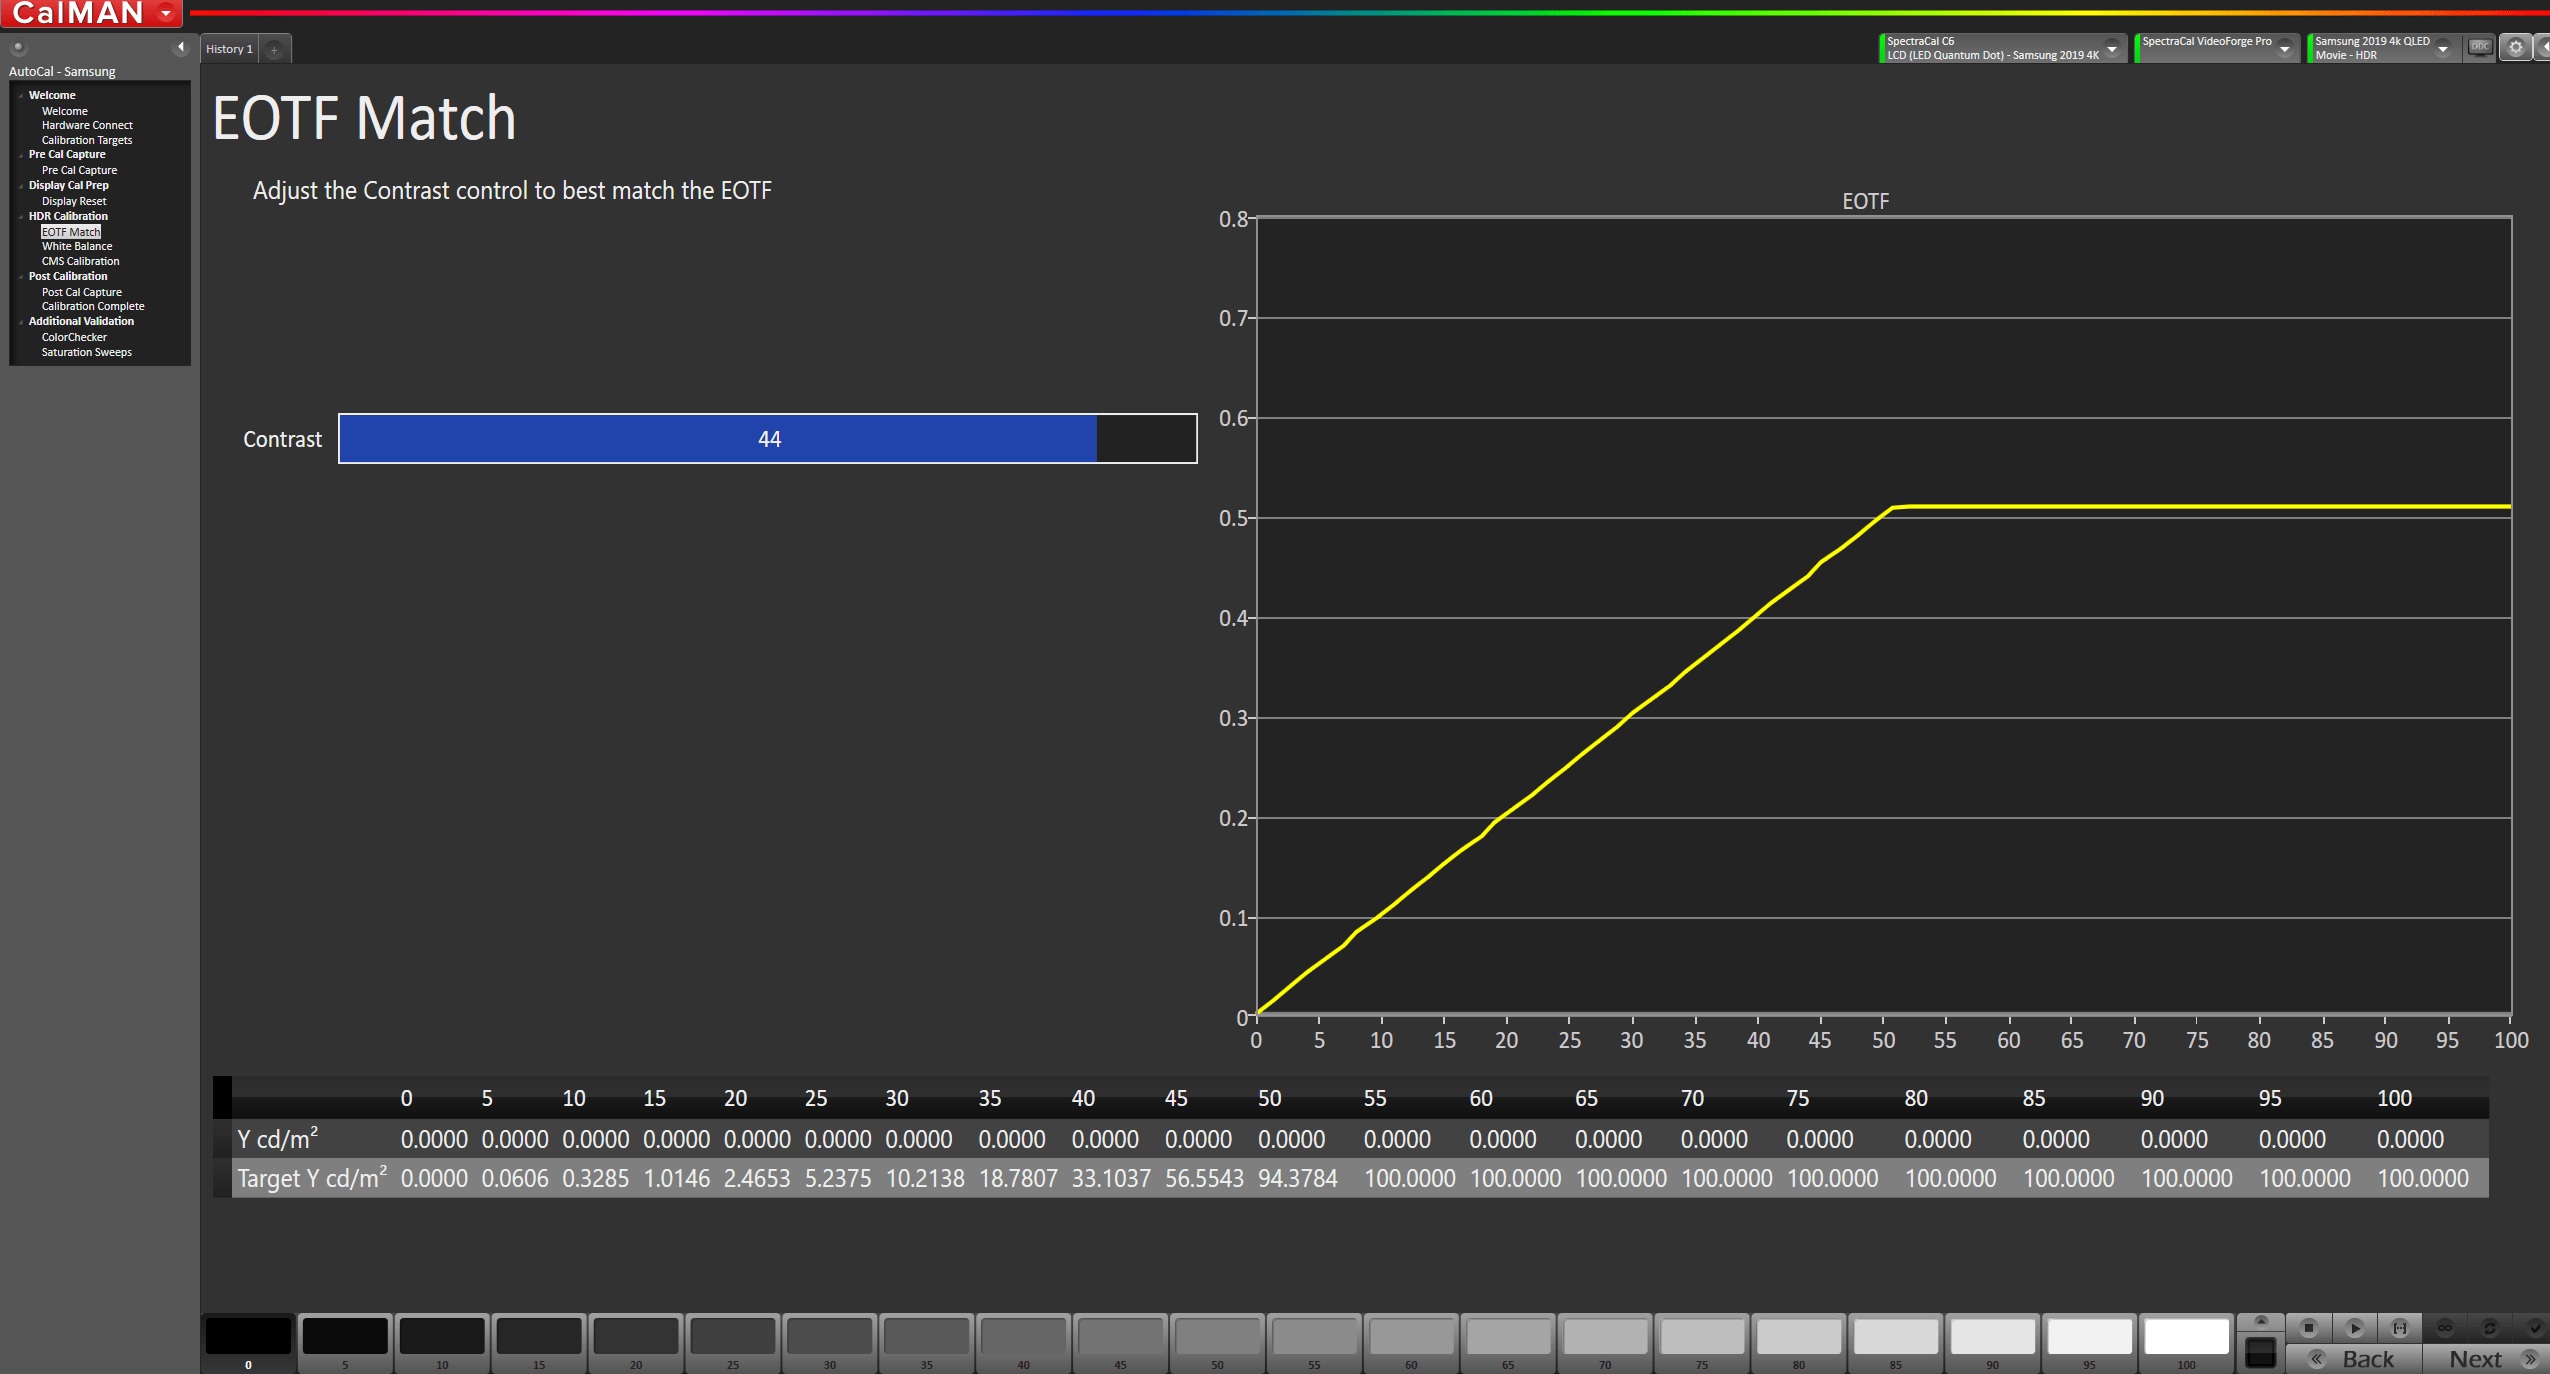
- First, press Read Series […] to take an initial reading of the EOTF
- If the EOTF is tracking above the yellow line, lower contrast until the lines best match.
- If the display is particularly bright (1800-2300nits), this value may need to be lowered to as much as 30-35
- If the EOTF is tracking below the yellow line, raise contrast until the lines best match.
- If the display has a lower peak luminance (450-700nits), this value may need to be raised to the maximum of 50
- If the EOTF is tracking above the yellow line, lower contrast until the lines best match.
- Once the best contrast is found, proceed to the next step
Step 6
On this page, Calman will adjust your display’s White Balance
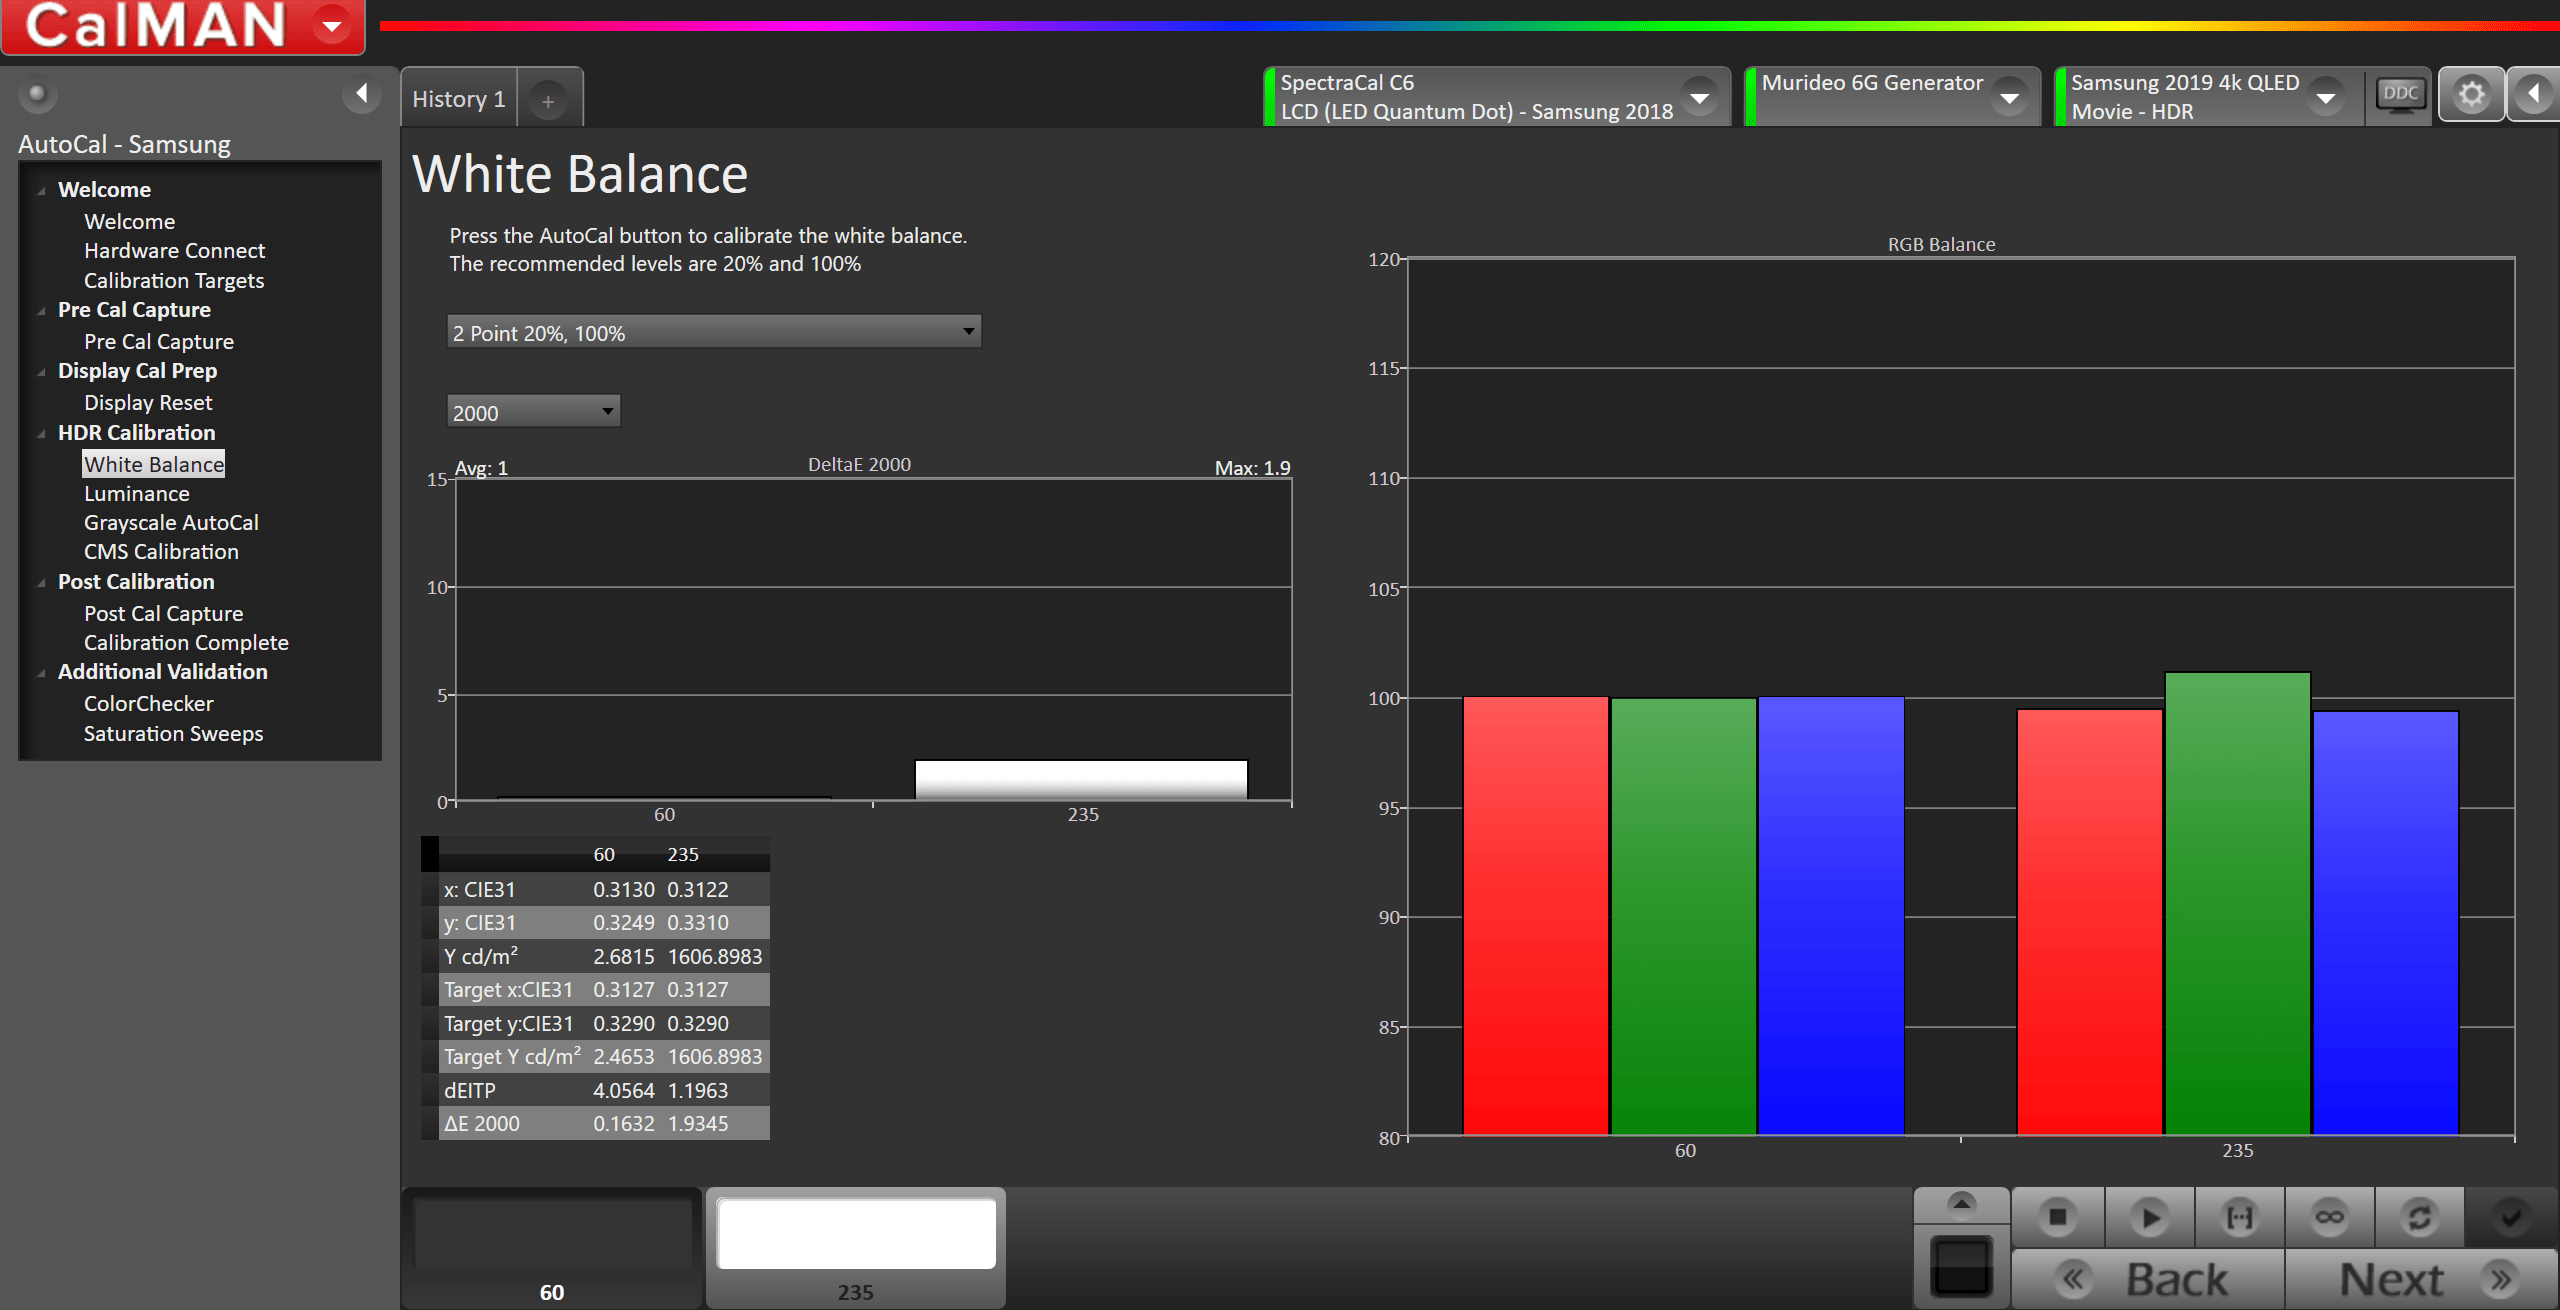
- Click the AutoCal button to perform the 2pt greyscale AutoCal
Greyscale Calibration Note:
Due to panel variability across various configurations of the QLED based TVs, the factory baseline EOTF settings can change the point alignment by model and panel size. Samsung QLED HDR calibration support has been updated to add in EOTF matching and remove MultiPoint Grayscale because of the variability. A combination of EOTF matching and a 2pt white balance produce excellent results across the range of supported QLED TVs and can be achieved quickly.
Step 7
On this page, Calman will adjust the Colorspace/CMS controls on your display
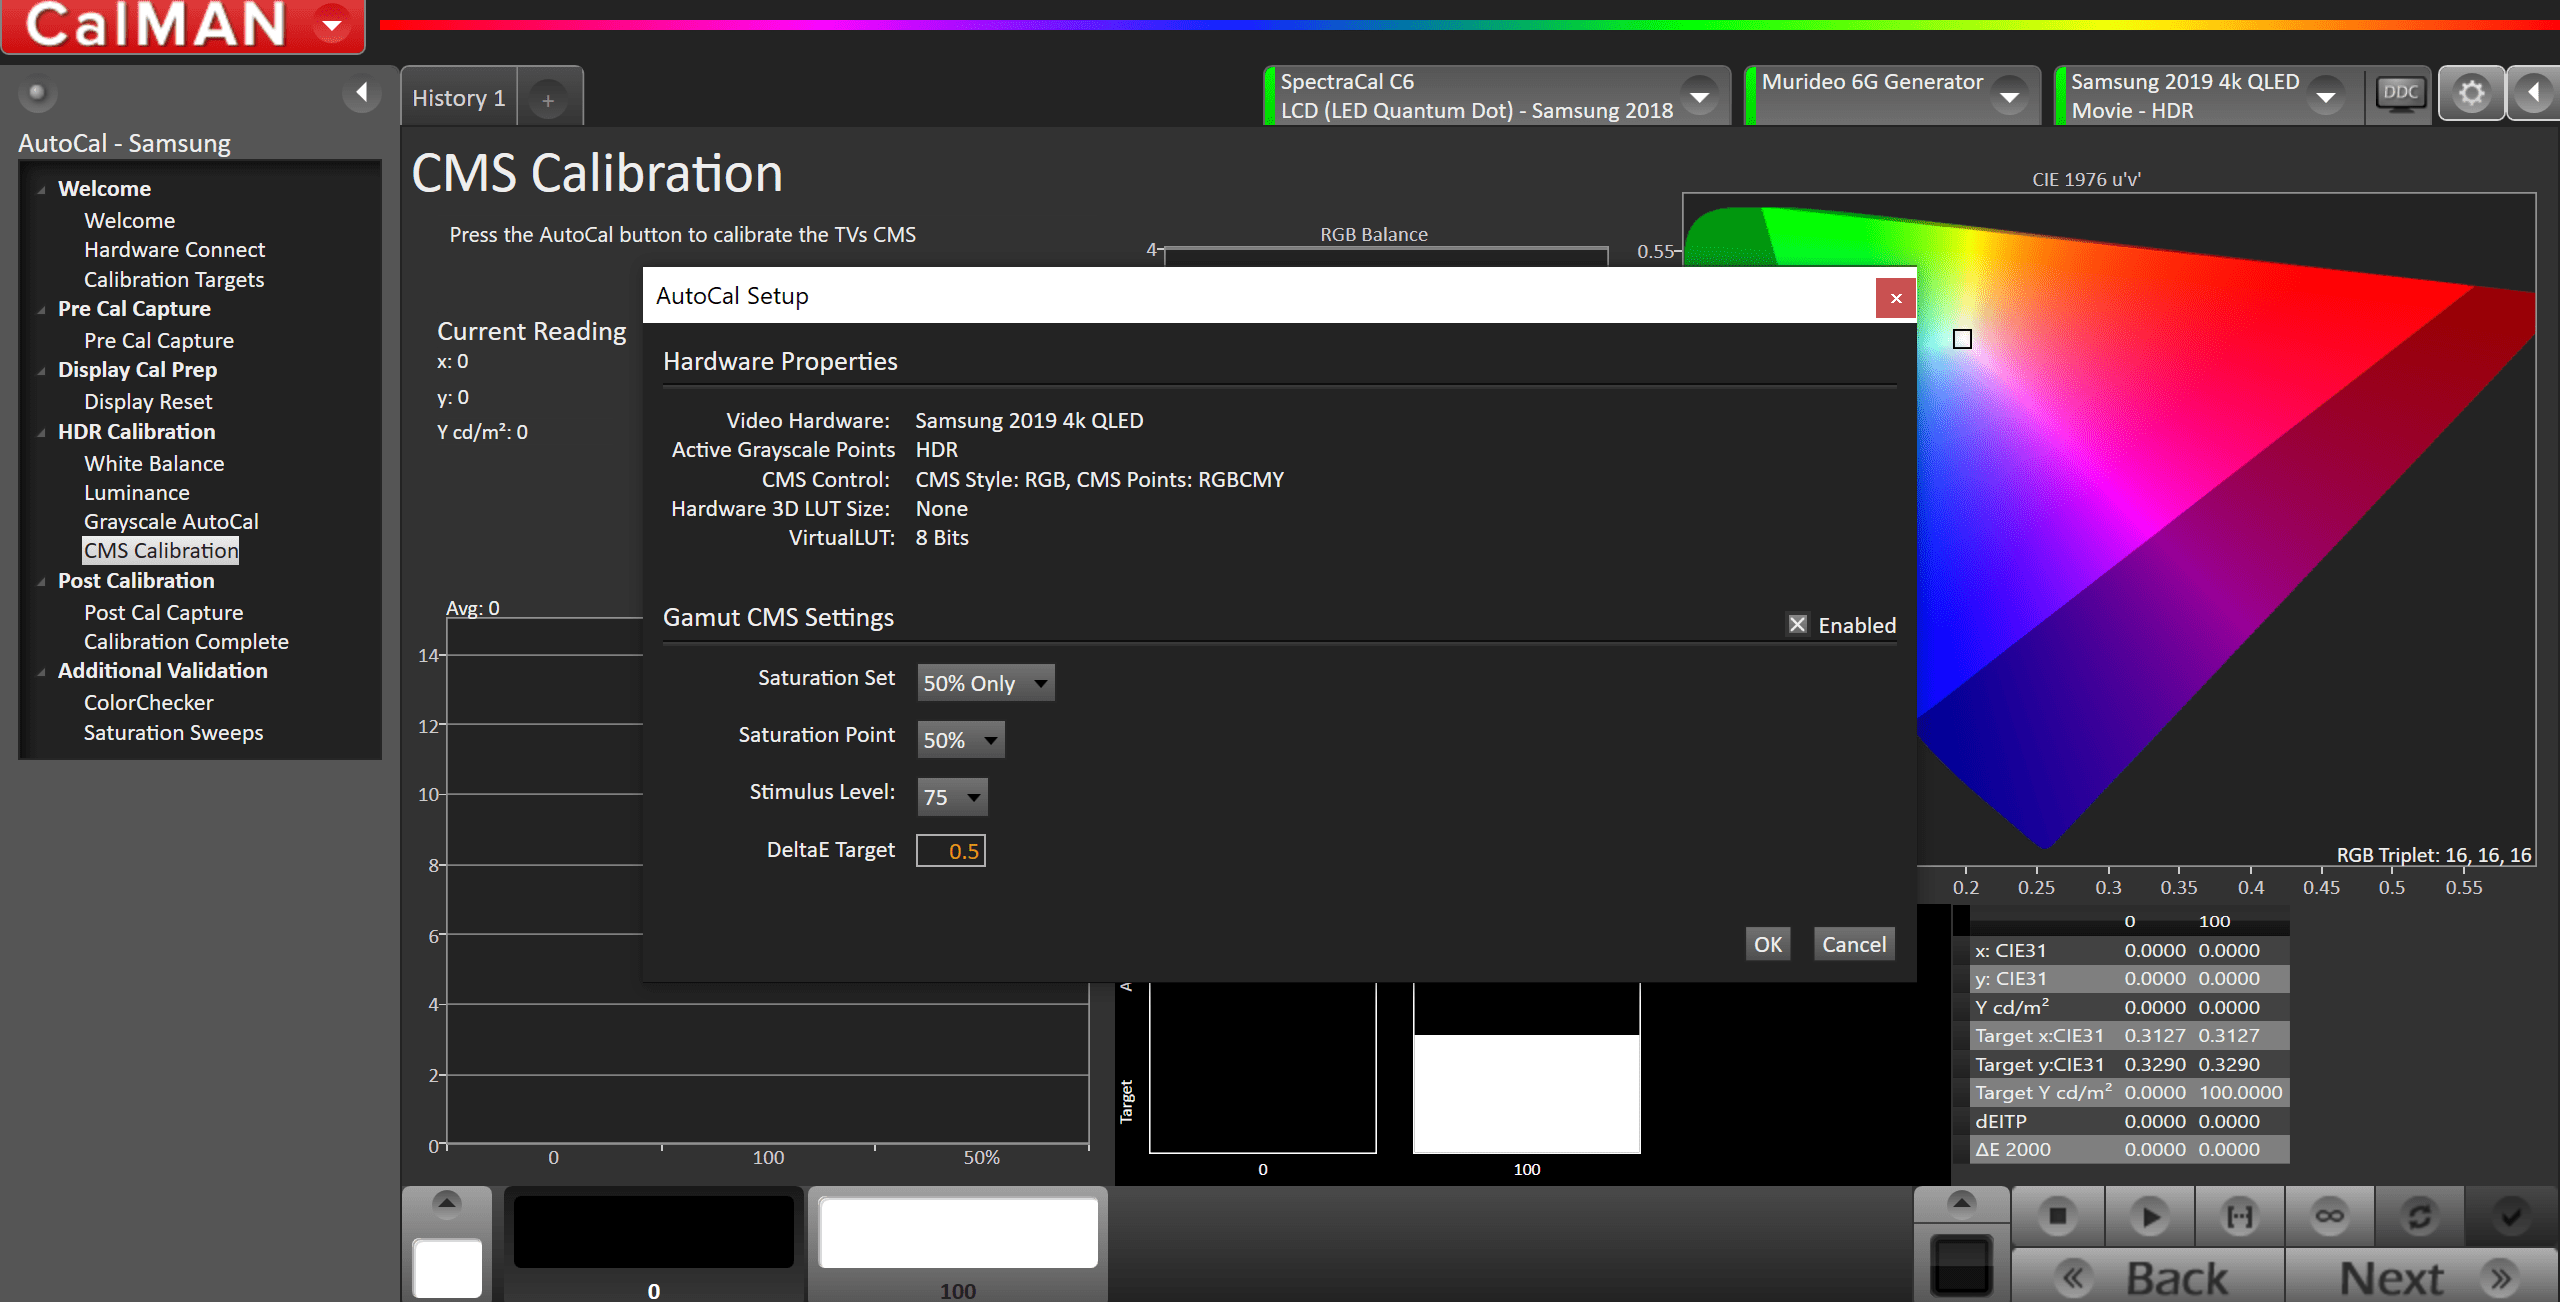
- Press the AutoCal button to open AutoCal dialog
- All options are preconfigured
- Click OK to begin colorspace AutoCal process
Step 8
Post-calibration readings to document the post-calibration condition of the display.
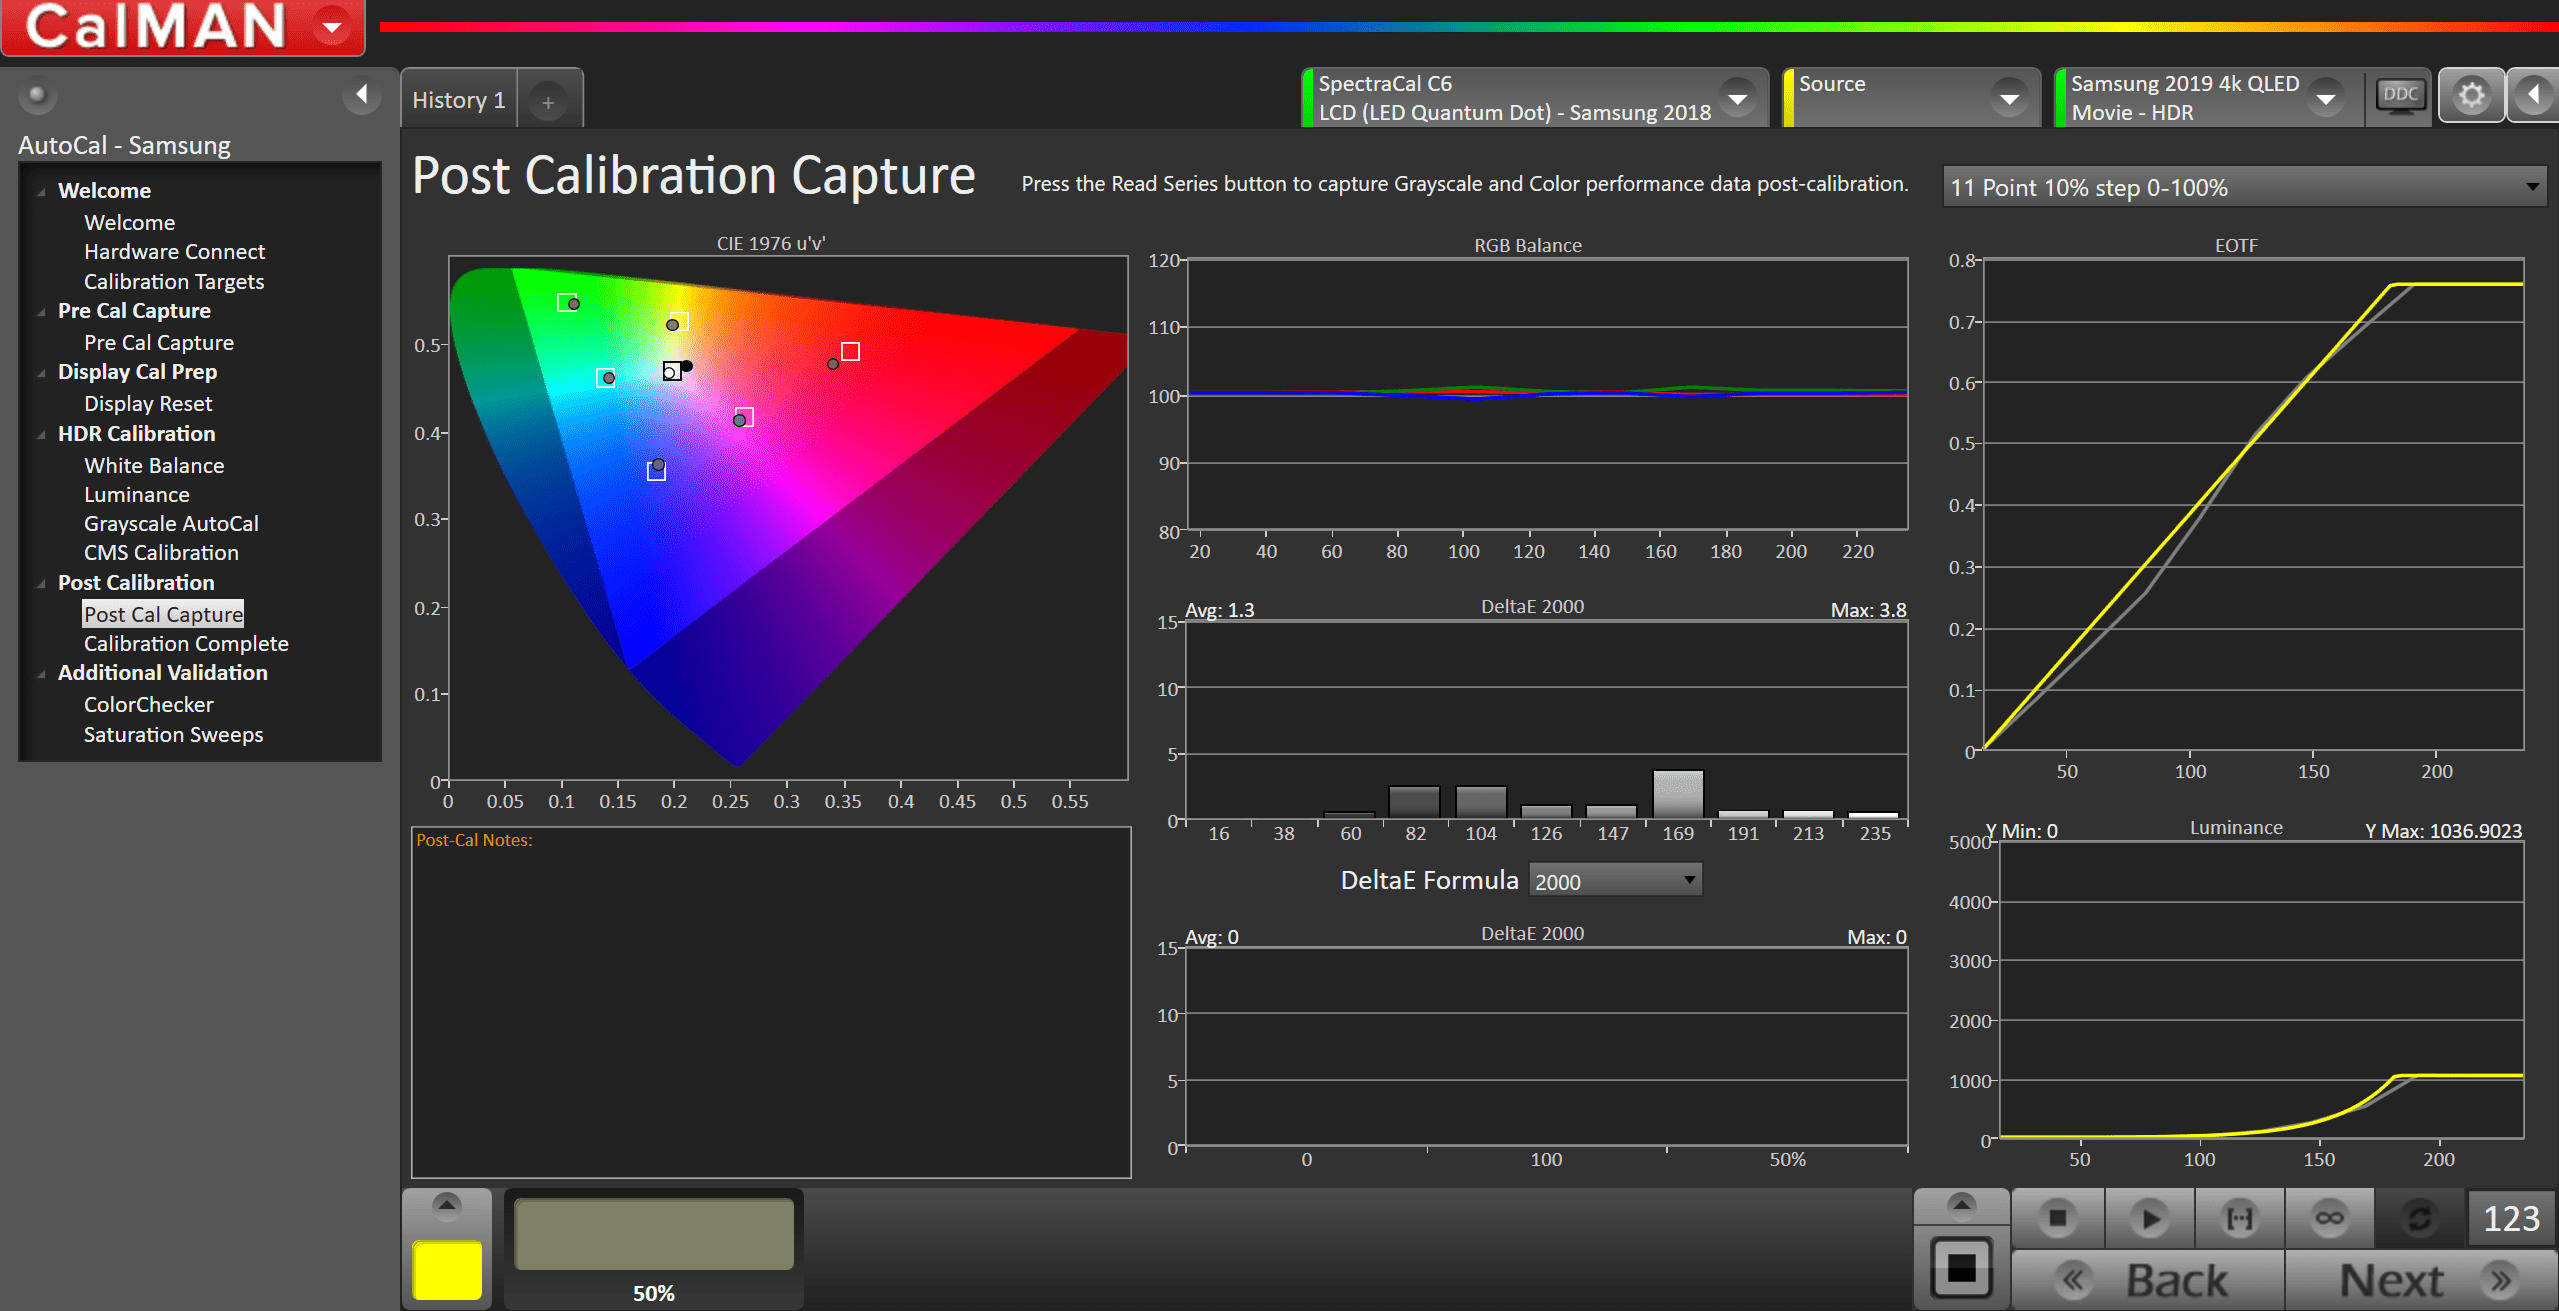
- Click the Read Series […] button
HDR Calibration is now complete
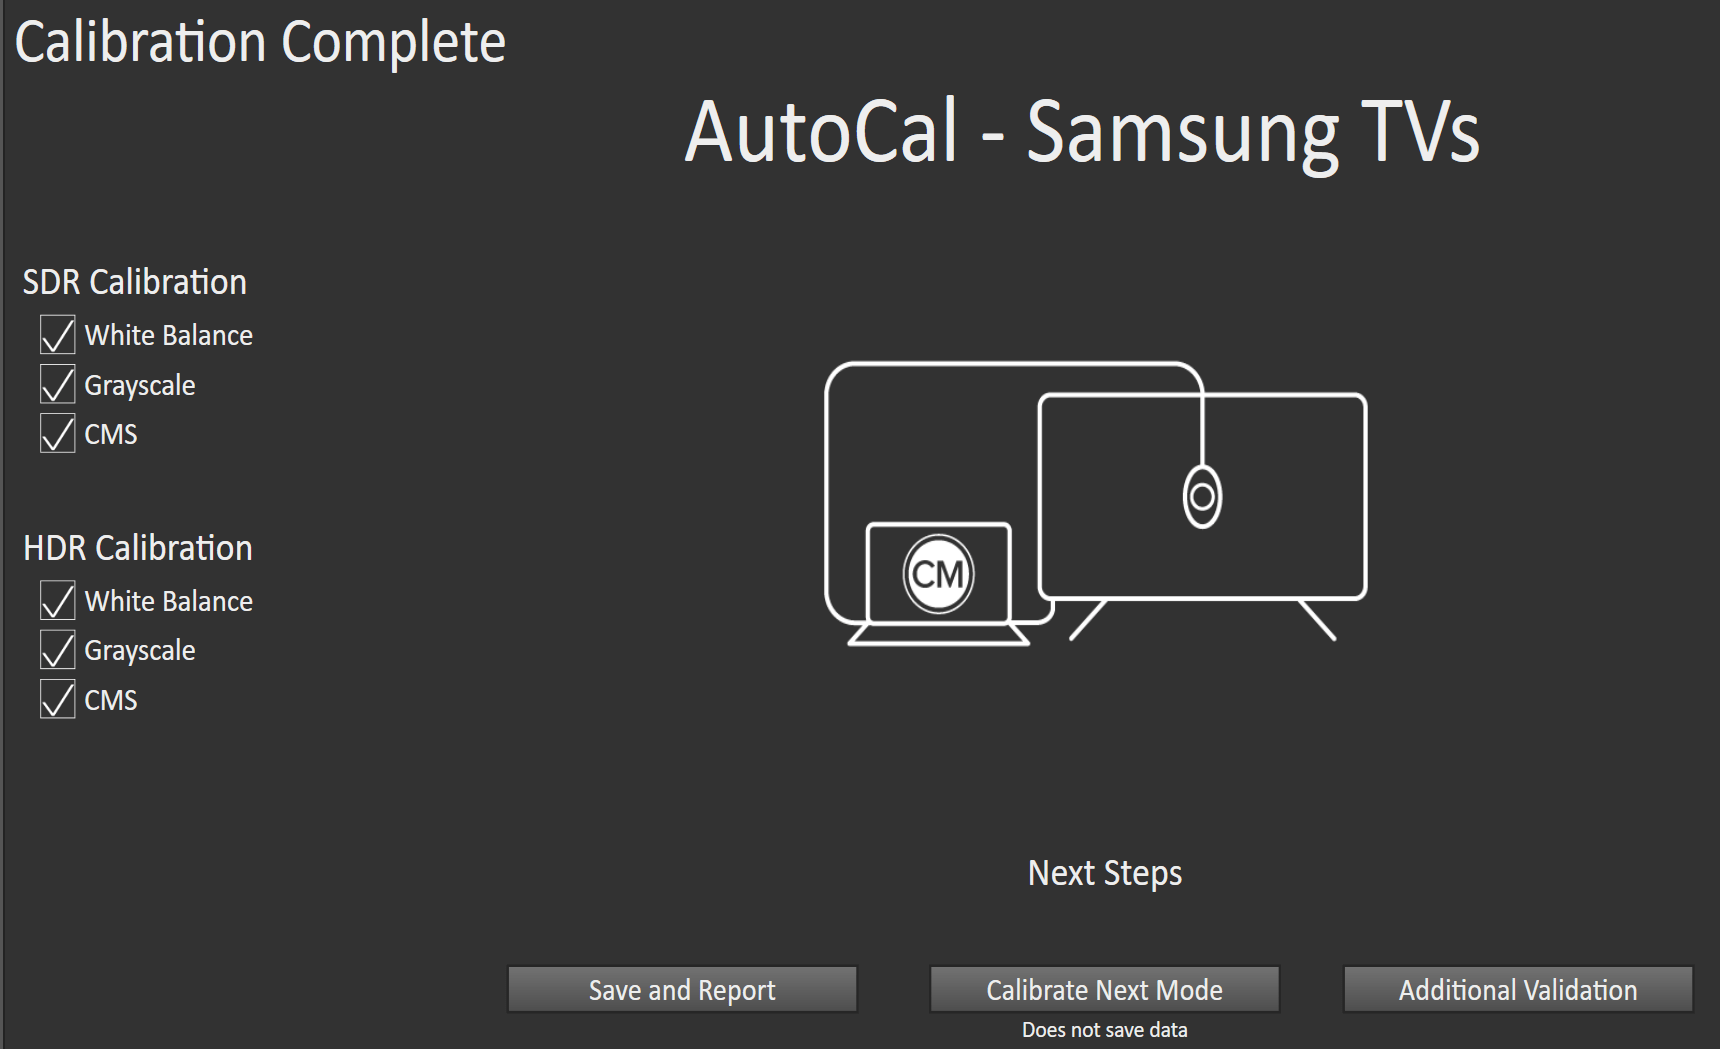
- Save and Report
- Saves current session, and opens AutoCal Report
- Calibrate Next Mode
- Clears data and allows you to return to the beginning of the workflow and calibrate a new mode
- Additional Validation
- Allows additional validation with ColorChecker and Saturation Sweeps.
- Optional